Quick & Crunchy Butter Crunch Cookies
Looking for a quick dessert? Bake Butter Crunch Cookies in 30 Minutes! These buttery, crunchy delights are perfect for family gatherings or sweet cravings.

- The Sweet Story of Cookies: A Personal Journey
- The Amazing World of Butter Crunch Cookies
- Why These Cookies Are Simply Irresistible
- Your Ultimate Guide to Essential Baking Ingredients
- Professional Cooking Method
- Pro Tips & Secrets for Rockin’ Butter Crunch Cookies
- Perfect Presentation: Make 'Em Instagram-Ready!
- Storage & Make-Ahead: Keep the Crunch Alive
- Creative Variations: Shake Things Up
- Complete Nutrition Guide: The Real Deal
- Conclusion: Get Your Bake On!
- Frequently Asked Questions
- Recipe Card
The Sweet Story of Cookies: A Personal Journey
Oh my gosh, let me take you back to my childhood! every saturday, my mom would pull out her old, beat-up mixing bowl and whip up a batch of buttery, soft cookies .
The whole house would smell like warm sugar and vanilla—seriously, it was like stepping into a warm hug. as her little sous chef, i’d sit there with flour dusted on my nose, dreaming of the crunchy cookie texture of the delicious butter cookies we’d be munching on soon enough.
If you’ve ever had that moment—the warmth of freshly baked cookies making your heart swell—you’ll know just how special it is.
So, if you’re looking to bake butter crunch cookies in 30 minutes , you’ve come to the right spot! i’ll spill all the secrets for this lip-smacking, crunchy cookie recipe.
Honestly, baking doesn’t have to be complicated. with just a few ingredients and a little time, you’ll be set for that sweet craving.
The Amazing World of Butter Crunch Cookies
Did you know cookies have been around in some shape or form since the 7th century? crazy, right? fast forward to today, these easy cookie recipes are still the life of the party, especially at family gatherings or after-school snacks.
Butter crunch cookies hold a special place in our hearts, and they’re super popular for a reason!
This recipe is perfect for beginners. seriously, if you can mix ingredients and drop spoonfuls on a baking sheet, you got this! it takes only about 30 minutes from prep to melting-in-your-mouth goodness.
Plus, it doesn’t break the bank. you probably have most of the butter crunch cookie ingredients at home already. you can whip up 24 of these sweet treats for just a few bucks!
Why These Cookies Are Simply Irresistible
Let’s chat about what makes these cookies a hit. first, they’re not just tasty; they’re also packed with some comfort food vibes.
Did i mention the health benefits? well, while they aren’t exactly a “health food,” using high-quality butter and sugar in moderation makes them a delightful treat worth the calories! plus, baking with kids is always a blast, turning this into a fun, family-friendly recipe.
Wanna impress your friends at your next gathering? bring along these cookies, and you’ll be the star of the show! and the crunchy topping? it adds a lovely texture that most cookie recipes just can’t compete with.
Sleeve up, everyone’s going to come back for seconds!
Now, let’s not forget the fantastic ways to serve these up. you could pair them with a glass of cold milk or a scoop of vanilla ice cream on a hot summer day.
Or, sprinkle a little sea salt on top for an extra flavor pop! dessert recipes in 30 minutes have never been so appealing.
The Great Baking Adventure Begins
Alright! are you as excited as i am? if you’re ready to start your cookie-baking adventure, grab your baking gear ! we’ll dive into the butter crunch cookie ingredients , and i promise, it’s going to be deliciously fun.
Just a heads up, keep that mixer handy, set your oven to 350° f, and let’s create some memories, one crunchy cookie at a time!
Happy baking, and get ready for your kitchen to smell AMAZING!
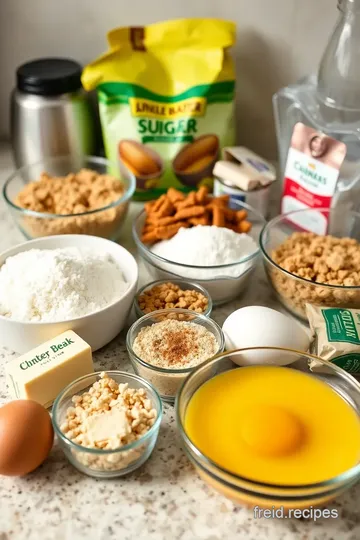
Your Ultimate Guide to Essential Baking Ingredients
Alright, friends! if you're anything like me, you enjoy whipping up easy cookie recipes right in the comfort of your kitchen.
And let's be honest, who doesn’t love the sweet aroma of cookies baking? but before we get into the nitty-gritty about how to bake butter crunch cookies in just 30 minutes , we need to chat about some essential ingredients that will make your baking journey as smooth as butter!
Premium Core Components
When it comes to baking, every ingredient counts. Here’s your go-to list for crucial cookie-making staples.
1. Wet and Dry Ingredients:
- For that classic butter cookie recipe, you'll need 1 cup (226 g) of unsalted butter , which adds richness. Make sure it's softened, or you'll face a tough dough!
- Combine with 1 cup (200 g) of granulated sugar to achieve that perfect balance of sweetness. Pro tip : Sugar should feel like fine granules, not chunky bits.
2. Quality Indicators:
- Check the color and aroma—fresh ingredients are key! If your flour has a funny smell or your baking soda has been in the pantry since the last millennium, toss 'em!
- Always prefer fresh eggs , and if you crack one that smells weird, get rid of it!
3. Storage Guidelines:
- Keep your flour in a cool, dark place. It's best enjoyed within 6-8 months , but it lasts indefinitely if kept properly sealed.
- Sugar? It can stick around pretty much forever if it’s in an airtight container!
4. Freshness Tips:
- For maximum flavor, always check the expiration dates. Basically, if it smells stale, it probably is!
Signature Seasoning Blend
Now, let's kick things up a notch with flavors! You’ll want to mix in some essential spices to elevate your cookie game.
1. Essential Spice Combinations:
- A little pinch of sea salt does wonders for your cookies! It offsets sweetness beautifully.
2. Herb Selections and Pairings:
- Adding a bit of vanilla extract? Don't skimp on it! One teaspoon brings a world of flavor to those vanilla cookies .
3. Flavor Enhancers:
- Ever thought about tossing in a dash of cinnamon or nutmeg? It's festive and adds warmth to your cookies, especially around holidays!
Smart Substitutions
So you found that you’re out of a key ingredient while about to create those crispy cookies? Don’t panic! Let’s talk about common substitutions.
1. Common Alternatives:
- If you’re out of butter, coconut oil works like a dream. And for a dairy-free version, try a vegan butter substitute!
2. Dietary Modifications:
- Seeking a gluten-free cookie option? Just swap the 2 cups (250 g) of all-purpose flour for a gluten-free flour blend !
Kitchen Equipment Essentials
Imagine needing your spatula for mixing and having to hunt it down – no thanks! Here’s a list of must-have tools that make baking fun:
1. Must-Have Tools:
- Mixing bowls and an electric mixer (or a trusty whisk) will definitely come in handy. You want that butter and sugar to be light and fluffy!
2. Preparation Tips:
- Always line your baking sheets with parchment paper to prevent sticking. This isn’t an episode of a baking show—you don’t want to wrestle the cookies off!
Let’s Get Baking!
With all these essential ingredients and tools at your fingertips, you're ready to jump into creating those 30-minute cookies ! Master the basics with simple baking tips, and pretty soon, you’ll be whipping up a batch of Butter Crunch Cookies that are crispy on the outside and soft on the inside—perfect for any sweet craving!
So grab your apron, set your oven to 350° F ( 175° C) , and let’s get to the fun part—baking delicious cookies that your whole family will adore. 🍪 Enjoy!
Professional Cooking Method
Let’s dive into the essential artistry of cooking like a pro. whether you’re a beginner or just looking to sharpen your skills, getting the hang of some professional cooking methods can take your cooking game to the next level.
It’s all about prepping right, managing your time, and staying safe in the kitchen. oh, and let me tell you, once you learn how to bake butter crunch cookies in 30 minutes , you won't look back!
Essential Preparation Steps
First off, let’s chat about mise en place . this fancy french term just means "everything in its place." before you even think about turning on that oven, gather all your ingredients—think butter, flour, sugar—for those delicious butter crunch cookies.
Measure them out! it might feel a bit tedious, but trust me, it’ll make your life so much easier.
Next up, time management is key. set a timer for yourself. for example, if your cookies need 15 minutes of prep and 10- 12 minutes for baking , you want to keep an eye on the clock.
This helps you enjoy the process rather than panic when you realize the oven timer is about to go off.
Don’t forget about organization strategies ! have your mixing bowls, measuring cups, and baking sheets sorted and ready to go.
A clutter-free workspace will make all the difference. plus, it keeps your focus sharp.
And of course, there are safety considerations to keep in mind. Keep that oven mitt nearby and avoid cross-contamination, especially when handling raw eggs. Wash those hands—no one likes a tummy ache!
Step-by-Step Process
Alright, onto the fun part—let’s get baking! Here’s how to do it:
- Preheat your oven to 350° F ( 175° C) .
- In a mixing bowl, cream together 1 cup of softened butter and 1 cup of granulated sugar until it’s light and fluffy.
- Next, add in 1 large egg and 1 teaspoon of vanilla extract . Mix it all together until well combined.
- In another bowl, whisk together 2 cups of all-purpose flour , 1 teaspoon of baking soda , and ½ teaspoon of salt .
- Combine the wet and dry ingredients gradually. Mix just until you see no flour—overmixing can lead to tough cookies, and nobody wants that.
- Use a cookie scoop or spoon to create mounds of dough on a prepared baking sheet.
- If you want, sprinkle them with coarse sugar for an extra sweet crunch.
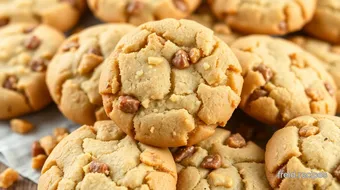
- Bake those beauties for 10- 12 minutes . You're looking for that lovely golden brown edge!
- Let them cool a bit before transferring to a wire rack—this helps to achieve that perfect crunchy cookie texture.
Remember, patience is key when it comes to timing. If they look a bit doughy, give them a minute or two. Visual cues for doneness matter!
Expert Techniques
Once you get the hang of these professional methods , you’ll want to up your game. Here are a few tips that have saved me more than once:
- Keep an eye on temperature control . An oven thermometer is your best friend to avoid burnt cookies.
- Look for critical steps —like how that butter should be softened and not melted. It makes a world of difference!
- Establish some quality checkpoints . Take a peek inside that oven occasionally and make sure they’re golden but not overdone.
But if things go sideways, don’t sweat it! use my troubleshooting tips . if the cookies are too flat, try chilling the dough next time.
If they’re too dry, a tad less flour next time should do the trick.
Success Strategies
Before you rush into the kitchen, let’s talk about some common mistakes to avoid . overmixing is a classic, and let's just say, nobody wants tough cookies.
Also, don’t skip ingredient checks—those missing eggs will ruin everything!
As for quality assurance tips , trust your instincts. taste your dough; if it seems too sugary, balance it with a pinch of salt.
You want your cookies to be a balanced sweet treat .
Feeling prepared? Make your cookies ahead of time if you’re having guests! They freeze wonderfully for quick desserts whenever those sweet cravings hit.
And remember, it’s all about having fun. Baking Butter Crunch Cookies isn’t just a task—it’s a chance to create sweet memories.
Stay tuned for the last section: Additional Information... where I'll share some creative ways to make these cookies even more irresistible, like exploring different cookie variations or best cookie toppings !

Pro Tips & Secrets for Rockin’ Butter Crunch Cookies
When diving into the world of bake butter crunch cookies in 30 minutes , there are some insider tips that can take your cookies from good to "oh my gosh, how did you make these?!".
First off, a little tip from my own kitchen escapades: don’t overmix that dough . you're mixing, mixing, and you think, "just a bit more won’t hurt!" but trust me, too much mixing turns cozy, soft cookies into tough bites.
Keep it gentle, and you’ll keep that soft and crunchy cookie dream alive.
Next, time-saving hack? preheat that oven first! while you’re prepping ingredients, let the oven do its thing. this little trick saves you time and ensures your cookies bake evenly.
And then there’s the sugar sprinkle—it’s an optional touch, but oh my goodness, if you're feeling fancy, don’t skip it! that coarse sugar on top adds a delightful crunch and looks so darn appealing.
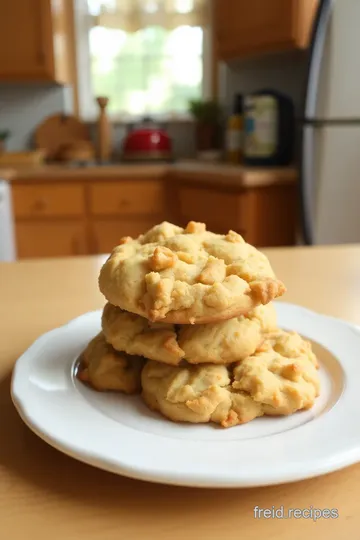
Perfect Presentation: Make 'Em Instagram-Ready!
Now let's talk presentation. honestly, nothing says "i’m a cookie maestro" like beautiful plating. when your cookies come out of the oven, let them cool a bit on a wire rack.
Think of them as your freshly styled pets—let them sit a while before snapping pics. use a colorful plate to contrast the golden hues of your cookies.
And don’t forget the garnish! a touch of flaked sea salt or a drizzle of melted chocolate can elevate your cookies to superstar status.
You could also set them next to some colorful sprinkles or nuts for that pop of color. seriously, visual appeal is half the battle with desserts, right?
Storage & Make-Ahead: Keep the Crunch Alive
About cookie storage, there’s a strategy. if you’re like me and can’t keep your hands off fresh cookies, well, they won’t last long in my house! but, if you do manage to have some leftovers, pop them in an airtight container .
They’ll stay crunchy for up to a week at room temperature.
If you want to prep ahead of time, consider freezing your cookie dough. just scoop those mounds onto a baking sheet, freeze until solid, then transfer to a ziplock bag.
You can bake them straight from the freezer; just add an extra couple of minutes to the cookie baking time .
Hello, quick treats on busy weeknights!
Creative Variations: Shake Things Up
Let’s talk about mixing things up with flavor! want to go nuts? toss in some chocolate chips or throw in some crunchy walnuts for a nutty flavor .
You can also add a hint of coconut to the dough. it’s like a mini-vacation in every bite!
Don’t forget the seasonal spins! pumpkin spice in the fall, peppermint in the winter! and if you're watching your diet, i’ve seen some creative gluten-free cookie alternatives or even delicious dairy-free cookies that still taste bomb.
No one needs to miss out on these tasty bites!
Complete Nutrition Guide: The Real Deal
Now, before you dive into the cookie pleasure, let’s take a quick peek at the nutritional information . these cookies are around 150 calories each .
So, you could enjoy a couple without too much guilt. plus, those sweet treats are a great source of happiness—calories aside!
If you're keeping an eye on health benefits, the butter provides that rich flavor while also packing in some vitamin a.
Balance it out with a glass of milk, and you’ll be golden!
But hey, as with everything, moderation is key. Portion out these delights and enjoy them with friends and family. Sharing is caring!
Conclusion: Get Your Bake On!
So there you have it, folks! with these pro tips and secrets, you’re all set to whip up some delicious bake butter crunch cookies in 30 minutes .
Whether you’re an old pro or a total newbie, you can nail this easy cookie recipe. go ahead, experiment with flavors, and get creative with toppings.
Enjoy the process! baking should be fun, not stressful. so grab your ingredients, turn up some tunes, and let’s create those sweet treats that everyone will want to dive into!
Happy baking, my cookie-loving friends! Can't wait to hear about your cookie adventures!
Frequently Asked Questions
How do I Bake Butter Crunch Cookies in 30 Minutes?
To bake Butter Crunch Cookies in 30 minutes, first preheat your oven to 350°F (175°C). Prepare the dough by creaming together softened butter and sugar, then mix in an egg and vanilla. Combine the dry ingredients, mix everything together, scoop onto baking sheets, and bake for 10-12 minutes until golden. With quick active prep and baking time, you can enjoy fresh cookies in no time!
Can I make these cookies without eggs?
Yes, you can make these cookies without eggs! Substitute the egg with a flaxseed meal mixture: combine 1 tablespoon of flaxseed meal with 2.5 tablespoons of water and let it sit for 5 minutes until it thickens. This vegan option will still yield delicious butter crunch cookies.
What are some variations I can try for Butter Crunch Cookies?
There are numerous tasty variations you can experiment with! Add chocolate chips for a rich chocolate flavor, mix in nuts for extra crunch, or incorporate flaked coconut for a tropical twist. Each variation gives a unique taste while keeping the basic buttery goodness intact!
How should I store my Butter Crunch Cookies?
To keep your Butter Crunch Cookies fresh and crunchy, store them in an airtight container at room temperature. They can last up to a week. For longer storage, consider freezing them in a sealed bag, where they can stay fresh for up to three months!
What is the nutritional information for Butter Crunch Cookies?
Each Butter Crunch Cookie has approximately 150 calories, with 1.5 g of protein, 7 g of fat, and 22 g of carbohydrates. Keep in mind that nutritional values may vary based on specific ingredient brands and serving sizes, so it’s always good to check if you're tracking your intake closely.
What tips do you have for making the best Butter Crunch Cookies?
For best results, avoid overmixing the dough as this can lead to tougher cookies. It’s also helpful to chill the dough for about 10 minutes before baking to enhance crunchiness. Using a cookie scoop can help achieve uniform sizes, resulting in evenly baked cookies!
Quick & Crunchy Butter Crunch Cookies Card
⚖️ Ingredients:
- 1 cup (226 g) unsalted butter, softened
- 1 cup (200 g) granulated sugar
- 1 large egg (50 g)
- 1 teaspoon (5 g) vanilla extract
- 2 cups (250 g) all-purpose flour
- 1 teaspoon (5 g) baking soda
- ½ teaspoon (2 g) salt
- ½ cup (75 g) coarse sugar for sprinkling (optional)
🥄 Instructions:
- Step 1: Preheat the oven to 350°F (175°C).
- Step 2: In a mixing bowl, cream together the softened butter and granulated sugar using an electric mixer until light and fluffy.
- Step 3: Beat in the egg and vanilla extract, mixing until thoroughly combined.
- Step 4: In a separate bowl, whisk together the flour, baking soda, and salt.
- Step 5: Gradually add the dry mixture to the wet mixture, mixing until just combined.
- Step 6: Use a cookie scoop or spoon to drop mounds of dough onto prepared baking sheets, spacing them about 2 inches apart.
- Step 7: Sprinkle the mounds with coarse sugar if desired.
- Step 8: Bake in the preheated oven for 10-12 minutes, or until golden brown around the edges.
- Step 9: Transfer cookies to a wire rack to cool completely.
Previous Recipe: Indulge in Warm Coffee Chocolate Layered Treats: A Decadent Mocha Delight
Next Recipe: My Family's Favorite Delicious Sear Round Steak with Rich Gravy Recipe