Ultimate Brine for Juicy Roast Chicken in 12 Hours
Craving the best Brine Juicy Chicken in 12 Hours? Try my simple herb-glazed version! So juicy and flavorful, it's perfect for weeknights or holidays. Get my tips inside!

A Juicy Journey: Brine Juicy Chicken in 12 Hours
You ever have one of those days where all you want is a chunk of juicy chicken that practically melts in your mouth? i mean, who doesn't want that? i remember a time when i was trying to impress my friends for a little dinner get-together.
And oh boy, i decided to try a brine juicy chicken in 12 hours . little did i know, that simple decision would turn my kitchen into a flavor wonderland.
You could feel the excitement. can you imagine the tender goodness just waiting for us?
The Scoop on Brining
So, let's break down this whole brining thing. brining is like giving your chicken a big, cozy bath filled with all sorts of savory chicken seasonings .
This technique is an old trick from southern kitchens. it’s how folks back in the day got their chickens nice and juicy.
Honestly, it’s still super relevant today. brined chicken has become a go-to for backyard bbqs and holiday feasts alike.
This recipe takes just about 15 minutes of hands-on prep . after that, you’ll let your chicken soak in that magic brine for 12 hours , and then it’s go time for cooking—like a moist chicken cooking method that anyone can master! the best part? the whole thing won't break the bank.
Ingredients are simple and easy to find, so you're not looking at a dinner that's going to cost you an arm and a leg.
You’ll get four hearty servings out of this beauty.
Why Brine? Oh, Let Me Count the Ways
You might be wondering, "why bother with brining?" well, let me lay it out for you. first off, it infuses flavor right into the chicken, making it so much better than just seasoning the outside.
It's juicy, flavorful, and downright delicious!
Plus, you know those special occasions when you want to impress? think about it — this dish can easily steal the spotlight at family gatherings or sunday dinners.
Trust me, the compliments will be rolling in like a freight train.
And if you’re into adventurous eats, this is where you can get creative. Play with spicy brine chicken variations or toss in some apple cider vinegar brine for a little tang! Who says your chicken has to be boring? Nope, not here, my friend!
Let’s Bring It Home
I promise, once you dive into this recipe, you’ll quickly learn the ropes of brined chicken flavors and kick off your culinary journey to juicy chicken like a pro! it’s like cooking chicken methods at their finest.
Plus, cooking a whole chicken is just so satisfying!
And you can grab all the ingredients easily. you might even already have some at home! we’re about to get into the nitty-gritty of the ingredients you’ll need, but first, let me tell you this: make sure to keep an eye on your cooking temperature for chicken.
That juicy perfection lies at 165° f ( 75° c) on your meat thermometer.
Okay, are you ready to brine your way to some mouthwatering meals? Let’s take a look at what you need to create this stunning dish!
Essential Ingredients Guide for Brining Juicy Chicken
Cooking chicken can be as rewarding as finding that elusive $20 bill in your old jeans. let’s dive into the essential ingredients guide that’ll take your chicken from bland to grand! we're talkin' about that juicy, flavorful goodness that’ll make everyone ask for seconds.
Premium Core Components
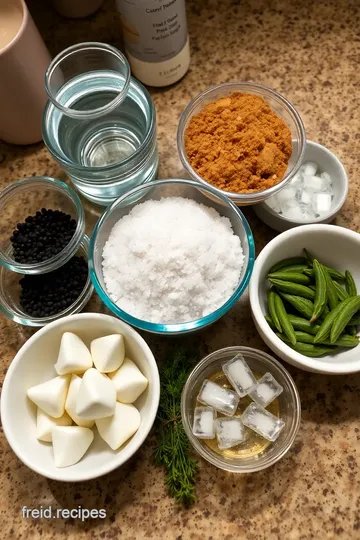
Okay, first off, let’s nail down those premium ingredients you’ll need. Here’s a breakdown of the brine ingredients you should definitely consider:
- Water: Use 4 cups (960 ml). It’s the base of your brine, going to soak up all that fabulous flavor.
- Kosher salt: Grab ½ cup (120 g). This is what will make your chicken flavorful and moist.
- Brown sugar: ¼ cup (50 g) adds that sweet touch which balances the salt perfect!
- Apple cider vinegar: 2 tablespoons (30 ml) helps tenderize while adding a zesty kick.
- Black peppercorns: 1 tablespoon (15 g), because flavor isn’t a one-note song.
- Dried thyme: 1 tablespoon (5 g) is your go-to herb for that earthy taste.
- Garlic: 2-3 cloves, smashed because garlic makes everything better.
Quality Indicators and Storage
When you’re picking out ingredients, look for freshness . opt for good-quality herbs and spices. check the container; if it smells like your grandma's kitchen, it's a winner! store them in a cool, dark place, and they’ll last a few months.
And hey, store your brine in the fridge if you're not using it right away.
Signature Seasoning Blend
Now that we've got our brine ingredients sorted out, don’t sleep on the signature seasoning blend ! A little mix of spices can create a whole new vibe.
- Essential spice combinations: Think about mixing paprika, garlic powder or onion powder for deep flavors.
- Herb selections: For a twist, try rosemary or sage, especially if you’re channeling that Southern roast chicken vibe.
- Flavor enhancers: A splash of lemon or a sprinkle of cayenne can give your chicken that extra little wow factor.
- Regional variations: If you’re feelin’ bold, modify your brine for a spicy brine chicken using chili flakes!
Smart Substitutions
Let’s be real: sometimes life throws a wrench into your well-laid plans. So here are some smart substitutions :
- Common alternatives: No apple cider vinegar? Use white vinegar or lemon juice.
- Dietary modifications: Make it a low-sodium option with less salt.
- Emergency replacements: No brown sugar? Honey or maple syrup can work in a pinch!
- Seasonal options: In the summer, how about fresh herbs instead of dried ones? So vibrant!
Kitchen Equipment Essentials
Now let’s tackle the kitchen equipment essentials you’ll need.
- Must-have tools: A large mixing bowl or stock pot is key for your brine.
- Alternative equipment: A zipper bag works fine if you don’t have a bowl big enough.
- Preparation tips: A whisk is perfect for mixing your brine; don’t skimp on the mixing!
- Storage solutions: Make sure to have plastic wrap on hand to cover those marinating chicken parts!
Trust me, after you nail down those essential ingredients and tools, you'll be all set to Brine Juicy Chicken in 12 Hours .
Stay tuned because when we get to the cooking instructions, we'll transform that brined beauty into a delicious, crispy chicken masterpiece.
Think about how it'll come out, golden and juicy, just waiting for your favorite sides! this is going to be one epic dinner, my friends.

Elevating Your Chicken Game with Professional Cooking Methods
Oh my gosh, if you want to enjoy the most mouthwatering juicy chicken , i've got just the thing - brine juicy chicken in 12 hours ! brining is an absolute game-changer for flavor and moisture.
Imagine biting into a beautifully roasted chicken, and it’s so tender and flavorful that you can’t get enough. that’s what we’re after.
Essential Preparation Steps
First, let’s talk about mise en place . it sounds fancy, but it’s just a way to say “get everything ready.
” before you even think about starting, measure out all your ingredients. you’ll want your homemade brine ingredients at the ready: water, kosher salt, brown sugar, and spices.
Having everything prepped saves you stress when you’re deep in the cooking game.
Time management is another key to success. spend about 15 minutes on prep and then simply let the chicken soak in that flavorful brine for 12 hours .
As for organization strategies , use your fridge to keep the chicken cold during brining. and don’t forget about safety! work with clean surfaces and utensils to prevent cross-contamination.
You'll thank yourself later.
Step-by-Step Process
Now, let’s get into the nitty-gritty! Here’s how to master brined chicken.
-
Prepare the brine : in a large bowl, mix 4 cups of water with ½ cup kosher salt and ¼ cup brown sugar .
Whisk it until it’s all dissolved. next, toss in 2 tablespoons of apple cider vinegar , a tablespoon each of peppercorns and dried thyme, plus smashed garlic cloves.
-
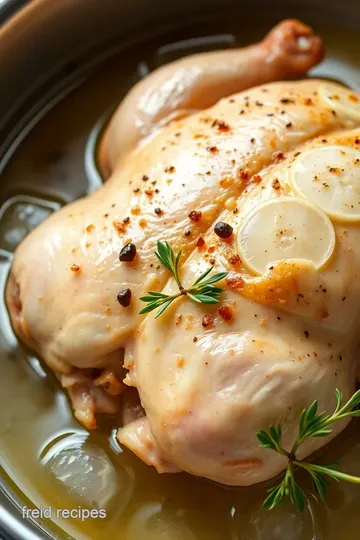
Brine the Chicken : Submerge your whole chicken in that brine. Once it’s in, cover it and pop it in the fridge for—you guessed it— 12 hours .
-
Preheat the Oven : Set your oven to 425° F ( 220° C) about 30 minutes before cooking to get it nice and hot.
-
Prepare for cooking : pull that chicken out, rinse it under cool water to wash off excess salt, and dry it off.
Rub some olive oil over it and season with paprika, onion powder, salt, and pepper.
-
Roast the Chicken : Put your bird in a roasting pan, and let it roast for 1 hour or until it hits an internal temperature of 165° F ( 75° C) .
-
Rest and Serve : Once it’s done, let the chicken rest for about 10- 15 minutes . This helps the juices redistribute, making each bite divine.
Expert Techniques
Getting consistent results is all about timing precision and temperature control . use a meat thermometer to check that perfect temperature.
If you want to get fancy, here’s a tip: dry out the skin before oiling—that’s how you get the crispy chicken skin we all drool over.
Another critical step? don’t skip the rinse after brining. it removes excess salt, giving you that perfect flavor without being too salty.
And if things don’t go as planned, don’t panic! just adjust your seasoning, or if it’s too dry, a little broth can go a long way.
Success Strategies
Now, let's avoid those common pitfalls. one big mistake is overcooking; keep that meat thermometer in hand! for quality assurance, always check your internal temperature.
If you’re making a moist chicken cooking method , keep an eye on cooking time.
And, if you’re planning a big meal, this chicken really shines as a make-ahead option . you can make the brine and marinate the chicken a day in advance.
Perfect for those easy chicken dinner ideas!
Before i wrap this up, remember that not all marinades have to be complex. garlic brine chicken can provide delicious flavors with simple ingredients.
So, whether you're brining for a bbq or a cozy sunday roast, you'll be set with this recipe.
Final Thoughts
With these techniques and tips, you’ll not only master the best brining recipes , but you’ll also impress your friends and family with your cooking skills.
For a delicious side, consider roasted vegetables or a fresh salad to complement the chicken. oh, and don't forget a cold light beer—it’s essential!
Up next, we’ll dive deeper into additional information about the art of brining, cooking methods, and more! Can’t wait to share more juicy tips with you!
Additional Recipe Information
When it comes to cooking chicken, nothing makes it sing quite like a good brine. the brine juicy chicken in 12 hours technique is a game changer! so strap in, grab a snack (i recommend popcorn!), and let's dive into some pro tips and presentation secrets.
Pro Tips & Secrets
You want insights? i got ‘em! first off, don’t skip the brine soak! even if you’re pressed for time, letting that chicken chill in the savory mix overnight makes all the difference.
Trust me on this— brined chicken flavors are next level.
Need to save some time? prepare your brine and chicken a day ahead. if you’ve got leftover brine, you can use it to marinate veggies! and here’s a little secret: to really bump up the flavor, try adding a few slices of lemon or some fresh thyme to your brine.
It’s like sunshine in a jar.
Now, when it comes to cooking, a meat thermometer is your best friend. aim for that juicy sweet spot of 165° f ( 75° c) .
Seriously, don’t guess! and hey, if you’re into crispy chicken skin, dry the skin thoroughly before roasting—that’s the key to crunch!
Perfect Presentation
Alright, so you’ve got a beautifully brined chicken; now it’s time to make it look fancy! plating is where you get to unleash your inner artist.
Place the chicken breast-side up on a rustic wooden board, or nestle it onto a lively bed of roasted veggies for a pop of color.
Garnish is everything, so sprinkle some fresh parsley or chopped thyme on top for that Instagram-worthy look. And don’t forget to drizzle a little olive oil over the top to catch the light—everyone loves a shiny roast chicken!
Storage & Make-Ahead
If you happen to have leftovers (which is a rarity at my house), here’s what you need to know. store your brined chicken in an airtight container in the fridge for up to 3-4 days .
If you want it to last longer, freeze it! just make sure to let it cool completely first to keep it safe.
When reheating, try using the oven instead of a microwave. preheat it to 350° f ( 175° c) , cover your chicken with foil, and it’ll get nice and warm without drying out.
Just don’t forget— resting chicken after cooking is key to keeping it moist!
Creative Variations
Feeling adventurous? let’s spice things up! you can totally adapt the chicken brine recipe to fit your mood. want some heat? toss in a few crushed red pepper flakes for a spicy brine chicken experience.
Or how about a touch of maple syrup instead of brown sugar? y’all, that sweetness will have you swooning!
If you’re a seasonal cook, feel free to play with ingredients based on what’s fresh and local. summer means fresh lemon, and in fall, you could swap in apple cider vinegar brine for that warm, cozy vibe.
Complete Nutrition Guide
Now let’s chat nutrition because who doesn’t love a little meal math? this brined chicken comes in at about 320 calories per serving .
It’s full of protein (around 25g!), so you can totally fuel up after that killer workout. just keep an eye on the sodium—your brining process can bump those levels up a bit.
If you’re watching your carbs, this recipe is a winner. serve it alongside some fresh greens or your favorite steamed veggies for a balanced plate.
And hey, don’t forget to indulge your taste buds with some savory seasonings! cooking with thyme and garlic can transform even the simplest side dish into something fab.
Conclusion
So there you have it! take this brine juicy chicken in 12 hours recipe, and make it your own.
Don’t be afraid to get creative, experiment with flavors, and present it like the culinary master you are! cooking should be fun, so embrace the process and don’t stress over a few hiccups along the way—it happens to the best of us.
Now go on, grab that chicken and get started! I promise you won’t regret diving into this delicious adventure. Happy cooking, friends!
Frequently Asked Questions
How do I Brine Juicy Chicken in 12 Hours without it being too salty?
To ensure your brined chicken isn't overly salty, it's important to rinse the chicken thoroughly after removing it from the brine. Additionally, you can adjust the salt-to-water ratio; for a milder brine, consider using less salt while maintaining the other ingredients. Always taste the brine before using it!
Can I use this brining method for other meats?
Absolutely! This brining technique is versatile and can be used for various meats like pork and turkey. Just keep in mind that different meats may require different brining times, so adjust accordingly for optimal results.
What is the best way to store leftover brined chicken?
To store leftover brined chicken, let it cool to room temperature before sealing it in an airtight container. It can be kept in the refrigerator for up to 3-4 days. If you want to keep it longer, consider freezing it, but ideally consume within 2-3 months for the best flavor.
Are there any nutritional considerations when Brine Juicy Chicken in 12 Hours?
Brining can add sodium to your chicken, so if you're watching your salt intake, consider reducing salt in other meals during the day. Additionally, this dish is high in protein, making it a great option for those looking to increase their protein intake. Always review your individual dietary needs when planning meals!
How can I make my brined chicken skin extra crispy?
To achieve crispy skin on your brined chicken, ensure you dry the skin thoroughly with paper towels before applying oil. Cooking the chicken at a higher temperature, like 425°F (220°C), will also help crisp the skin. You may also consider using a convection oven setting if available, as it circulates hot air around the chicken.
Can I add more flavors to the brine when making Juicy Chicken in 12 Hours?
Yes! You can enhance your brine by incorporating herbs, citrus zest, or even spices like crushed red pepper for a kick. Adding aromatic ingredients such as bay leaves or fresh herbs can also add depth to the flavor, making your chicken even more delicious!
Ultimate Brine for Juicy Roast Chicken in 12 Hours Card

⚖️ Ingredients:
- 4 cups (960 ml) water
- ½ cup (120 g) kosher salt
- ¼ cup (50 g) brown sugar
- 2 tablespoons (30 ml) apple cider vinegar
- 1 tablespoon (15 g) black peppercorns
- 1 tablespoon (5 g) dried thyme
- 2-3 cloves garlic, smashed
- 1 whole chicken (3-4 lbs or 1.4-1.8 kg), cleaned and patted dry
- 2 tablespoons (30 ml) olive oil
- 1 teaspoon (5 g) ground paprika
- 1 teaspoon (5 g) onion powder
- Salt and pepper, to taste
🥄 Instructions:
- Step 1: In a large mixing bowl, combine water, kosher salt, and brown sugar. Whisk until the salt and sugar dissolve.
- Step 2: Add vinegar, peppercorns, thyme, and garlic. Mix well.
- Step 3: Submerge the whole chicken in the brine. Cover and refrigerate for 12 hours.
- Step 4: Preheat the oven to 425°F (220°C) approximately 30 minutes before cooking.
- Step 5: Remove the chicken from the brine and rinse under cool water. Pat dry with paper towels.
- Step 6: Rub olive oil all over the chicken, and season with paprika, onion powder, salt, and pepper.
- Step 7: Place the chicken breast-side up on a roasting pan. Roast in the oven for 1 hour, or until the internal temperature reaches 165°F (75°C).
- Step 8: Let the chicken rest for 10-15 minutes before carving. Serve with your favorite sides!
Previous Recipe: Easy Whipped Fresh Strawberries with Sweet Cream: A Summer Delight
Next Recipe: My Easy Bake Pumpkin Pie: Deliciously Creamy Treat for Thanksgiving