Canyon Gluten Free Bread Recipe
Discover my cherished canyon gluten free bread recipe! It's easy to make, perfectly nutty, and oh-so-fluffy. Ideal for toast or sandwiches—try it today!

The Secret to Canyon Gluten-Free Bread
You ever have one of those days where you just crave a cozy slice of bread? yeah, me too! i remember one rainy afternoon, the kind where the sky just begs for comfort food.
I had a craving for canyon gluten-free bread . that earthy texture, a little crunchy on the outside, fluffy on the inside—it just hits different, especially when slathered with some honey butter.
Let's dive into this story, shall we?
A Little History Behind the Loaf
So, what’s the deal with this canyon gluten-free bread? it’s inspired by the amazing landscapes of our national parks, where the earth meets the sky in the most delightful way.
Traditionally, bread has been around for thousands of years, but the gluten-free movement is relatively new. it really shot up in popularity as more folks discovered they had gluten sensitivities or celiac disease.
Now, gluten-free bread recipes are everywhere, and it’s a game-changer for so many.
Modern-day gluten-free baking is no longer just about missing out on good bread. it’s about creating something just as delicious! the best part? this canyon gluten-free bread takes about 2 hours from start to finish, and i promise, it’s a medium difficulty level.
It's not an all-day commitment but still requires a little love and care. and let’s talk money; the ingredients won’t break the bank.
You can whip up a whole loaf that yields about 10 slices for about $10—way less than that gluten-free store-bought bread.
Health Benefits and Unique Stuff
Let’s be real; bread isn't just comfort food—it can also be healthy! this homemade gluten-free bread packs a nutritious punch with almond flour, which adds some good fats and protein.
If you’re looking for healthy gluten-free bread , you’ve hit the jackpot. you can serve it at brunch, family gatherings, or even when a friend drops by unexpectedly.
Don’t just think of it as a side dish; this bread can totally stand alone.
It’s also versatile. want to whip up some gluten-free toast ideas ? use this bread alongside smashed avocado or just classic butter.
Maybe you’ve got a sweet tooth? try making it into a sweet gluten-free bread for breakfast. what i love most is it allows room for creativity with gluten-free bread variations .
Toss in your favorite herbs or seeds, and you've got something unique every time!
Ready to Cook?
So, are you ready to roll up those sleeves? before we jump into the ingredient list, know there are some handy tips to keep in mind.
Fresh ingredients are key, whether it's your baking powder or flour. room temperature eggs can yield a fluffier bread, and giving your loaf enough time to cool will help with slicing later on.
You’ll want every slice to look as gorgeous as it tastes!
Listen, i’ve had my fair share of kitchen flops—overbaking, not rising enough, you name it. but, when you follow these simple instructions, i promise you’ll be waving goodbye to store-bought canyon bakehouse bread and saying hello to your new favorite kitchen creation.
Get excited; your friends will think you’re a magician in the cooking department!
Now, let’s check out what ingredients you’ll need to get this gluten-free loaf recipe rolling. Trust me, you’re going to want to take notes here!
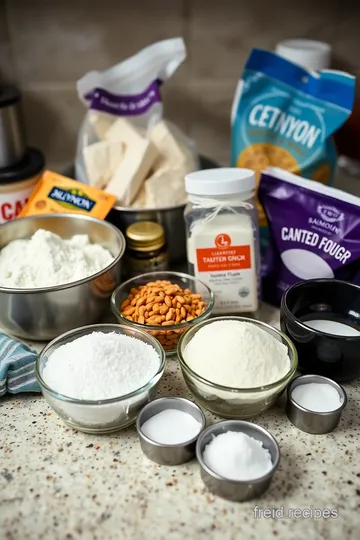
Essential Ingredients Guide
Let’s talk about the building blocks of any great kitchen experience, focusing on what you really need to whip up those amazing dishes , especially if you're diving into the gluten-free bread game like canyon gluten-free bread .
Premium Core Components
You’ll want to nail down some premium ingredients for your kitchen. first off, let’s discuss measurements . in the u.s.
, we stick with cups and tablespoons, but in the rest of the world, it’s all about grams and liters.
So having both handy can really save you a headache.
Now, how to pick the best ingredients? Look for signs of freshness. For instance, when you’re eyeing that gluten-free flour , it should smell nutty and fresh, not stale.
What about storage ? keep your flours in airtight containers. most flour types stay fresh for about 3-6 months when stored properly.
And oh! don’t forget to check their expiry dates. it can ruin your day if you try baking with outdated stuff.
Signature Seasoning Blend
Next up, the magic of seasonings! a classic spice mix can bring your bread to life. think garlic powder and onion powder – they’re just as essential for a gluten-free loaf as they are in any other recipe.
Fresh herbs like thyme and rosemary are your friends—don’t skimp on them!
And hey, exploring regional flavors can give your bread that special twist. Italian herb blends? Yes, please! You’ll find that signature seasoning blend truly makes your homemade gluten-free bread shine.
Smart Substitutions
Now, let’s face it, life happens, and sometimes we run out of certain ingredients. need a quick substitute ? if your gluten-free flour ran out, try a blend of coconut and almond flour, but just remember—this combo behaves differently.
If you’re looking for a filler , you can use mashed bananas or applesauce to add moisture and flavor without the gluten drama.
You might also find yourself needing to cater to dietary restrictions. No eggs? Go for flaxseed meal mixed with water for an easy vegan alternative. Simple, right?
Kitchen Equipment Essentials
Alright, time to gear up! you don’t need to go on a shopping spree. some must-have tools include mixing bowls, a sturdy whisk, and a good loaf pan.
I’ll tell you—it’s all about versatility. you don’t need fancy gadgets to create that fluffy gluten-free bread. a rubber spatula for folding and a few basic measuring cups do the trick!
And let’s not forget about storage solutions . An airtight container will keep your baking essentials fresh. Plus, who likes to deal with clumpy flour? No thanks!
Cooking Tips for Gluten-Free Baking
When diving into gluten-free baking , certain tips can really enhance your success. for starters, make sure your dry ingredients are mixed evenly—this prevents dense clumps in your baked goods.
Also, temperature is key! warm water ( 105° f- 110° f) helps activate yeast and gives you that beautiful rise you’re looking for.
Fluffiness matters . Ensure your eggs are at room temperature—that’s like giving your bread a warm hug before it hits the oven.
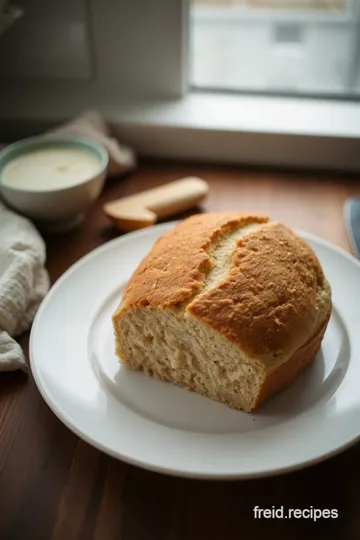
Making Canyon Gluten-Free Bread
Now that you’ve got the essentials down, it’s time to transform those ingredients into something savory and satisfying—the canyon gluten-free bread! this loaf takes all the elements we covered and blends them into something hearty and wholesome.
Consider this your personal blueprint for adventure in gluten-free baking . trust me, once you master these basics, you’re in for a world of delicious bread variations .
From sweet to savory , the possibilities are endless!
Next up, we’ll dive into our detailed instructions so you can bake your very own Canyon Gluten-Free Bread. Get ready to impress your friends and family with that homemade goodness!
Unlocking the Secrets of Professional Cooking
Cooking can feel a lot like working with magic. one minute you're just a person with some pots and pans, and the next, you’re stirring up something delicious to feed the crew.
But to truly take your cooking skills to that “wow” level, you gotta get into some professional techniques. today, i’m diving deep into the essentials of professional cooking, intertwining the art with a fun journey through making canyon gluten-free bread .
Trust me, if you've ever wanted to impress your friends with some homemade gluten-free goodies , you’re in the right place!
Essential Preparation Steps
Mise en place — now that sounds fancy, huh? in simple terms, it’s just a french way of saying "get your stuff together.
” before you start cooking, gather all your ingredients. for our canyon gluten-free bread, that means having your gluten-free flours , almond flour, and all the good stuff lined up and ready to go.
Seriously, it makes a huge difference.
Don’t forget about time management ! make sure to plan your steps. for this loaf, it’s a total of about 1 hour 55 minutes from start to finish, so keep an eye on that clock.
And speaking of organization, keep your kitchen tidy. having a clutter-free workspace helps you focus and avoid accidents. safety’s key! always be aware of hot surfaces and sharp knives.
You don’t want a trip to the er when you were just trying to make fluffy gluten-free bread .
Step-by-Step Process
Alright, diving into the nitty-gritty! Here’s how we can make that Canyon Gluten-Free Bread step by step:
-
Preheat your oven to 375° F ( 190° C) . Seriously, don’t skip this. A hot oven is crucial for that crusty outside and soft inside.
-
Combine your dry ingredients in one bowl—make sure to whisk them well. We need everything blended nicely to avoid clumps in your gluten-free loaf recipe .
-
In another bowl, you’ll mix your wet ingredients —which includes warm water (between 105° f- 110° f/ 40° c- 43° c) .
This warmth helps activate that yeast. no one wants flat bread, am i right?
-
Now, combine the wet and dry mixtures. Fold gently until it’s smooth—think of it like a comforting embrace!
-
Let it rise for about 1 hour , then pop it in the oven for 40- 45 minutes .
Keep a close eye on it; the visual cues are when it turns golden brown and your whole house smells like heaven!
-
Finally, let it cool before slicing. If you try to cut it too soon, it’ll crumble. Waiting is hard, but it’s worth it!
Expert Techniques
Once you get the hang of the recipe, it’s time to explore some expert techniques. For starters, always check your oven temperature. An oven thermometer can save you from a baking disaster.
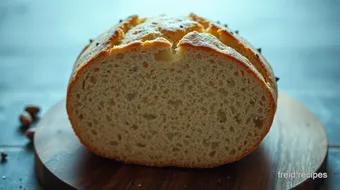
A soft crumb means the bread is done. stick a toothpick in the center, and if it comes out clean, you’re golden! keep an “oops” image in your mind when things don’t go as planned—maybe the dough didn’t rise enough.
No worries! just bake it a little longer or embrace a rustic look.
Success Strategies
Let’s knock those common mistakes out of the park! One biggie? Not having your ingredients at room temperature. Room temp eggs can lift your batter and give you that perfect rise.
Quality assurance? Always taste test. Not just during baking, but after! A gluten-free diet doesn’t have to be bland. Use herbs, spices, and seeds to amp up the flavor.
Also, consider storage. Keep your bread in an airtight container at room temperature or freeze slices for later. It can get you through those busy mornings for gluten-free toast ideas !
And there you have it! a professional-style cooking journey blended with the delightful art of making canyon gluten-free bread . with these tips and tricks, you’ll be whipping up easy gluten-free baking recipes that are as scrumptious as they are satisfying.
As we wrap this up, I’m excited to share more about methods, variations, and ideas for homemade gluten-free snacks ! So, keep reading for more cooking joys and kitchen adventures !
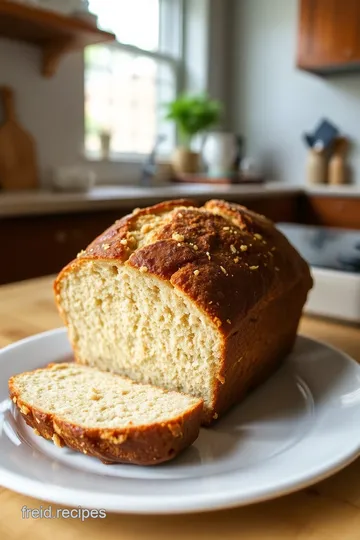
Whippin’ Up the Best Homemade Canyon Gluten-Free Bread
So, let’s dive into the details of making an absolutely delicious canyon gluten-free bread. you’re probably wondering what makes this recipe so special—well, it’s got that earthy twist we all love! trust me, if you’ve been missing good bread since going gluten-free, this recipe will change your game.
Pro Tips & Secrets to Nail That Bread
Honestly, baking gluten-free bread can feel a bit tricky. But don’t sweat it! Here are some of my personal insights to take your Canyon Gluten-Free Bread from good to spectacular :
-
Time-saving techniques: if you’re short on time, mix your dry ingredients ahead of time and store them. when you're ready to bake, just add in your wet ingredients.
It’s like a little bread-making cheat!
-
Flavor Enhancement Tips: Consider adding a tablespoon of honey or maple syrup. That sweet touch balances beautifully with the nutty flavors.
-
Presentation Advice: Placing it on a rustic wooden board can make it look oh-so-fancy. Add some fresh herbs around the loaf for an extra pop of visual appeal!
Perfect Presentation That Wows
We eat with our eyes first, right? So let’s make that bread stunning :
-
Plating Techniques: When you slice the bread, do so at an angle for those beautiful, thick-cut pieces that scream homemade goodness.
-
Garnish Ideas: Sprinkle some sunflower seeds on top before baking. They toast beautifully and add a delightful crunch.
-
Color Combinations: Pair your bread with bright, colorful spreads—think beet hummus or vibrant avocado mash. It’ll look drool-worthy on your Instagram feed!
Storage & Make-Ahead Tips
Alright, if you’re like me, you want to have fresh bread on hand at all times. Here’s how to store your Canyon Gluten-Free Bread:
-
Storage Guidelines: Keep your bread in an airtight container at room temperature for about 3-4 days. If you want it to last longer, pop it in the fridge or freezer.
-
Reheating Instructions: Warm it up in the toaster or oven just until it’s heated through. This helps bring back that fluffy texture.
-
Freshness Duration: Homemade gluten-free bread stays good for about a week in the fridge. Freeze any that you can’t finish within that time—it freezes really well!
Creative Variations for Every Celebration
Let’s talk creativity! If you’re feeling adventurous, jazz up your Canyon Gluten-Free Bread with these variations:
-
Flavor Adaptations: Swap out half the almond flour for a mix of other gluten-free flours like coconut or sorghum for a fun twist.
-
Dietary Modifications: Want it vegan? Just replace the eggs with a flaxseed mixture—mix 1 tablespoon of ground flaxseed with 3 tablespoons of water, let it sit to thicken, then toss it in!
-
Seasonal Twists: Try adding pumpkin puree and spices like cinnamon for a cozy fall variation.
Nutty Nutrition Facts That Matter
Now, let’s get to the health stuff . This Canyon Gluten-Free Bread is not just tasty; it packs a nutritional punch.
-
Detailed Breakdown: Each slice is about 130 calories, with 4g of protein and 2g of fiber. Not too shabby!
-
Health Benefits: The combination of almond flour and tapioca starch provides a nice mix of healthy fats and carbohydrates, ideal for a balanced diet.
-
Dietary Considerations: This recipe is not just gluten-free; you can make it dairy-free and nut-free depending on your needs. Just swap in your favorites!
Expert FAQ Solutions
What if your dough doesn’t rise? Or, what’s up with xanthan gum? Don’t worry; I’ve got answers:
-
Common Questions: If your bread flops, it could be due to expired baking powder. Always check your ingredients!
-
Success Tips: Make sure your water is the right temperature— not too hot, not too cold —to activate the yeast properly.
Conclusion: Get Baking!
So, what are you waiting for? roll up those sleeves and give this canyon gluten-free bread a shot. it might seem a bit daunting, but with these tips, tricks, and a dash of confidence, you’ll be well on your way to baking a loaf that’ll impress both gluten-free eaters and bread lovers alike.
Seriously, think of all the gluten-free toast ideas and homemade gluten-free snacks you can whip up. the smell of fresh bread wafting through your kitchen? that’s a win right there!
Happy baking, friends! Enjoy the journey, and remember: Every loaf gets better with practice!
Canyon Gluten Free Bread Recipe Card
⚖️ Ingredients:
- 1 cup (120g) gluten-free all-purpose flour
- 1/2 cup (50g) almond flour
- 1/2 cup (60g) tapioca starch
- 1 teaspoon (5g) xanthan gum
- 1 teaspoon (5g) baking powder
- 1/2 teaspoon (2g) salt
- 1 tablespoon (12g) sugar
- 1 cup (240ml) warm water (105°F-110°F/40°C-43°C)
- 1 tablespoon (15ml) apple cider vinegar
- 1/4 cup (60ml) olive oil
- 3 large eggs, room temperature
🥄 Instructions:
- Step 1: Gather all ingredients and ensure eggs are at room temperature. Preheat the oven to 375°F (190°C).
- Step 2: In a large mixing bowl, combine gluten-free flour, almond flour, tapioca starch, xanthan gum, baking powder, salt, and sugar. Whisk until thoroughly blended.
- Step 3: In another bowl, mix warm water, apple cider vinegar, olive oil, and eggs. Whisk until smooth.
- Step 4: Pour the wet mixture into the dry ingredients. Use a rubber spatula to fold gently until you reach a smooth, thick batter.
- Step 5: Transfer the batter to the greased loaf pan. Cover with a kitchen towel or plastic wrap. Let it rise in a warm place for about 1 hour until it has risen slightly.
- Step 6: Place the loaf in the preheated oven. Bake for 40-45 minutes, or until the bread is golden and a toothpick inserted in the center comes out clean.
- Step 7: Remove from the oven and let the bread cool in the pan for about 10 minutes before transferring it to a wire rack to cool completely. Slice and serve.
Previous Recipe: How to Make Amazing Gluten Free Saltine Crackers: 5 Simple Steps
Next Recipe: My Grandmother's Unforgettable Lactose Free Ricotta Cheese Recipe