Crispy Gluten-Free Pita Chips
Wondering how to whip up satisfying gluten free pita chips? These crispy, flavorful snacks are perfect for dipping or enjoying as they are. Let's dive into my favorite recipe!

- Recipe Overview
- Key Benefits
- Essential Ingredients Guide to Deliciousness
- Crunchy Perfection: Professional Cooking Method for Gluten-Free Pita Chips
- Pro Tips & Secrets for Perfect Pita Chips
- Perfect Presentation for Your Snack Game
- Storage & Make-Ahead Tips
- Creative Variations to Spice Things Up
- Complete Nutrition Guide
- Expert FAQ Solutions
- Wrapping It Up
- Recipe Card
Honestly, is there anything better than a crunchy snack on a lazy afternoon? picture this: you're sprawled on the couch, remote in one hand, and a bowl of crispy goodness in the other.
That’s where gluten-free pita chips come in! i remember the first time i experimented with them—just a simple idea crafted from pita bread i had lying around.
Who knew that some olive oil and spices would create a little miracle? now, they’ve become a staple in my house.
What’s fantastic about these chips is that they’re not only delicious but also a great way to whip up a batch of gluten-free snacks that everyone can enjoy.
Whether you’re in the mood for a light nibble or a full-on party platter, these bad boys are sure to impress.
Recipe Overview
Let's dive into where these crispy chips first came from. pita bread has roots in middle eastern cuisine, dating back thousands of years.
Traditionally, it’s enjoyed alongside mediterranean dishes—think hummus or baba ghanoush. fast forward to today, and they’re making waves in the snack aisle as one of the leading options for gluten-free appetizers .
These chips are super easy to make during your hectic afternoon. it takes about 25 minutes from start to finish, including prep and bake time.
Seriously, even your busiest weekdays can fit in a snack break with these. plus, they yield around 4 servings , making them perfect for sharing—but honestly, if they’re around, i usually end up eating most of them myself!
Cost-wise, let's keep it real. You can make a batch for about $5! That’s much cheaper than those pre-packaged gluten-free snacks you see at the store, and they taste way better, too.
Key Benefits
Now, let’s chat about why you need these homemade pita chips in your life. first off, they serve up some great health benefits.
Using olive oil rather than heavier oils makes these chips a lighter, healthier alternative to traditional snacks. plus, you get to pick the seasonings, so you can tailor them to any flavor profile you’re craving.
They're also perfect for special occasions. hosting friends over for game night? these chips paired with some spicy hummus or your favorite dipping sauces for chips will have everyone raving.
Let’s be honest, people always love snacks that look and taste great!
Unlike some other quick snack recipes that are filled with additives, these chips offer an awesome crunch without the guilt.
They are excellent low-sodium snacks that don’t skimp on flavor. you can get creative with your seasonings, using everything from smoked paprika to italian herbs , giving them a personal touch that you won't find in store-bought options.
And if you're into healthy eating habits , these chips have got you covered. they’re packed with fiber and make for light snack options that won't weigh you down.
Plus, they’re vegan, with just a few adjustments, which is a win for plant-based dieters!
So, are you excited to try making your own crispy pita chips? Let’s jump into what you need to get started!
Ingredients Section
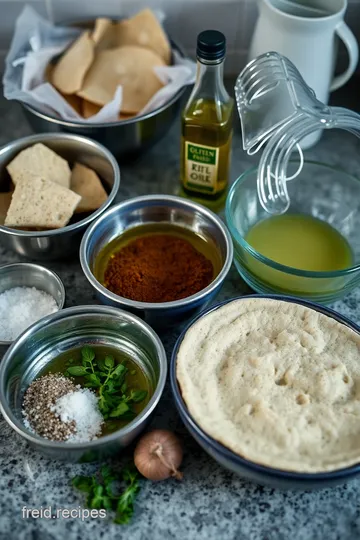
To whip up your very own crispy homemade chips , gather these ingredients and let’s cook up a storm. You won’t regret it!
Essential Ingredients Guide to Deliciousness
Hey there, snack lovers! today, we’re diving into the world of gluten-free snacks , focusing on those crunchy delights that can perk up any bite—like my favorite crispy gluten-free pita chips ! let’s break it down, ingredient by ingredient, because trust me, knowing what you’re cooking with can make all the difference.
Premium Core Components
Alright, first off, let’s talk measurements. when i say to grab 4 large gluten-free pita breads (about 25 cm each), i'm not just throwing numbers out there.
You need those pitas to get that perfect crunch! if you're more into metrics, that’s roughly 60 ml of olive oil to brush on—extra glug matters for flavor!
Now, for quality—when you’re picking your olive oil, go for extra-virgin . It'll make your chips taste like they came straight from a fancy Mediterranean restaurant!
And storage? Super simple! Keep these chips in an airtight container for up to a week. But let’s be honest—good luck making them last that long!
When selecting your ingredients, freshness is key. Spot perfumed, vibrant herbs and each spice's zest. That’s what gives your chips the amazing crunch and taste to stand out!
Signature Seasoning Blend
Here’s the fun part— spice it up! for these crispy beauties, i typically use garlic powder, onion powder, and a sprinkle of smoked paprika .
Oh, and don’t skip the sea salt; it’s like the cherry on top of a sundae! feel free to experiment with other spices.
Maybe a little cayenne for heat or some italian seasoning for that classic flavor.
Now on to the blending— herb selections and pairings can totally change the game. oregano is a great fit here, giving a nod to mediterranean flavors.
Regional variations are also fun—basil if you’re feeling italian, or chili powder if you want to spice it up.
Smart Substitutions
Sometimes, you might find yourself out of garlic powder (gasp!) or running low on olive oil. what then? fear not! common alternatives can save your chips! grab some minced garlic instead, and if you’re short on oil, you can swap it out for melted coconut oil.
Dietary modifications can also be a breeze. A low-sodium lifestyle? Just dial back on the salt! And if you need a quick snack recipe without the pita, how about sliced veggies? They’re lovely crunchy alternatives!
Kitchen Equipment Essentials
Okay, now let’s talk tools. you don’t need a fancy kitchen to whip up these homemade pita chips . just grab a baking sheet, parchment paper, a brush for oil, and a sharp knife or pizza cutter .
Alternative equipment? Sure! If you don’t have parchment paper, keep the oil handy—just grease your pan well to avoid stickiness.
Preparation tips: cut your pitas into wedges ahead of time and get your flavored oil ready. makes the whole process smoother! and for storage, i swear by a good ol’ airtight container .
It keeps your chips fresh and crunchy for days.
Wrap It All Up
So, to sum it all up, whether you're craving fiber-rich snacks or healthier alternatives, these crispy gluten-free pita chips are a home run.
They’re so versatile, and you can mix and match your favorite seasoning blends. plus, they’re perfect for dipping in your go-to sauces—think hummus or tzatziki.
Honestly, they’re a great option for gatherings or just a chill night at home.
Next up, I’ll walk you through the instructions for making these crunchy, salty delights that’ll replace your store-bought chips. So stick around—your taste buds are about to thank you!
Crunchy Perfection: Professional Cooking Method for Gluten-Free Pita Chips
Oh my gosh, if you’re a snack lover like me, you’re gonna want to stick around for these crispy gluten-free pita chips ! they’re not just any chips; they're made with gluten-free pita bread slathered with flavorful olive oil and spices, baked to golden perfection.
Perfect for dipping or just munching on their own. so let’s dive into the professional cooking methods that will make your snack game on point !
Essential Preparation Steps
First things first: mise en place . sounds fancy, huh? it simply means getting all your ingredients ready before you start cooking.
For these pita chips, you’ll need 4 large gluten-free pitas, olive oil, garlic powder, onion powder, sea salt , and some herbs.
Assemble everything and you’ll be flying through this recipe.
Time management is key. set aside about 10 minutes for prep and 10- 15 minutes for baking . don’t forget to preheat your oven to 350° f ( 175° c) before diving into the action.
Now, let’s chat organization strategies . keep your workspace clutter-free to make it easier to whip up your chips. lay out a cutting board, knife or pizza cutter, and your baking sheet lined with parchment paper.
And hey, safety first! watch those fingers while cutting the pitas into wedges.
Step-by-Step Process
Ready to make those mouthwatering chips? Here’s a simple breakdown of what to do:
- Preheat your oven to 350° F ( 175° C) .
- Line a baking sheet with parchment paper to prevent sticking.
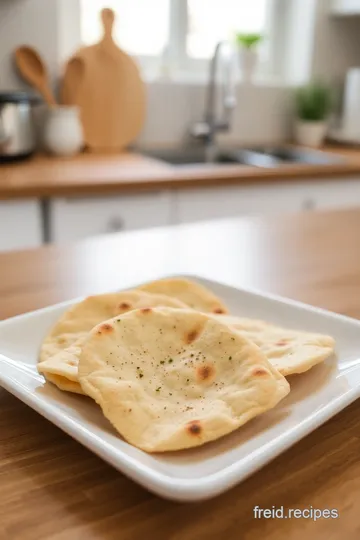
- Cut your pitas : Stack them, slice each in half to create rounds, and cut each round into wedges. Think pizza!
- Mix the seasoning : Whisk together 1/4 cup olive oil , 1 tsp garlic powder , 1 tsp onion powder , 1 tsp sea salt , 1/2 tsp smoked paprika , and 1/2 tsp dried oregano in a bowl.
- Brush the pita wedges on both sides with that glorious oil mix. Make sure every bit of those edges is well coated for maximum flavor!
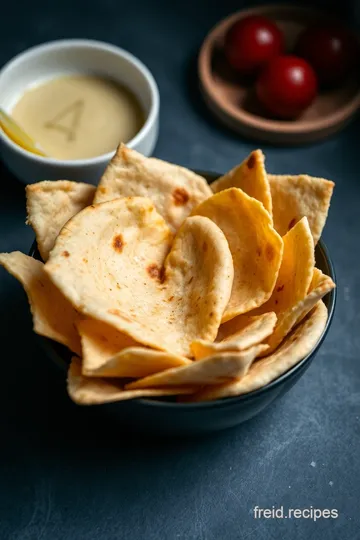
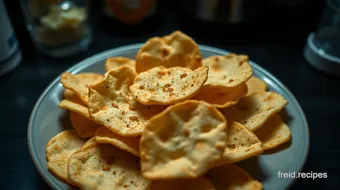
- Bake those chips in a single layer for 10- 15 minutes , flipping halfway through until the chips are golden brown and crispy . Pro tip: watch them closely; they can turn from perfect to burnt in a snap!
- Cool them down for a few minutes before diving in. Trust me, your mouth will thank you!
Expert Techniques
As you’re baking, keep in mind some critical steps for that professional touch. the timing precision is everything here. if you notice that the edges are browning quickly, feel free to pull them at that mark.
Also, baking time can vary based on your oven—every oven has its own quirks.
Quality checkpoints involve tasting a chip to ensure it’s flavorful enough. If not, sprinkle a bit more seasoning before cooling!
And if you’re troubleshooting, don’t panic if they come out tougher than expected. a quick fix? baking them for a shorter time or keeping an eye on the color can help you avoid that.
Success Strategies
Let’s wrap this up with some common mistakes to avoid . make sure your pita wedges are all even sizes ; otherwise, they won’t cook evenly.
Also, resist the urge to overcrowd the baking sheet; you want that hot air to circulate!
For quality assurance , taste-test a couple of chips just as they come out. if they need more flavor, toss them in your favorite spices while they’re still warm.
You’ll be amazed at how easy it is to elevate their flavor profile!
Looking for make-ahead options ? bake a batch, let them cool, and store them in an airtight container. they'll stay crispy for about a week.
Perfect for quick snack attacks during the week!
These gluten-free pita chips are more than just a snack; they’re perfect for parties, game nights, or just a crunchy treat while binge-watching your favorite show.
Pair them with hummus, tzatziki, or whatever dipping sauce tickles your fancy!
So, whether you’re looking for healthy snack ideas or tasty spice blends to elevate your snack game, these chips are a delicious solution .
Enjoy experimenting with the flavors, and get ready for some serious crunch!
Stay tuned for more additional information , and happy snacking!
Pro Tips & Secrets for Perfect Pita Chips
Okay, first things first, let me spill the beans on some pro tips from my own kitchen adventures! when you’re whipping up these gluten-free pita chips , what you want is that perfect crunch without any burnt edges.
So, watch those bad boys closely during baking—seriously, they can go from golden to burnt faster than you can say “snack attack!”
And if you’re all about saving time, consider making a big batch . just double the recipe and use two baking sheets.
Less work later when you have a craving! trust me, nothing beats that moment when you kick back and munch on some crispy homemade chips straight from the oven.
For flavor enhancement, mix up your seasoning game ! Garlic and onion powder are fab, but why not throw in some chili powder or a sprinkle of Italian seasoning for a gourmet twist? If you're feeling fancy, add a dash of Parmesan cheese —totally delicious!
Perfect Presentation for Your Snack Game
Now, let’s chat about making those pita chips look like a million bucks! first, plating tricks are key. instead of just dumping those wedges on a plate, try arranging them in a fanned-out circle.
It’s like giving your snack a runway debut—totally insta-worthy!
When it comes to garnishing , fresh herbs like parsley or basil add a pop of green. plus, they make everything look more fresh .
As for color combos? think about serving your chips with bright dips like red roasted pepper hummus or a creamy green avocado dip.
Yum!
Storage & Make-Ahead Tips
Wondering how to keep your gluten-free pita chips crunchy? here’s the scoop: store them in an airtight container at room temperature.
They’ll stay fresh for about a week—if they last that long! pro tip : if they start to lose their crunch, a quick bake in the oven for 3- 5 minutes can revive them.
If you’re a planner like me, making these ahead of time is a breeze. Just whip them up on a Sunday and snack on them all week!
Creative Variations to Spice Things Up
Now let’s get creative. with gluten-free recipes , the sky's the limit! you can play around with seasonal twists —pumpkin spice in the fall, or zesty lemon pepper in the summer.
Feeling adventurous? try some mediterranean spice blends —think za’atar or sumac—for a lovely aromatic touch.
And if you’ve got friends with special dietary needs, you can easily tweak these chips. going low-sodium? just cut back on the sea salt.
Or for vegan options, all the spices are plant-based—easy peasy!
Complete Nutrition Guide
You know what’s awesome? these chips are not only delicious , but they’re also packed with benefits. each serving gives you around 150 calories —not bad for a snack that’s full of flavor! besides that, they’re a decent source of fiber , which helps keep you full.
Kiddo’s snacks totally don’t have to be junk food.
Just keep in mind your portion sizes. While they’re healthy, don’t go overboard—mind that snack balance !
Expert FAQ Solutions
Still got questions? i’ve been there! troubleshooting is a part of the cooking journey. if your chips turn out soft, it could be due to not baking them long enough.
Remember to turn them halfway through for even cooking.
And if you want to dab into variations? Go wild! Mix up your spice blends. You can even make a sweet version with cinnamon and sugar for a totally different snack vibe.
Wrapping It Up
So there you have it—your go-to guide for making crispy gluten-free pita chips ! this simple, quick snack is perfect for movie nights, hangouts, or just chilling by yourself with a little dipping sauce for some extra flavor.
Enjoy making them, sharing them, and, of course, eating them! you’ve got this, friend. happy snacking!
Crispy Gluten-Free Pita Chips Card
⚖️ Ingredients:
- 4 large gluten-free pita bread (approximately 25 cm in diameter)
- 1/4 cup (60 ml) olive oil
- 1 teaspoon garlic powder
- 1 teaspoon onion powder
- 1 teaspoon sea salt
- 1/2 teaspoon smoked paprika (optional)
- 1/2 teaspoon dried oregano (or herb of choice)
🥄 Instructions:
- Step 1: Preheat the oven to 350°F (175°C).
- Step 2: Line a baking sheet with parchment paper to prevent sticking.
- Step 3: Stack pitas and slice each in half to separate into two rounds. Cut each round into wedges (like a pizza) to create chips.
- Step 4: In a small bowl, combine olive oil, garlic powder, onion powder, sea salt, smoked paprika, and oregano.
- Step 5: Brush the oil mixture onto both sides of the pita wedges, ensuring all edges are well-coated for maximum flavor.
- Step 6: Arrange the wedges in a single layer on the baking sheet. Bake for 10-15 minutes, or until golden brown and crispy, turning halfway through.
- Step 7: Remove from the oven, allow cooling slightly before enjoying.
Previous Recipe: How to Create the Ultimate Gluten Free Cookie Mix for Delicious Treats
Next Recipe: My Grandmother's Ethereal Rice Pilaf: Is Rice Pilaf Gluten Free?