Decadent Gluten-Free Dark Chocolate Truffles
Craving something indulgent? These gluten free chocolates—rich dark chocolate truffles—are a dream! Perfect for satisfying your sweet tooth. Try it out!

- Indulge in Decadent Gluten-Free Dark Chocolate Truffles
- Essential Ingredients Guide: Elevating Your Kitchen Game
- Whipping Up Perfect Decadent Gluten-Free Dark Chocolate Truffles
- Pro Tips & Secrets for Decadent Gluten-Free Dark Chocolate Truffles
- Perfect Presentation: Make ‘Em Pretty!
- Storage & Make-Ahead Magic
- Creative Variations: Make It Yours
- Complete Nutrition Guide
- Expert FAQ Solutions
- Wrapping it Up
- Recipe Card
Indulge in Decadent Gluten-Free Dark Chocolate Truffles
Have you ever found yourself yearning for something rich, creamy, and utterly luxurious? picture this: a rainy sunday afternoon, curled up on the couch, book in one hand, and a plate of decadent gluten-free dark chocolate truffles in the other.
Oh my gosh, pure bliss! it’s almost like a warm hug from your favorite dessert. and trust me, these truffles deliver all the feels.
From their french origins to being a staple in many modern dessert tables, truffles are a beloved treat across countless cultures.
They’ve made their way into american homes, especially as gluten-free lifestyles have gained popularity. so when you’re looking for no gluten chocolate treats , these truffles will not only satisfy your sweet tooth but also fit seamlessly into your dietary needs.
The Lowdown on Your New Favorite Dessert
Making these truffles is a breeze! they’re classified as easy chocolate truffles , with minimal fuss involved. prep time? just 15 minutes! add another 30 minutes for chilling, and voila! in under an hour, you’ll have 12 luscious truffles ready to impress.
When it comes to cost, you’re looking at a modest investment for rich chocolate desserts . you might spend a little more on high-quality chocolate, but hey, that’s just part of the indulgence, right? plus, the creamy, dreamy bites make it all worth it, especially when you consider the satisfaction each truffle brings.
Why You’ll Love These Truffles
Let’s talk health for a sec. dark chocolate is packed with antioxidants and can even have health benefits. yep, you heard right! these truffles are not just delicious gluten-free desserts ; they can qualify as healthy chocolate desserts when eaten in moderation.
So feel free to indulge guilt-free!
Beyond that, there’s something incredibly special about serving homemade chocolate truffles at gatherings. whether it’s a cozy dinner party or a festive celebration, they’re perfect for any special occasion .
Plus, you can customize them with creative truffle variations . want a hint of peppermint? or maybe a dash of chili powder for a kick? the options are endless!
And speaking of customization, that's where the magic happens! these decadent bites are far superior to store-bought options. you control the flavors, the quality, and while we’re at it, you can make dairy-free chocolate truffles if you’re looking for a plant-based option.
Ready to Get Truffling?
Now that i’ve got you dreaming of these gluten-free indulgences , it’s time to dive into what you’ll need to whip them up.
You'll be gathering some artisan chocolate truffles ingredients shortly! don't hold back on your flavors; this is your canvas.
So get ready to roll up your sleeves and make some gourmet truffles that could easily be mistaken for store-bought magic.
I promise these little spheres of chocolate happiness will satisfy your cravings and bring joy every time you take a bite!
Let's jump right into the ingredient list, shall we?

Essential Ingredients Guide: Elevating Your Kitchen Game
Cooking can feel like magic sometimes, right? you take a handful of ingredients, sprinkle in some love, and voilà—something delicious appears! but to pull off that kitchen wizardry, you need to know your essential ingredients .
Today, we’re diving into what you absolutely must have for culinary success.
Premium Core Components
First things first: the premium core components . Think of these as the building blocks of your kitchen. Here’s what you need to know:
-
Detailed Measurements: Whether you're measuring in cups or grams, precision matters. For example, 8 ounces of dark chocolate equals about 225 grams. Knowing these conversions keeps your dishes consistent and delightful.
-
Quality indicators: look for ingredients that "speak" to you. quality dark chocolate should have a rich aroma and a high cocoa percentage, usually 70% or more .
When you pay attention to these indicators, your dishes will reach new heights.
-
Storage Guidelines: Keep your pantry organized! Store dried herbs in a dark, cool place to maintain their potency. And always check the expiration dates—after all, freshness is key.
-
Freshness Tips: When selecting fresh ingredients, look for vibrant colors and firm textures. That fresh basil you spot in the market? Grab it—it’ll brighten any dish.
Signature Seasoning Blend
Moving on to the exciting part— signature seasoning blends ! Your cooking can go from “meh” to “WOW” just by mixing the right spices.
-
Essential Spice Combinations: Think about classics like garlic powder with onion powder, or cumin with coriander. These combos are your culinary secret weapons .
-
Herb Selections: Fresh herbs can elevate your dish. Basil pairs beautifully with tomatoes, and rosemary works wonders with roasted potatoes.
-
Flavor Enhancers: Don’t forget about garlic and onions. They set the stage for flavor in so many recipes. Just a little sauté time can bring the party to your pan!
-
Regional Variations: Want a kick? Toss in some chili powder for a Southwest vibe or add curry powder for an Indian twist. Get creative—cooking is an adventure!
Smart Substitutions
Sometimes, life happens, and you don’t have the exact ingredient. No worries! Here are some smart substitutions :
-
Common Alternatives: Out of butter? Use coconut oil instead. It adds a subtle flavor and is perfect for gluten-free desserts .
-
Dietary Modifications: Need a vegan option? Substitute heavy cream with coconut cream for those creamy recipes, like a decadent dark chocolate truffle recipe .
-
Emergency Replacements: Don’t fret! If you’re out of eggs in a baking pinch, try using 1/4 cup applesauce per egg—works like a charm!
-
Seasonal Options: Create seasonal magic by using fruits and vegetables that are in season. They’ll taste better and often cost less!
Kitchen Equipment Essentials
Alright, let’s talk tools—your kitchen equipment essentials .
-
Must-Have Tools: Get yourself a trusty chef’s knife and a good-quality cutting board. You’ll wonder how you ever cooked without them!
-
Alternative Equipment: No double boiler? No problem! You can create one using a heatproof bowl set over a pot of simmering water.
-
Preparation Tips: Keep your workspace clean and organized. A clutter-free counter means less stress and more focus when you cook.
-
Storage Solutions: Invest in clear containers for pantry items. You’ll easily see what you have, and everything will stay fresh.
Wrapping It Up and Onto Deliciousness
So, whether you’re whipping up some easy chocolate truffles for a special occasion or diving into a rich chocolate dessert for the fam, having the right ingredients will make all the difference.
You’ll impress everyone and maybe even score some homemade chocolate truffles for yourself!
Now, let’s move on to the instructions section where we’ll put all this knowledge into action and make something absolutely scrumptious! Get ready to indulge in those Decadent Gluten-Free Dark Chocolate Truffles !
Whipping Up Perfect Decadent Gluten-Free Dark Chocolate Truffles
Oh my gosh, if you’re a chocolate lover like i am, you’re gonna want to make these decadent gluten-free dark chocolate truffles .
Seriously, it’s like a little bite of heaven! with creamy goodness and deep chocolate flavor, they’re sure to satisfy your sweet tooth.
Trust me, once you whip these up, you’ll be the star of any gathering, holiday, or just a regular tuesday night.
Essential Preparation Steps: Getting Ready to Indulge
Before diving into the truffle magic, let me talk about some prep steps. first on the agenda: mise en place .
Yeah, i know it sounds fancy, but it just means getting all your ingredients ready and organized. you’ll need 8 ounces of good dark chocolate , ½ cup of heavy cream , and some other goodies all prepped.
Always remember, a little prep goes a long way!
Now, time management is crucial. You want to melt the chocolate first, but while it’s cooling, you can chill the mixture. It’s all about working smarter, not harder!
And hey, let’s not skip the safety considerations either. like, when you’re melting chocolate, don’t crank the heat! keep it low and slow .
If you overheat it, you’ll end up with a sad, crumbly mess instead of smooth, luxurious chocolate goodness.
Step-by-Step Process: Let’s Make Some Truffles!
Now, let’s get into the good stuff. Follow these fun, easy steps to create your beautiful truffles:
-
Melt Chocolate:
- Start by chopping 8 ounces of dark chocolate and putting it in a heatproof bowl.
- Grab a saucepan and heat ½ cup of heavy cream until it just starts to simmer— around 190° F is prime time here.
- Pour this hot cream over the chocolate and let it sit for 1– 2 minutes . This lets the chocolate melt properly.
- Add in 2 tablespoons of unsalted butter and a splash of vanilla extract . Whisk it all together until it’s smooth and shiny like your favorite dessert dream.
-
Chill Mixture:
- Cover the bowl with plastic wrap and pop it in the fridge for 30 minutes. Just enough time to get that perfect set.
-
Form Truffles:
- After chilling, use a small scoop or spoon to grab a piece of that amazing chocolate and roll it into a ball. Pro tip: Keep your hands cool or wet to make the rolling quick and easy!
-
Coat Truffles:
- Now comes the fun part: roll your truffles in ¼ cup of unsweetened cocoa powder or chopped nuts if you’re feeling adventurous!
-
Final Chill:
- Place those beautiful truffles on a baking sheet lined with parchment paper and chill for an additional 15 minutes before you dig in.
Expert Techniques: Elevating Your Truffle Game
Alright, let’s talk about some pro techniques. quality is key, folks! make sure you’re using high-quality dark chocolate (aim for at least 70% cocoa ).
That’s how you get that rich flavor that chocolate lovers crave!
And if things aren’t coming together as they should, stay calm. if your mixture is too soft to roll, stick it back in the fridge until it firms up.
We’ve all been there—melting things down and then realizing it’s too gooey. no sweat!
Success Strategies: Making Sure You Nail It!
Now, listen. there are a couple of rookie mistakes that can snag you here. first off, avoid rushing the chilling processes.
Patience truly pays off. if you’re thinking about making these for a gathering, they make great make-ahead options !
Also, consider using different flavorings. Orange zest, or maybe a drop of espresso for those rich chocolate desserts vibes. Whatever floats your chocolate boat!
Wrapping It Up with Additional Information
And there you have it! enjoy biting into these gluten-free chocolates that not only look impressive but are also super easy to make.
Whether you’re nibbling solo or gifting them, these truffles will surely make you a crowd favorite. so, next time you’re craving something sweet, remember this easy chocolate truffles recipe is just a few steps away.
Happy chocolate making, my friends!
Pro Tips & Secrets for Decadent Gluten-Free Dark Chocolate Truffles
When it comes to easy chocolate truffles , every little tip makes a difference. okay, so here’s the scoop: use high-quality dark chocolate.
Seriously, don’t skimp on this. grab some at least 70% cocoa, and your truffles will sing! something magical happens when good chocolate meets cream.
Also, temperature control is key here. make sure that when you mix cream and chocolate, the cream is just simmering.
If it’s boiling, you might end up with a chocolate disaster!
For those of us who always seem in a rush (story of my life), chilling the mixture for 30 minutes might feel like forever! but i promise it’s so worth it.
If you're super tight on time, just pop it in the freezer for about 15- 20 minutes instead. your future self will thank you.
And don't forget, we’re all about that rich chocolate flavor —add a splash of vanilla or whatever extract tickles your fancy.
Orange zest is a killer combo too!
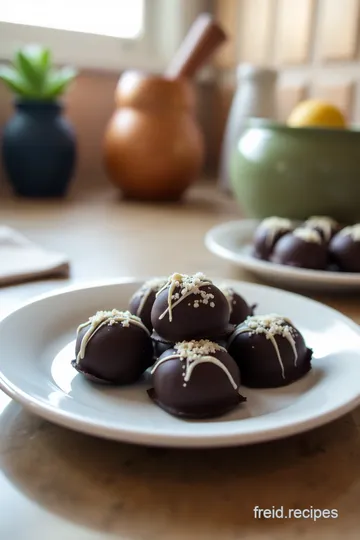
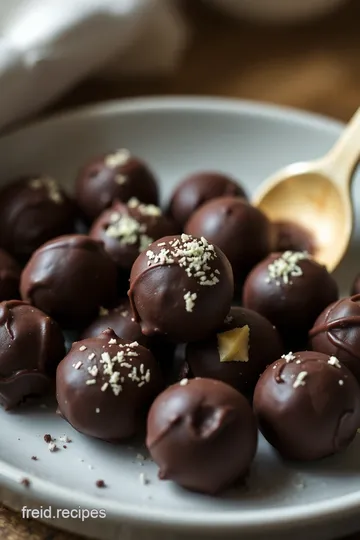
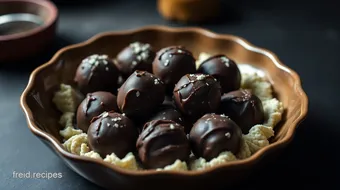
Perfect Presentation: Make ‘Em Pretty!
Alright, plating techniques matter! i mean, we eat with our eyes first, right? after rolling your truffles in cocoa powder (or nuts if you're feeling fancy), place them lovingly on a parchment-lined baking sheet.
If you want to elevate your gluten-free indulgence , try garnishing with a sprinkle of sea salt or even edible gold leaf if you're feeling extra bougie.
Color combinations ? Think contrasting shades! Bright berries or a scoop of vanilla ice cream next to those dark chocolate beauties make everything pop. Visual appeal is half the battle.
Storage & Make-Ahead Magic
One of the best parts about these truffles is that they’re perfect for make-ahead . they can chill out in your fridge for up to two weeks! .
Just pop them in a container with a lid, and you’re golden. if you made too many (which, let’s face it, is impossible when it’s chocolate), you can freeze them.
Just make sure they’re in a freezer-safe container, and they’ll be good for up to three months.
When you're ready to enjoy your truffles, no need to defrost them completely. just let them sit at room temperature for about 15 minutes before diving in.
Trust me, they’ll be a hit!
Creative Variations: Make It Yours
Got cravings? let’s get creative. these homemade chocolate truffles are a blank canvas! swapping out the flavor profiles can turn a simple dark chocolate recipe into something special.
Want some zing? try adding peppermint extract for a festive vibe or some espresso powder for a nice kick. how about dairy-free version ? simply switch out the heavy cream for coconut cream.
You’d never guess they were plant-based !
As for seasonal twists —think pumpkin spice truffles in fall or fruity variations in summer. Why not go crazy with some chili powder for that sweet and spicy combo? The world is your oyster, or should I say, your truffle!
Complete Nutrition Guide
Who says indulging in rich chocolate desserts can’t be healthy? well, okay, maybe they can, but let’s not think about that right now.
These truffles pack a decent punch with only 150 calories each . and with a good dose of fiber from the dark chocolate, you can justify one or two.
Now, if you need to watch your sugar, try using a natural sweetener like agave or erythritol instead. Just pay attention to your measurements since they have different sweetness levels.
Expert FAQ Solutions
You might be thinking, “does it really have to be gluten-free ?” well, yes! but here’s why: even if you’re not gluten-free, these truffles taste amazing.
You won’t even miss the gluten, and honestly, who says “no” to gourmet truffles recipes ?
Got questions? Here are some common ones:
- What if my truffles are crumbly? Don’t sweat it! They may need a tad more cream or time to chill.
- Can I ship these as a gift? Absolutely! Just pack them well and keep cool during transit. They make the best easy homemade gifts !
Wrapping it Up
So, whether it's a birthday bash, a festive gathering, or just a cozy night in—these gluten-free chocolates are sure to steal the show.
With a little creativity and your own twist, you’ll keep coming back to this fabulous chocolate truffle recipe over and over.
Happy truffle-making, my fellow chocolate lovers! indulge, enjoy, and don’t forget to share—or not!
Decadent Gluten-Free Dark Chocolate Truffles Card
⚖️ Ingredients:
- 8 ounces high-quality dark chocolate (minimum 70% cocoa), chopped
- ½ cup heavy cream
- 2 tablespoons unsalted butter
- 1 teaspoon pure vanilla extract or flavor extract (e.g., orange, peppermint)
- ¼ cup unsweetened cocoa powder
- Optional: ½ cup finely chopped nuts or shredded coconut for rolling
🥄 Instructions:
- Step 1: Place chopped dark chocolate in a heatproof bowl.
- Step 2: In a small saucepan, heat the heavy cream until it just begins to simmer.
- Step 3: Pour hot cream over the chocolate and let sit for 1-2 minutes.
- Step 4: Add butter and vanilla, then whisk until the mixture is smooth and shiny.
- Step 5: Cover the bowl with plastic wrap and refrigerate for 30 minutes, or until set.
- Step 6: Use a small scoop or spoon to portion out the chocolate mixture.
- Step 7: Roll each portion into a ball with your hands, working quickly to prevent melting.
- Step 8: Roll truffles in cocoa powder (or nuts/coconut) to coat evenly.
- Step 9: Place on a parchment-lined baking sheet.
- Step 10: Refrigerate the finished truffles for at least 15 minutes before serving.
Previous Recipe: Easy Dairy-Free Cupcakes: 5 Fluffy Treats for Everyone!
Next Recipe: Delicious Gluten and Dairy Free Breakfast: 5 Fluffy Sweet Potato Pancakes!