Delicious Gluten-Free Sandwiches You'll Love
Looking for the ultimate gluten-free sandwiches? I've crafted these delicious options that burst with flavor! Try these easy recipes and impress your taste buds!

- Your Essential Ingredients Guide: Building a Solid Foundation for Culinary Adventures
- Mastering Professional Cooking Techniques: Savoring Gluten-Free Sandwiches
- Pro Tips & Secrets for Gluten-Free Sandwiches
- Perfect Presentation
- Storage & Make-Ahead
- Creative Variations
- Complete Nutrition Guide
- Expert FAQ Solutions
- Wrapping it Up
- Recipe Card
Have you ever sat down for lunch and felt that familiar blend of boredom and hunger? trust me, i’ve been there! one day, i found myself staring at yet another sad sandwich, wondering why i keep doing this to myself.
Then it hit me: it was time to shake things up with gluten-free sandwiches ! honestly, these aren’t just for folks avoiding gluten.
They’re for anyone craving a fresh and exciting bite filled with flavor. let me tell you, once you dive into the world of gluten-free recipes , everything changes.
Remember the last time you had a sandwich that was so good you couldn’t help but smile? that’s what these healthy sandwich ideas are all about.
They make the perfect gluten-free lunch options for anyone, no gluten allergy required. trust me; this isn't just for those with dietary restrictions—it's for anyone looking for a new lunch favorite!
Recipe Overview
Not to get all historical on you, but sandwiches have been around since the 18th century. the earl of sandwich is said to have invented them so he could eat without leaving the gaming table! fast forward to today, and we still cherish that tasty genius.
With the growing popularity of gluten-free foods, people are turning to gluten-free bread recipes for their lunch needs.
Now, making these easy gluten-free meals can take around 35 minutes from prep to plate. yeah, that’s right! and don’t let the thought of making your own bread intimidate you; it’s all about simple steps.
The difficulty level is medium, mainly because you'll need some knife skills for those delicious fillings. for about $10, you get a yield of four scrumptious sandwiches.
It’s a win-win!
Key Benefits
Let’s break it down: opting for gluten-free sandwiches means you’re likely using nutrient-rich sandwich ingredients . you can load them up with all kinds of tasty and healthy fillings.
Think fresh veggies, creative gluten-free spread options , and even plant-based proteins. now, we’re talking about some serious flavor!
These beauties aren’t just for lunch, either. they’re perfect for any special occasion! think about it: they’ll be a hit at picnics, family gatherings, or even just for a quick dinner when you’re too tired to whip up a full meal.
Plus, they can totally impress your friends—“oh, you made vegetarian gluten-free sandwiches ? you fancy!”
Just imagine biting into a well-made gluten-free sandwich. the texture, the flavor—it’s not just a meal; it's an experience. you get to enjoy the layers of everything from fresh seasonal vegetables to delicious homemade gluten-free spreads and dips .
And the best part? you know exactly what’s in it!
Now that we've set the stage with all that goodness, it's time to roll up our sleeves and get into the ingredients needed for your own gourmet adventure in the kitchen! Let's make these gluten-free sandwiches a reality in your life!
Your Essential Ingredients Guide: Building a Solid Foundation for Culinary Adventures
When it comes to cooking, having the right ingredients can make or break a dish. seriously, they’re everything! whether you’re whipping up a quick gluten free sandwich or a gourmet feast, knowing your ingredients is key.
Let's dive into the essentials, so you can strut your stuff in the kitchen like a pro!
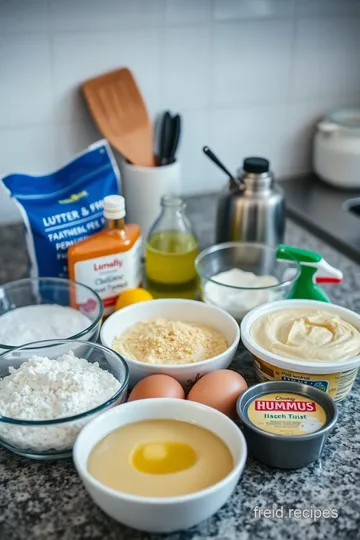
Premium Core Components
First, let’s tackle the basics. Here’s what you need to know:
Measurements: You’ll need 2 cups (240g) of gluten-free all-purpose flour for that bread, and guess what? That also means about 240ml in metric. It’s all about precision, my friend.
Quality indicators: an ingredient can look good but still be iffy. check your flour for lumps or a rancid smell—nobody wants bad flour ruining their gluten-free bread recipe.
And trust me, a fresh bag of spices can change the flavor game!
Storage guidelines: you want fresh ingredients, so store your flour in a cool, dry place. cadging your gluten-free ingredients can give them more shelf life.
The cooler, the better. generally, gluten-free flours last about 3 to 6 months when sealed tightly.
Freshness Tips: Always sniff your spices before using them. If they lack fragrance, they’re probably old news.
Signature Seasoning Blend
Now onto the fun part: seasonings! Here's how to elevate your flavors:
Essential Spice Combinations: Think garlic powder, onion powder, and maybe a pinch of smoked paprika. Toss these in your next veggie mix and thank me later.
Herb Selections: Fresh herbs like basil and cilantro can make your sandwiches sing. Garlic and parsley? Chef's kiss. They’re super versatile!
Flavor Enhancers: Don’t sleep on your salts and acids! A good quality sea salt and a dash of lemon juice can turn plain ol’ veggies into gluten-free fillings to die for!
Regional Variations: Want some kick? Try southwestern spices for a bit of heat. Feeling French? Use herbes de Provence.
Smart Substitutions
Even the best-laid plans can hit a snag. No worries! Here’s how to roll with the punches:
Common Alternatives: If you run out of something, don’t panic! Coconut flour is a tasty substitute for gluten-free all-purpose flour—just adjust your liquid, as it absorbs more.
Dietary Modifications: Going vegan? Swap out eggs for flaxseed meal mixed with water. And if you're on a low-carb kick, check out almond flour.
Emergency Replacements: Out of gluten-free bread? Try lettuce wraps! Seriously, they’re fantastic if you want to make healthy sandwich ideas even healthier.
Seasonal Options: Use seasonal vegetables for sandwiches to keep things exciting. Fresh corn in summer? Yes, please!
Kitchen Equipment Essentials
You can't create magic without the right tools:
Must-Have Tools: Mixing bowls, a whisk, and baking sheets are non-negotiable. A good knife and a cutting board are essential for preppin’ your fillings.
Alternative Equipment Options: No toaster? No problem! A grill pan can give your sandwiches that crispy crust without all the fuss.
Preparation Tips: Always read through your recipe before starting to avoid any surprises. Believe me, you don't want flour all over your kitchen.
Storage Solutions: Keep your spices and dry ingredients in airtight containers to keep 'em fresh. Seriously, a good jar can save your life.
And there you have it, friend! these essential ingredients and tips will guide you to the land of endless delicious meals.
So whether you’re making quick gluten free meals or planning a picnic with gluten-free picnic food, remember that every detail counts.
Now, let’s take these inspired ingredients and turn them into some mouthwatering gluten-free sandwiches that'll blow your tastebuds away! stay tuned for the tasty instructions up next!
Mastering Professional Cooking Techniques: Savoring Gluten-Free Sandwiches
Oh my gosh, have you ever thought of how fancy a simple sandwich can get? today, we’re diving into professional cooking methods to elevate those gluten-free sandwiches .
Whether you're making a hearty lunch or gourmet picnic treats, getting it right can be super satisfying. let's break it down!
Essential Preparation Steps
Before diving into cooking, let’s chat about mise en place . french for “everything in its place,” this means having all your ingredients prepped and ready.
For your gluten-free bread recipe , this means measuring out your gluten-free flour, water, and other goodies ahead of time.
Trust me, nothing throws off the vibe faster than running around the kitchen looking for a whisk!
Next up is time management . set a timer for your bread to rise—about 30 minutes should do the trick.
While that’s happening, slice up your veggies. a little organization goes a long way! i like to put all my ingredients in little bowls; it feels like i’m hosting a cooking show.
And don’t forget about safety —sharp knives are no joke, folks! make sure you’re cuttin’ away from yourself, please! and keep things tidy.
Nobody needs a slip-up in what should be a fun sandwich-making session.
Step-by-Step Process
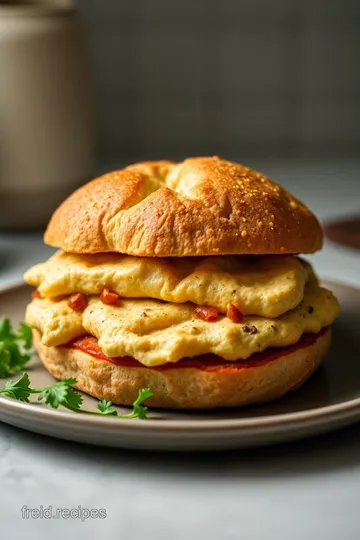
Alright! Let’s get cooking. Here’s how to whip up those gourmet gluten-free sandwiches :
-
Prep Your Bread: In a mixing bowl, combine warm water, sugar, and yeast, letting it froth up for about 5- 10 minutes . That’s pure magic!
-
Mixing it up: in another bowl, whisk together your gluten-free flour and salt. gradually add the yeast mixture and eggs, mixing until it forms a dough.
Cover and let that bad boy rise for 30 minutes .
-
Bake time: preheat your oven to 375° f ( 190° c) . shape your dough on a baking sheet and pop it in to bake for 25- 30 minutes or until golden brown.
You’ll want that signature hollow sound when tapped.
-
Veggie time: While your bread is baking, slice up that cucumber, tomato, and avocado. Season with salt and pepper to unleash the flavors!
Expert Techniques
Now, let’s sprinkle in some professional tips!
- Quality Checkpoints: The bread should be light and airy. If it's dense, you might need to rethink rising time or your yeast's freshness.
- Temperature Control: Make sure your water is warm—not hot, which can kill the yeast. Aim for around 100° F ( 37° C) .
- Visual Cues: You’ll know your bread is done when it’s golden brown and sounds hollow. If you don’t hear the thunk , back in it goes!
Success Strategies
Here’s where we avoid common pitfalls. A huge mistake is rushing the rising time—don’t skip it; it’s crucial! Also, let your bread cool completely before slicing.
Ensuring quality assurance is as simple as tasting along the way. a little bite of that bread fresh out of the oven? heaven! and remember, when making meal prep gluten-free sandwiches , store your sandwiches covered in the fridge to keep them fresh.
If you want to take it a step further, think about make-ahead options. you can whip up a big batch of gluten-free bread on sunday and create different sandwiches throughout the week.
Talk about a time-saver!
Wrapping It Up
There you have it! A fun, laid-back approach to mastering healthy sandwich ideas while keeping it gluten-free. I love how these sandwiches can be tailored to the fresh, seasonal veggies you find at your local market—just get creative!
And hey, if you ever find yourself at a loss for inspiration, remember that sandwich-making is all about layering flavors and textures.
The world is your oyster (or should i say, gluten-free bread?)!
Next up, we’ll explore even more gluten-free cooking tips and tricks to keep your kitchen adventures exciting! Stay tuned, my friends!
Pro Tips & Secrets for Gluten-Free Sandwiches
Let’s kick things off with some killer pro tips to elevate your gourmet gluten-free sandwiches ! first off, if you're like me and sometimes find gluten-free bread a bit dense, try toasting it.
Seriously, that little crunch makes a huge difference. time-saving technique: make that gluten-free bread ahead of time and freeze it.
When you're ready to whip up a sandwich, grab a couple of slices, toast them, and you’re golden!
Now, let’s talk flavor enhancements . adding herbs de provence or even a pinch of smoked paprika to your hummus can give it a whole new vibe.
Sprinkle it on top before slapping on those wholesome sandwich fillings. and for presentation? use a sharp knife to cut your sandwiches into triangles.
It's nothing fancy, but it looks so much more appetizing!
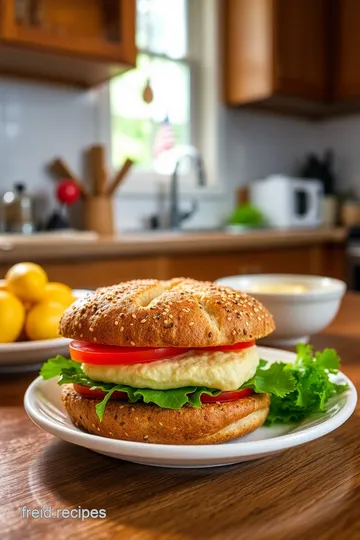
Perfect Presentation
Speaking of looks, presentation can turn any meal into a gourmet experience, even with those easy gluten-free meals! when plating your sandwiches, stack them like a little sandwich tower.
It’s all about height. and for the garnish, fresh herbs like parsley or basil are a fantastic touch. they not only look pretty, but they also pack a flavor punch.
Having a color play is essential, too! don’t forget those seasonal vegetables for sandwiches. use vibrant red tomatoes, bright green spinach, and rich avocado for a vibrant look.
A hint of color variety can make even simple gluten-free snacks feel fancy!
Storage & Make-Ahead
Now, let's keep it real. sometimes life gets busy, and we need our sandwiches ready to roll. if you’re meal prepping gluten-free sandwiches, store them in an airtight container in the fridge.
They should last for about 3 days . just remember to keep your spreads separate until you’re ready to eat to prevent them from getting soggy.
For longer trips like gluten-free picnics, opt for hearty fillings that stay fresh longer, like a mix of roasted veggies or even grilled chicken.
And reheating? a hot skillet for about 5 minutes will usually do the trick to bring that sandwich back to life without it getting too clumsy.
Creative Variations
Are you adventurous with your gluten-free lunch options? play with different flavors! swap traditional spreads with homemade gluten-free pesto or even a smoky bbq sauce for a new twist.
Don’t shy away from seasonality, either. late summer? fill those sandwiches with roasted corn, green peppers, and a sprinkle of feta.
If you’re feeling the cravings for something hearty, consider regional variations—how about a New Orleans-style veggie po’ boy with pickled veggies on a gluten-free hoagie? The sky’s the limit! And for my vegetarian friends, plant-based sandwich recipes are here to save the day!
Complete Nutrition Guide
Let’s get down to the nitty-gritty of those nutrient-rich sandwich ingredients . the gluten-free bread recipe i shared is not only delicious but packed with protein from eggs and healthy fats from olive oil.
You’re lookin' at a balanced meal here, especially when you add those colorful fillings!
If you're concerned about gluten-free diet meal ideas being low on fiber, toss in some leafy greens. they’ll bulk up your sandwich while keeping it fresh and nutritious.
Aim for one sandwich to have about 10 grams of protein and 30 grams of carbs , making it a solid option for lunch.
Expert FAQ Solutions
You know i'm here to answer the burning questions. like, “what if my gluten-free bread crumbles?” simple! make sure to let it cool completely and slice it with a serrated knife.
Also, if you've got leftover bread, reheat it gently.
Got a question about flavor pairs? Honestly, I cannot recommend hummus paired with roasted red peppers enough! Such a gourmet sandwich idea .
Wrapping it Up
So, whether you’re prepping for a picnic or just chasing down some healthy sandwich ideas, these gluten-free sandwiches are your new best friends.
Look into into creativity with fillings, get those presentation skills honed, and remember that with a little planning, you can make meal prep fun and delicious.
Go ahead, let the gluten-free lifestyle shine in your meals! you got this!
Delicious Gluten-Free Sandwiches You'll Love Card
⚖️ Ingredients:
- 2 cups gluten-free all-purpose flour (with xanthan gum)
- 1/2 cup warm water
- 1/4 cup olive oil
- 1 tablespoon sugar
- 2 teaspoons instant yeast
- 1 teaspoon salt
- 2 large eggs
- 1 cup hummus (store-bought or homemade)
- 1 large cucumber, sliced
- 1 ripe avocado, sliced
- 1 large tomato, sliced
- 1 cup spinach leaves or arugula
- Salt and pepper, to taste
🥄 Instructions:
- Step 1: In a mixing bowl, combine warm water, sugar, and instant yeast; let sit until frothy.
- Step 2: In a separate bowl, whisk together gluten-free flour, salt, and olive oil.
- Step 3: Add eggs and the yeast mixture to the dry ingredients; mix until a dough forms.
- Step 4: Transfer dough to a greased bowl, cover, and let rise for about 30 minutes.
- Step 5: Preheat oven to 375°F (190°C).
- Step 6: Pour the risen dough into a baking sheet lined with parchment paper; shape into a loaf.
- Step 7: Bake for about 25-30 minutes or until golden brown and it sounds hollow when tapped.
- Step 8: While the bread is baking, prepare your fillings by slicing cucumber, avocado, and tomato finely.
- Step 9: Season the vegetables with salt and pepper.
- Step 10: Once the bread has cooled, slice it into even pieces.
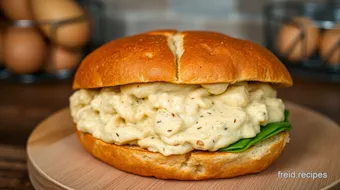
- Step 11: Spread hummus on one slice, layer with spinach, followed by cucumber, avocado, and tomato slices.
- Step 12: Top with another slice of bread and cut in half.
Previous Recipe: How to Make Zesty Chickpea Hummus Bites: Easy Dairy Free Appetizers
Next Recipe: How to Make Amazing Gluten Free Ice Cream Cones at Home