Easy Sugar Free Strawberry Syrup
Craving a guilt-free treat? Discover my easy sugar free strawberry syrup recipe—perfect on pancakes, yogurt, or as a refreshing drink. Let's make it together!

- Sweet Beginnings: The Joy of Sugar-Free Strawberry Syrup
- A Sweet Treat’s Journey Through Time
- Why You Need This Syrup in Your Life
- Essential Ingredients Guide to Make the Best Sugar-Free Strawberry Syrup
- Mastering the Art of Professional Cooking: Essential Methods for Success
- Pro Tips & Secrets for Sugar-Free Strawberry Syrup
- Perfect Presentation
- Storage & Make-Ahead Tips
- Creative Variations
- Complete Nutrition Guide
- Expert FAQ Solutions
- A Sweet Conclusion
- Recipe Card
Sweet Beginnings: The Joy of Sugar-Free Strawberry Syrup
Oh my gosh, have you ever tried to enjoy a sweet treat, only to be hit with an overwhelming guilt trip because of all that sugar? i’ve so been there, sitting in front of a stack of pancakes drizzled in syrup, feeling like i've just let my diet go down the drain.
That’s why i was beyond excited when i whipped up some sugar-free strawberry syrup ! the vibrant flavor of fresh strawberries without the guilty aftermath—count me in!
Let’s just say this recipe has a backstory. growing up, my grandma used to make homemade strawberry syrup for our pancakes every sunday morning.
Of course, these were loaded with sugar, so when i learned that i could swap it out with a sugar-free version, i felt like a superhero standing up to the sugar villains we face every day.
Now, i keep that glorious strawberry flavor in my life without having to feel like i’m diving into a sugar coma.
A Sweet Treat’s Journey Through Time
The historical roots of strawberry syrup date back to farm-fresh kitchens where strawberries were simply too delicious to ignore. as the years rolled on, syrup became a staple in many households, especially during summer when strawberries flood the market.
Nowadays, with the wave of healthy eating hitting the nation, this sugar-free syrup has gained newfound popularity. it’s not just about tossing fruits into a blender, my friends; it’s about crafting a homemade syrup that fits right in with modern health trends.
The beauty of this syrup is that it’s incredibly easy to make ! we’re talking about a total time commitment of about 30 minutes .
Seriously, all you need is some fresh strawberries and a few ingredients. and the difficulty level? easy-peasy ! you'll be doing this like a pro in no time.
Plus, it costs just a few bucks to whip out a batch that yields about 8 servings .
Why You Need This Syrup in Your Life
Let’s chat benefits! first off, this syrup is a game-changer for your health. by swapping out sugar for erythritol —a popular low-calorie sweetener—you get a healthy strawberry syrup that won't spike your blood sugar levels.
It’s rich in vitamins from fresh strawberries, so you can spoil your taste buds while still being kind to your body.
Honestly, who wouldn’t want to drizzle that over desserts and feel like they’re winning at life?
This isn’t just syrup; it’s a versatile champion of flavors! use it as a delicious topping for pancakes or waffles, or dribble it over greek yogurt for a healthy breakfast option.
It’s perfect for summer parties as a refreshing drink mixer, or even as a diner's secret weapon for that fancy touch.
Just the thought of it makes me want to dive into my kitchen right now!
Compared to regular sugary syrups, this option stands tall—no added sugars means you can enjoy your guilt-free dessert dreams without reservation.
If you're aiming to cut sugar from your diet, this syrup checks all the boxes. it’s the best way to indulge in those sweet strawberry vibes without the crazy caloric intake.
Now, how about we get into the juicy details? You know, it's time to gather our must-have ingredients for this delightful journey of homemade syrup recipes ! Are you ready to create that sweet sensation in your kitchen? Let’s jump right in!
Essential Ingredients Guide to Make the Best Sugar-Free Strawberry Syrup
Okay, my fellow food lovers! let’s dive into the fabulous world of sugar-free syrup recipes . if you’ve ever had a hankering for something sweet without piling on the sugar, you’re in for a treat—especially with this delicious sugar-free strawberry syrup .
And guess what? it’s not just good; it’s genuinely good for you !
Premium Core Components
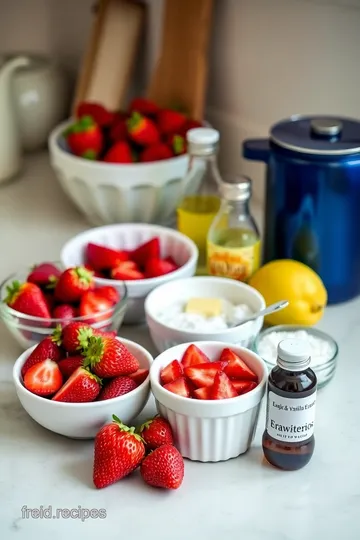
When you're cooking up this syrup, here are the premium core components you’ll absolutely need:
- Fresh Strawberries : About 2 cups (or 300 grams) hulled and sliced. Ripe ones are key! You want sweetness without any added nonsense.
- Water : 1 cup (that's 240 ml for you metric folks).
- Lemon Juice : Just 1 tablespoon (15 ml) brings out that berry flavor beautifully.
- Erythritol : 2 tablespoons (30 grams) brings the sweetness without the calories—seriously, it’s a game changer!
- Vanilla Extract : 1 teaspoon (5 ml) if you want to take it next level. Trust me, just do this.
Now, for quality indicators , look for bright red strawberries. If you can smell their wonderful aroma, you know you're on the right track!
As for storage , let that syrup cool down then pop it in an airtight jar in the fridge. It'll last about a week but, honestly, it won’t last that long in my house because it’s just that good!
Signature Seasoning Blend
This syrup doesn’t need much seasoning. It’s like the Beyoncé of syrups—confident all on its own! But to really lift your guilt-free desserts , think about mixing things up:
- Pairing Herbs : Ever try mint or basil with strawberries? It’s pretty darn refreshing! Just toss in a few leaves while it’s cooking.
- Got a flair for the adventurous? A splash of balsamic vinegar brings a delightful twist to those fresh flavors.
Smart Substitutions
For my friends with dietary restrictions or just folks looking to mix it up, there are plenty of smart substitutions in the world of syrup-making:
- Erythritol isn’t your only option. Try stevia or monk fruit sweetener for a different flavor profile.
- You can even throw in some other berries! Use half strawberries and half blueberries or raspberries for a colorful twist!
Kitchen Equipment Essentials
You don’t need a ton of fancy gear to whip up this syrup. Here are the must-have tools :
- Medium Saucepan : For cooking. Any pot that holds water will do just fine.
- Wooden Spoon or Spatula : For stirring. Seriously, a wooden spoon adds a little something special, don’t you think?
- Blender : Optional, but if you’re into a smooth syrup like I am, go for it!
- Fine Mesh Strainer : If you want a clear syrup, go ahead and strain away!
Catching the Flavor
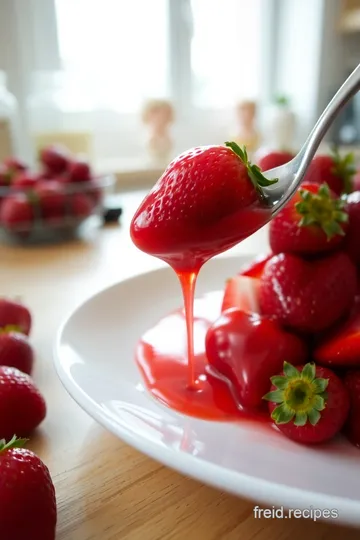
When you make this syrup, it’s not just about taste. it’s about creating an experience. i remember the first time i drizzled sugar-free strawberry syrup on pancakes.
It was like sunshine on my soul! you wanna share that joy by making homemade syrup recipes your go-to!
This syrup shines on pancakes like a star in a summer sky . it's an absolute must for that low-sugar breakfast.
Or, mix it in some sparkling water for a refreshing summer drink!
Now that we’ve covered the essentials, you're ready for the actual cooking part. Next up, let’s dive into the step-by-step instructions for how to bring this sweet goodness into your life!
Mastering the Art of Professional Cooking: Essential Methods for Success
Oh man, if you’ve ever stepped into a kitchen ready to whip up something delicious, you know it can be a bit hectic! learning the professional cooking method is like getting a backstage pass to a cooking concert—it’s where the magic happens.
So, grab your apron and let’s dive into some essential preparation steps that’ll have you feeling like a top chef in no time!
Essential Preparation Steps
Mise en place —sounds fancy, right? but it’s simply about getting all your ingredients ready before cooking. measure out your stuff, chop your veggies, and have everything within arm's reach.
You’ll work faster and feel less stressed! trust me, when you're working with a sticky syrup or an intricate sauce, having everything prepped is like having a cheat sheet.
Time management is key too! if you're making that sugar-free strawberry syrup , you don’t want to find yourself scrambling to chop strawberries while your pot's boiling over.
Start with tasks that take the most time, like simmering your syrup. then move on to quick stuff, like prepping toppings or garnishes.
Speaking of organization, use containers for smaller ingredients—think tiny bowls for spices and sweeteners. it keeps your counter tidy and helps you spot what you need quickly.
And don’t forget safety! always keep a towel handy for spills and work in a well-lit area to avoid mishaps.
The last thing you want is a little cut ruining your day.
Step-by-Step Process
Alright, let’s break it down. When you’re ready to cook, follow these clear, numbered steps like a pro:
-
Prepare the Strawberries : Start by hulling and slicing those beautiful red gems.
-
Combine It All : In your medium saucepan, toss your sliced strawberries, water, lemon juice, and 2 tablespoons of erythritol . It's a natural sweetener that adds sweetness without the sugar.
-
Let it simmer : bring this vibrant mix to a boil over medium heat ( around 350° f ). once it’s bubbling, drop the heat to low and let it simmer for 15- 20 minutes .
During this time, keep an eye on it and stir occasionally.
-
Blending Magic (Optional) : If you like it smooth, go ahead and blend it! Use a blender or an immersion blender for quick work.
-
Strain (Optional) : Pour it through a fine mesh strainer if you’re going for a clear syrup. No one wants chunks when they’re pouring it over pancakes!
-
Add Flair with Vanilla : Stir in 1 teaspoon of vanilla extract if you want to take it up a notch!
-
Cool Down : Let your syrup cool completely. Then pop it into a mason jar. It'll last in the fridge for about a week—if it lasts that long!
Expert Techniques
Now that you’ve got the basics down, let’s talk expert techniques. to get that fantastic taste, always taste as you go! is it sweet enough? add a tad more erythritol if you need it.
Remember, it’s about having a balance of flavors.
Don’t stress if your sauce seems too thin—you can always simmer it longer to thicken it up. keep checking the consistency! visual cues are super important here; it should coat the back of a spoon when it’s ready.
If you add herbs for a kick, like fresh mint, don’t throw them in at the beginning. add them towards the end to preserve their vibrant flavor profile.
And if something goes wrong? don’t panic! every mistake is a step toward mastery.
Success Strategies
Now, let’s avoid some common pitfalls. one mistake is using not-so-ripe strawberries. trust me, they’re gonna make your syrup taste off.
Always pick the ripest, brightest fruit you can find for that healthy strawberry syrup .
To ensure quality, check the sweetness after blending. you can always tweak it! and hey, if you’re prepping ahead, you can make this syrup and store it for later—perfect for when you need something sweet to drizzle over fresh fruit or yogurt for a quick guilt-free dessert .
This syrup is versatile, so experiment! use it as a topping for waffles or even in refreshing summer drinks. play around with it, and you'll find all sorts of strawberry topping ideas as you get more comfortable in the kitchen.
Alright, i hope you’re feeling inspired and ready to dive into cooking! let’s wrap things up with some additional information on variations and ways to enjoy this syrup.
It’s a sweet ride for sure!
Pro Tips & Secrets for Sugar-Free Strawberry Syrup
Oh my gosh, let me share some of my favorite tips to level up your sugar-free strawberry syrup game! first off, when you're picking your strawberries, go for the ripe ones .
You want strawberries that are bursting with flavor! trust me, they will make your syrup sing.
Time-Saving Techniques
Got a busy schedule? no sweat! you can totally prep your ingredients ahead of time. slice those strawberries and store 'em in the fridge.
When you're ready, just toss them in the pot with the other ingredients. quick and easy, just like your favorite sugar-free syrup recipes .
Flavor Enhancement Tips
Want to jazz up your syrup? consider adding a splash of vanilla extract or a dash of lemon zest! it lifts the strawberry flavor and makes it pop.
Erythritol is a great sweetener, but feel free to experiment with other natural sweetener alternatives until you find your personal sweet spot.
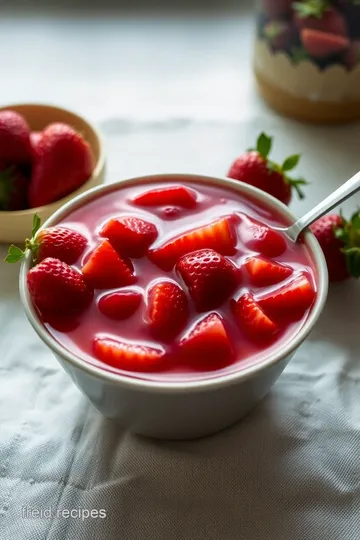
Perfect Presentation
Now that you’ve got your syrup ready, let’s talk presentation ! When you plate your pancakes or yogurt, drizzle your syrup elegantly for that Instagram-worthy look.
Garnish Ideas
Fresh mint leaves work wonders! they not only add a splash of color but also a refreshing aroma that screams, "i care about my dessert!" and don’t overlook the power of color combinations .
A dollop of whipped cream or a sprinkle of almonds can elevate your creation to the next stratosphere.
Visual Appeal Tips
Use a clear jar to store your syrup, so the vibrant red color shows through. You want guests to see how fresh and delicious that syrup is before they even taste it!
Storage & Make-Ahead Tips
What’s great about this sugar-free strawberry syrup? It’s super easy to store! Once it’s cooled, pop it in a clean jar and keep it in the fridge.
Preservation Methods
It should last about two weeks in the fridge. Just remember to label it; you don't want it to become a mystery syrup!
Reheating Instructions
When you're ready to use it again, just warm it up in the microwave or on the stovetop for a few seconds. It’s also delicious served cold over desserts!
Creative Variations
Get creative! This isn’t just a one-trick pony.
Flavor Adaptations
Feeling adventurous? Try adding herbs like basil or mint to create a unique twist. You’ll end up with a delicious herbed strawberry syrup that pairs beautifully with savory dishes.
Dietary Modifications
For a low-calorie strawberry sauce , consider swapping out some strawberries for blueberries. Yes, it works!
Seasonal Twists
Don’t be shy about seasonal flavors. In fall, add a pinch of cinnamon for that cozy vibe. In summer, churn out batches of this syrup to splash over some grilled peaches.
Complete Nutrition Guide
Want to know what’s in your syrup? Let’s break it down!
Health Benefits
Strawberries are loaded with vitamin c and antioxidants. by using erythritol, you’re keeping calories down and dodging that sugar crash.
Plus, it’s a great option for folks keeping an eye on their sugar intake.
Portion Guidance
You might be surprised by how little you need to satisfy that sweet tooth. Just two tablespoons of syrup is often enough.
Expert FAQ Solutions
Stuck on something? Here are some common questions.
What if my syrup is too thin? No problem! Simply simmer it longer to thicken.
Can I change the sweetener? Absolutely! Just remember to adjust according to the brand's power—you might need less or more.
What are the best ways to use strawberry syrup? oh my sweet friends, the possibilities are endless! drizzle it over pancakes, mix it into yogurt, or even use it in a refreshing summer drink.
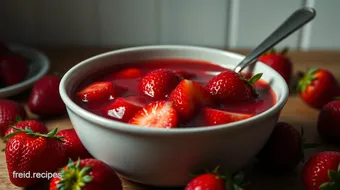
A Sweet Conclusion
In the end, this sugar-free strawberry syrup isn’t just about avoiding sugar; it’s about enjoying the goodness of fresh fruit without the guilt.
Perfect for pancakes, yogurt, or even as an upgrade for your favorite guilt-free desserts. so, gather your strawberries and whip up this easy strawberry syrup! who knew being healthy could taste this good? your taste buds—and your waistline—will thank you later.
Easy Sugar Free Strawberry Syrup Card
⚖️ Ingredients:
- 2 cups fresh strawberries, hulled and sliced (300g)
- 1 cup water (240ml)
- 1 tablespoon lemon juice (15ml)
- 2 tablespoons erythritol or preferred sugar substitute (30g)
- 1 teaspoon vanilla extract (5ml) (optional)
🥄 Instructions:
- Step 1: Hull and slice 2 cups of fresh strawberries.
- Step 2: In a medium saucepan, add sliced strawberries, water, lemon juice, and erythritol.
- Step 3: Bring to a boil over medium heat, stirring occasionally.
- Step 4: Once boiling, reduce heat to low and simmer for 15-20 minutes until strawberries have softened.
- Step 5: For a smoother syrup, use a blender or immersion blender to puree the mixture until desired consistency is reached.
- Step 6: If you prefer a clear syrup, pour the mixture through a fine mesh strainer to remove solids.
- Step 7: Stir in the vanilla extract if using, and mix thoroughly.
- Step 8: Allow syrup to cool, then transfer to a clean jar or bottle. Store in the refrigerator.
Previous Recipe: My Grandmother's Flan: Is Flan Gluten Free? A Creamy Delight!
Next Recipe: How to Make Silky Dairy-Free Honey Butter: My Favorite Recipe