Gluten-Free Goldfish Crackers
Craving snacks? Try these gluten free goldfish crackers—easy, cheesy, and perfect for kids! Explore tips for delicious gluten-free baking. Discover how to make them today!

- Have You Ever Wondered Why Homemade Snacks Taste So Much Better?
- A Taste of History: The Story Behind Goldfish Crackers
- Gluten-Free Goldfish Crackers: A Culinary Journey
- Why This Recipe Will Amaze You
- Health and Nutrition Highlights
- Recipe at a Glance
- Master Ingredient List
- Kitchen Equipment Essentials
- Expert Cooking Method for Gluten-Free Goldfish Crackers
- Master Chef's Advice
- Perfect Presentation
- Storage and Make-Ahead
- Creative Variations
- Complete Nutrition Guide
- Expert FAQ Solutions
- Recipe Card
Have You Ever Wondered Why Homemade Snacks Taste So Much Better?
Picture this: you’re sitting on the couch, tired from a long day, and you reach for a bag of store-bought snacks.
But instead of that satisfying crunch and cheesy goodness, you find yourself disappointed. have you ever thought, “why do they always taste so different from the real thing?” it’s kind of a mystery, isn’t it? today, i want to share with you a recipe that not only answers that question but also elevates your snacking game: gluten-free goldfish crackers .
These little bites of joy take just about 20 minutes to whip up and are super easy to make, even if you’re a novice in the kitchen.
A Taste of History: The Story Behind Goldfish Crackers
Let’s take a little detour into the world of snacks, shall we? goldfish crackers have been a classic go-to for many folks, originating in switzerland way back in 1962.
Originally called “goldfisch” , these cheesy treats became wildly popular in the u.s. in the late 20th century. with a crunchy exterior and a delightful cheese flavor, they captured the hearts (and stomachs) of kids and adults alike.
But as with many beloved recipes, it wasn't long before dietary restrictions like gluten intolerance emerged, prompting creative cooks like us to reinvent the classic snack.
So what makes this gluten-free recipe special? well, not only do they stay true to that familiar flavor and delightful crunch, but they also cater to those of us who might have to steer clear of gluten.
The unique selling point here is that these homemade goldfish crackers are free of preservatives and filled with wholesome ingredients.
Plus, they’re super versatile. you can easily swap ingredients to make them dairy-free or even vegan!
Gluten-Free Goldfish Crackers: A Culinary Journey
Embracing the rich culinary heritage of comfort foods, these crackers are a modern spin on a cherished classic. they don’t just pop in and out of the oven; they carry a delightful backstory, connecting us to childhood memories of lunchboxes filled with cheesy, crunchy treats.
Today, gluten-free options are all the rage, and these crackers are the kind of savory snack recipe everyone can enjoy at parties or while binge-watching the latest series on netflix.
Seriously, they’re a crowd-pleaser!
Why This Recipe Will Amaze You
Let's get to the good stuff: why will these gluten-free goldfish crackers amaze you? for starters, the unique flavor combinations —from sharp cheddar to a hint of garlic and paprika—create a schmelty explosion of happiness in your mouth.
Plus, the methods i’m about to share are foolproof; even if you’ve never tackled baking before, you can definitely pull it off.
I promise you’ll feel like a rock star when they come out perfectly golden and crispy!
And then there’s the time-saving aspect. we live busy lives, right? you can whip these up in a flash, which is especially handy when you have unexpected guests (or kids!) dropping by.
Just imagine serving these delightful bites next to some dips, and watch everyone go absolutely nuts over them.
Health and Nutrition Highlights
While indulging in snacking, it’s nice to have options that benefit our health. these gluten-free goldfish crackers boast several key nutritional benefits; they’re packed with protein thanks to the cheese, and when you use a quality gluten-free flour, you often get extra nutrients too.
Plus, you can control the ingredients! want to make them dairy-free? go for dairy-free cheese options that fit your kind of lifestyle.
Snack with a purpose!
Recipe at a Glance
Here’s a quick overview before we head to the ingredients part. this recipe requires about 20 minutes of preparation and 15 minutes of cooking , making it roughly 35 minutes total —perfect for a quick afternoon snack or a last-minute appetizer.
It’s definitely an easy recipe that serves about 4 people —or one really hungry snack ensoiast!
Next up, let’s dive into the ingredients. I can nearly smell that cheesy goodness just thinking about it! Grab your apron and let’s get started on making these delicious gluten-free goldfish crackers!
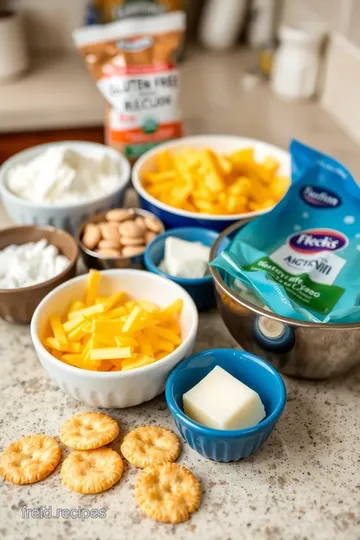
Master Ingredient List
Premium Core Ingredients
-
1 cup gluten-free all-purpose flour : look for blends that include xanthan gum for the best texture. brands like bob's red mill or king arthur flour are super reliable.
When you pick it up, feel free to squeeze the bag a little; a good quality flour will feel soft and silky.
-
1/2 cup cheddar cheese, shredded : go for the good stuff here! i always opt for sharp cheddar because it brings a deeper flavor to the party.
If you're keeping things dairy-free, try a nice vegan cheese shreds – they’re surprisingly tasty these days!
-
1/4 cup unsalted butter or coconut oil : unsalted butter is my go-to. remember to let it sit out a bit to soften; hard butter makes mixing a bit of a chore.
If you’re swapping in coconut oil, gently melt it just enough to make it easy to blend into the flour.
-
1/4 teaspoon garlic powder : This adds a lovely warmth. Check out the freshness of your spices; they should smell pungent and flavorful.
-
1/4 teaspoon onion powder : Like garlic, it should have a robust aroma. Keep it stored in a cool, dark spot to maintain its flavor.
-
1/2 teaspoon salt : The secret to elevating any dish! Sea salt or Himalayan pink salt works wonders here.
-
1/4 teaspoon paprika (optional) : This step is just for fun – a sprinkle of smoked paprika can really amp the flavor up.
-
3-4 tablespoons cold water : Make sure this is genuinely cold; it helps keep the texture light and airy.
Signature Seasoning Blend
For these gluten-free goldfish crackers, you want flavors that pop! i love adding a blend of spices. apart from the core ingredients, consider mixing in some dried herbs like thyme or rosemary for a comforting taste that reminds me of cozy evenings at home.
Need some extra kick? a pinch of cayenne could do the trick!
Smart Substitutions
So maybe you’re out of cheddar or just want something different? use gouda, parmesan , or dive into the world of vegan cheese options .
For those avoiding gluten altogether, rice or almond flour can be good swaps, albeit with a different texture.
If you're scratching your head about emergency replacements , unsweetened applesauce can sometimes replace butter in a pinch when you're looking for a low-fat option.
And hey, lemon zest adds a seasonal twist as well!
Kitchen Equipment Essentials
You don’t need to go all out on fancy gadgets, but some essentials make life a lot easier:
-
Mixing bowls : A couple of these in different sizes work wonders. I have one that’s practically a family heirloom at this point!
-
A good rolling pin : okay, you can use a wine bottle too; i won’t tell. but if you love baking as much as i do, investing in a rolling pin makes rolling out dough a breeze.
-
Goldfish cookie cutter : If you’ve got kids in the house, this will bring a smile to their faces. If you don’t have one, any small cookie cutter will do. Get creative!
-
Parchment paper : Trust me, this saves a ton of cleanup time and helps in evenly baking your crackers.
Pro Ingredient Tips
Here are a few nuggets of wisdom I’ve picked up along the way:
-
Selection secrets : Always check the packaging on your gluten-free flour. Make sure it's fresh and hasn’t been sitting on the shelf for ages; older flour can lead to dense crackers.
-
Quality markers : Fresh cheese will always taste better. If you can, buy cheese from the deli counter; you won't regret it.
-
Storage solutions : once you've made your goldfish, store them in an airtight container. they can get a bit soft, but popping them in the oven for a few minutes gets them crispy again.
-
Money-saving tips : A simple way to save is to buy larger quantities of flour or cheese when they’re on sale. It’s amazing how much that adds up over time!
After gathering these hearty ingredients and handy tips, let’s not waste any more time. it’s time to roll up those sleeves and dive into the enjoyable, almost meditative process of creating your own gluten-free goldfish crackers .
When you take that first crunchy bite, your taste buds will throw a little celebration! hang tight for the next section, where i’ll walk you through the steps to turn these ingredients into a delicious, crispy snack.
Expert Cooking Method for Gluten-Free Goldfish Crackers
Ah, the joy of making your own snacks! i remember the first time i attempted to whip up a batch of gluten-free goldfish crackers.
I was knee-deep in culinary chaos, but oh, was it worth it! not only did they turn out delicious, but the satisfaction of biting into a crisp, cheesy cracker you made all by yourself? there is nothing quite like it.
Essential Preparation Steps
To kick things off, let’s talk mise en place . this fancy french term just means having all your ingredients prepped and ready to go.
Here’s a quick rundown on what you’ll need:
- Ingredients : Have your gluten-free flour, cheddar, butter, and spices in easy reach.
- Tools : Grab a mixing bowl, whisk, parchment paper, a rolling pin, and, if you like, a goldfish cookie cutter.
Now, about those prep techniques—measure your cheese and flour accurately! I once dumped a whole cup of cheese instead of half and ended up with a gooey mess. Don’t be me!
Time management is also crucial here. The prep will take you about 20 minutes, and the baking will be another 15. Set your timer for success.
For organization tips , I recommend cleaning as you go. It keeps your workspace uncluttered, and you won’t feel like a tornado hit your kitchen post-baking.
Professional Cooking Method
Alright, let’s dive into the nitty-gritty step-by-step process.
-
Preheat Your Oven : Set it to 350°F (175°C) while you gather your ingredients. This little step keeps the baking process smooth.
-
Mix the Dry Ingredients : Toss your flour, garlic powder, onion powder, salt, and paprika into a bowl. Whisk it until everything’s combined—think of it like a mini workout!
-
Add Cheese and Butter : Drop that shredded cheese and softened butter into the mix. Now for the fun part! Use a fork to blend everything until you see coarse crumbs—kind of like sand on a beach, but tastier!
-
Incorporate water : add cold water one tablespoon at a time. give it a good mix with each addition. you want a nice soft dough—in other words, not too sticky but not too dry either.
-
Knead the Dough : Gently knead your dough on a floured surface. It should be smooth after a few kneads, like the folks at the local bakery make it look so easy.
-
Roll out the dough : roll the dough between two sheets of parchment paper until it’s about 1/8 inch thick.
This will prevent it from sticking like a stubborn burr on your favorite shirt.
-
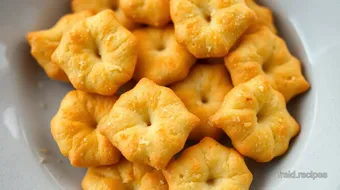
Cut Out Shapes : With your trusty goldfish cutter, go to town, cutting out shapes. Lay these little guys on your lined baking sheet.
-
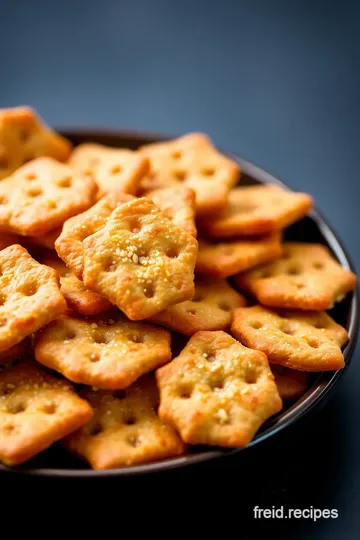
Bake : Stick the sheet in the preheated oven. Be vigilant here; check at the 10-minute mark for golden-brown perfection.
-
Cool Down : Let them rest on the baking sheet for a few minutes and then transfer them to a wire rack. The smell will be divine, I promise!
-
Serve : Enjoy your homemade gluten-free goldfish either as is or alongside your favorite dip—hello, guacamole!
Expert Techniques
Now, let’s sharpen our skills with some expert advice.
Ensure your cheese is shredded finely—this helps it melt into the dough beautifully. precision in your measurements really matters; otherwise, you might end up with overly chewy crackers.
I once got distracted and let my salt fly with heavy hands. let’s just say i didn’t let anyone else try those!
Success Strategies
If things go awry, remember these troubleshooting tips:
- Cracker too soft? Give them a few extra minutes in the oven.
- Too dry? Be gentle when rolling out the dough; excess flour can toughen it up.
For quality assurance, keep an eye out for that beautiful golden brown color and crispness. Feel free to taste a piece before serving them up.
Creating these gluten-free goldfish crackers can feel a bit daunting at first, but trust me—you’ll be churning them out like a pro in no time.
And don’t forget, you can customize them endlessly! think spices like cayenne for a kick or different types of cheese.
By the way, in the next bit, we’ll get into some exciting variations and creative serving suggestions!

Master Chef's Advice
Professional Insights
When it comes to whipping up homemade snacks, i’ve learned that quality ingredients make all the difference. when i first embarked on my gluten-free journey, i didn’t realize just how essential it was to find good gluten-free all-purpose flour .
Brands vary, and some perform better than others. in my experience, the ones with xanthan gum integrated are super handy—they really help create that desirable texture in baked goods.
Expert Techniques
I’ll be honest; i had my fair share of epic fails in the kitchen. one time, i forgot to chill the dough for these gluten-free goldfish , and they ended up spreading everywhere! the expert tip? don’t skip the chilling part.
Trust me, letting that dough rest allows the flavors to develop beautifully and keeps those cracker shapes intact during baking.
Kitchen Wisdom
It’s all about trusting your instincts. if the dough feels too sticky, sprinkle in a bit more flour. on the flip side, if it’s too dry, a splash more water does the trick.
Just remember, every kitchen is a bit different!
Success Guarantees
Have a backup plan! when i make these goldfish crackers, i always prep a double batch. they tend to disappear fast—trust me.
You can freeze them too. they stay crisp and make for an instant treat for unexpected snackers.
Perfect Presentation
Plating Techniques
I like to get a bit fancy when it comes to presentation. an old-school english cheddar and some lovely homemade crackers (like these) taste even better when served on a rustic wooden board.
Arrange them in a fan or neat pyramid shape.
Garnish Ideas
A sprinkle of fresh chopped herbs, like parsley or dill, elevates the visual appeal significantly. or, if you've got some extra cheese lying around, shave some on top for that gooey goodness that looks oh-so-inviting.
Serving Suggestions
Pair them with a crunchy veggie platter or creamy dips. Hummus, salsa, or even a spicy guacamole bring them to life. Who doesn’t love a good snack platter!?
Visual Appeal Tips
Keep your color palette in mind. Think vibrant veggies next to those lovely golden gluten-free goldfish . You can also throw in some beautiful fruits for a refreshing contrast.
Storage and Make-Ahead
Storage Guidelines
These crackers stay fresh for a while—just pop them in an airtight container. They can endure for about a week. Although, let’s be real, they usually don’t stick around that long!
Preservation Methods
If you think they’ll last beyond that, consider freezing them. Lay them flat in single layers in a freezer-safe bag. They thaw beautifully and retain that delicious crunch.
Reheating Instructions
For a quick revival, toss them in a 350°F (175°C) oven for just a few minutes. This gets them crispy again if they’ve softened a bit.
Freshness Tips
To keep that homemade feel , avoid letting them sit out in open air too long. The moment they start to get soft, it's time to seal them up.
Creative Variations
Flavor Adaptations
One of the best parts about this recipe is the ability to play with flavors! Add some smoked paprika for that extra zing, or toss in some garlic powder.
Dietary Modifications
If you’re avoiding dairy, remember that there are plenty of dairy-free cheese options available now. They can add that cheesy flavor without the lactose.
Seasonal Twists
Depending on the season, like autumn, try incorporating pumpkin spice for a festive touch. You’d be surprised how versatile these crackers can be!
Regional Variations
Love a kick? Why not infuse some classic British flavors , like a touch of curry powder? Trust me, it’s a fun twist that surprises friends at parties.
Complete Nutrition Guide
Detailed Breakdown
When measuring out these homemade goodies, keep in mind they’re packed with flavor without the preservatives you often find in store-bought snacks.
Health Benefits
These healthy homemade crackers are made with real ingredients. They’re low in sugar and can be adjusted to be vegan and gluten-free with simple ingredient swaps.
Dietary Information
You could enjoy these guilt-free knowing exactly what’s in them! With gluten-free recipes like this, snacking can actually be a part of healthy eating.
Portion Guidance
Moderation is key, but let’s face it; one cup per serving of these crackers often leads to “just a few more” piling up. That’s the magic of these snacks!
Expert FAQ Solutions
Common Concerns
One question I always get is, “Can I really make gluten-free crackers at home?” The answer is a resounding yes!
Expert Answers
Another issue I faced was getting them to hold their shape. Remember, chilling the dough REALLY helps!
Troubleshooting Guide
If they start to crumble too much, maybe you didn’t knead it long enough. Just give it a bit more love.
Success Tips
Trust your instincts! Cooking is all about getting those feel-good vibes in the kitchen.
In conclusion, making gluten-free goldfish crackers is a delightful and rewarding experience. with a bit of creativity and some personal tweaks, you can create snacks that not only taste fantastic but are also packed with goodness.
So, gather your ingredients, roll up those sleeves, and dive into this fun cooking adventure!
Gluten-Free Goldfish Crackers Card
⚖️ Ingredients:
- 1 cup gluten-free all-purpose flour (preferably one with xanthan gum)
- 1/2 cup cheddar cheese, shredded (or dairy-free cheese for a vegan option)
- 1/4 cup unsalted butter, softened (or coconut oil for a dairy-free option)
- 1/4 teaspoon garlic powder
- 1/4 teaspoon onion powder
- 1/2 teaspoon salt
- 1/4 teaspoon paprika (optional, for a smoky flavor)
- 3-4 tablespoons cold water
🥄 Instructions:
- Step 1: Preheat your oven to 350°F (175°C) and line a baking sheet with parchment paper.
- Step 2: In a medium bowl, combine the gluten-free flour, garlic powder, onion powder, salt, and paprika. Whisk together until evenly mixed.
- Step 3: Add the shredded cheddar cheese and softened butter into the bowl with the dry ingredients. Use a fork or pastry cutter to blend until the mixture resembles coarse crumbs.
- Step 4: Gradually add cold water, one tablespoon at a time, mixing after each addition until the dough comes together.
- Step 5: Transfer the dough to a lightly floured surface. Knead it gently a few times until smooth. Form into a disk and wrap in plastic wrap. Let it rest in the refrigerator for about 10 minutes.
- Step 6: Unwrap the dough and place it between two sheets of parchment paper. Roll it out to a thickness of about 1/8 inch (3 mm).
- Step 7: Using a goldfish-shaped cookie cutter or any small cookie cutter, cut out shapes from the rolled-out dough. Place the cutouts on the prepared baking sheet.
- Step 8: Bake the crackers in the preheated oven for 12-15 minutes, or until golden brown and crisp. Check around the 10-minute mark to ensure they do not burn.
- Step 9: Remove from the oven and allow to cool on the baking sheet for a few minutes, then transfer them to a wire rack to cool completely.
- Step 10: Serve them as a snack plain or with a side of dip like hummus or guacamole.
Previous Recipe: Peanut Free Apple Cider Vinegar: 7 Simple Dressing Recipes
Next Recipe: Sugar Free Caramel Syrup: 5 Delicious Ways to Indulge Guilt-Free