Guilt-Free Berry Jelly: Your New Favorite Sugar Free Delight!
Looking for a delicious jelly sugar free recipe? This homemade berry jelly captures summer's essence without the guilt—perfect for all your breakfast delights!

Sweet Memories, No Sugar Needed!
Have you ever been at a picnic, sun shining, laughter filling the air, and a friend whipped out a jar of homemade jelly sugar free ? that moment becomes a burst of colors with light and joy, right? i still remember that sweltering summer day when i first tasted a sugar-free berry jelly slathered on a crunchy piece of toast.
Oh my gosh! it felt like summer in my mouth! that sweet moment of freedom from sugar made me curious about how to recreate that at home.
If you’ve ever wondered how to make a delicious jelly without sugar while keeping it flavorful, this recipe is for you!
A Glimpse into Jelly’s Journey
The history of jelly goes way back—like really back. ancient folks had their ways of preserving fruit; they knew how to keep their harvests fresh.
Fast forward to today, and we’re still using those age-old techniques, but with a twist! now, it's all about avoiding sugar and finding that sweet spot with alternative sweeteners in jelly .
In modern times, many folks, whether they're watching their sugar intake for health reasons or just trying to eat cleaner, are on the lookout for yummy options like sugar-free jam .
This recipe for sugar-free berry jelly combines vibrant flavors of fresh or frozen berries with just enough sweetness, making sure everyone can enjoy it without that sugar overload.
Easy Peasy, Lemon Squeezy
Making this jelly takes about 30 minutes tops , with prepping and cooking combined. sounds quick, right? this recipe is a breeze! if you can boil water, you can make this delicious jelly.
Plus, you’ll yield about two cups —that’s around eight servings! perfect for breakfast or snacks.
Wait, what’s the cost? let’s just say it’s light on the wallet too! most ingredients are pantry staples! you can grab your fresh berries, a sugar substitute, and some gelatin and boom—you’re ready to go.
Why You’ll Love This Sugar-Free Jelly
Now let’s talk benefits.
First off, this jelly is guilt-free! packed with natural berry goodness, it’s a healthy snack idea that’s low in calories and refined sugars.
Think of it as a delicious edible hug from fruit! plus, you can control the sweetness by adjusting the sugar substitute to your liking.
Oh, and did i mention the versatility? this jelly isn’t just for toast! spread it on your morning english muffin, layer it in parfaits, or serve it as a berry topping for desserts.
Seriously, it’s fantastic.
It’s easy to whip up for any occasion, especially for those special gatherings or bbqs where everyone’s on the lookout for something unique.
And hey, you’ll be rocking that no sugar jelly recipe like a pro!
Final Thoughts Before We look into In
So, are you ready to get started? you’re in for a treat that checks all the boxes—deliciousness, health, and fun! here, i’ll lay out the ingredients you’ll need.
It’s time to gather your berries and let’s make this homemade jelly without sugar !
Trust me, once you taste this delightful low-calorie jelly , you might just find yourself falling head over heels. and the best part? you can store it in the fridge for up to two weeks.
Get ready to amaze your taste buds! let’s dive into those juicy ingredients!
Essential Ingredients Guide
Making jam or jelly at home is such a satisfying experience. and if you’re trying to keep things low-sugar or sugar-free, you’re in for a treat! making sugar-free jelly is easier than you think.
Let’s dive into the essentials you'll need to know about when whipping up your homemade jelly without sugar.
Premium Core Components
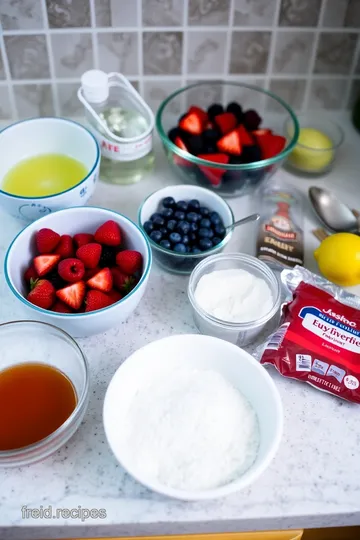
First off, let’s talk about the ingredients . Here’s what you need to have ready for your sugar-free jam.
Ingredients:
- 2 cups (300 g) of fresh or frozen mixed berries (think strawberries, blueberries, raspberries)
- 1/4 cup (60 ml) of water
- 2 tablespoons (30 ml) of lemon juice (fresh is best!)
- 1/4 cup (50 g) of granulated sugar substitute (erythritol or stevia)
- 1 tablespoon (10 g) of cornstarch (for thickening, if you like)
- 1 teaspoon (5 g) of unsweetened gelatin (or a vegan alternative)
Quality Indicators: Look for ripe berries—trust me, they make the best healthy berry preserves . If you're using frozen berries, make sure they aren't loaded down with added sugars or syrups.
Storage guidelines: after you make your jelly, pour it into clean glass jars. you can store it in the fridge for up to two weeks.
Use airtight containers to keep it fresh, but i’d bet it won’t last that long, especially if you’re putting it on everything!
Signature Seasoning Blend
Okay, now for the fun part—flavor! You can have a signature seasoning blend when making your jelly. Some key pairings include:
- Fresh herbs like mint or basil for a light twist.
- You could even throw in some vanilla extract for a sweet touch.
- Love spice? Don't shy away from adding a hint of cinnamon.
Regional variations can get interesting, too. say you want a tropical vibe—go for mixed berries combined with coconut flavors or lime zest.
You can easily craft unique jelly flavors that’ll wow your taste buds!
Smart Substitutions
Now onto smart substitutions . Life happens, and sometimes you might not have everything you need. Here’s what you can do:
- Don’t have the exact berries? Use whatever is fresh or frozen on hand.
- Out of cornstarch? Arrowroot is a great alternative for jelly thickness !
- Need something vegan? Use a plant-based gelatin instead.
You’ll find that many fruits make an excellent low-calorie jelly . think peaches or cherries—the options are endless! if you're keeping an eye on sugar, experimenting with alternative sweeteners can be a game-changer.
Kitchen Equipment Essentials
Now let's chat tools. You don't need a fancy kitchen for this! Here are a few must-have tools :
- Medium saucepan : It’s where the magic happens.
- A spoon or spatula : For stirring that berry goodness.
- Measuring cups and spoons : Precision is your friend!
- Fine mesh strainer : Optional, if you prefer a smooth jelly (and who doesn’t?).
When it comes to storage solutions, i recommend using glass jars! they’re not just pretty but keep your jelly nice and fresh.
You’ll thank me later when you’re spreading that homemade jelly without sugar all over your morning toast.
Bringing It All Together
Ready to get cooking? this jelly recipe is not only easy, but it’s also a fantastic way to enjoy sugar-free dessert recipes .
Plus, you can impress your friends with your homemade jelly skills. just think about how cool it’ll be to serve your own berry topping on their breakfast or dessert!
Next up, i’ll break down how to actually make this magic happen. trust me, i can’t wait to share my step-by-step instructions! your adventures in making berry jelly with stevia are about to take flight.
Let’s dive right in and scale through the process together!
Mastering the Art of Sugar-Free Jelly: The Professional Method
So, you’ve made it here, and you’re ready to dive into the wonderful world of sugar-free jelly . whether you're trying to whip up a delicious homemade jelly to liven up your breakfast or looking for healthy snacks ideas , this guide is tailor-made just for you! i can’t tell you how many times i’ve battled with store-bought options loaded with sugar.
Can we just ditch that stuff already? let's get into how to make a delightful sugar-free berry jelly without breaking a sweat!
Essential Preparation Steps
Before we start jelly-making, let’s chat mise en place—fancy French for “everything in its place.” We clear our space, have our ingredients prepped, and that helps everything go smoothly.
Time Management Tips: Always read through the entire recipe first. It saves you from last-minute chaos when you’re midway through cooking.
Organization Strategies: Keep your tools nearby—think measuring cups, a saucepan, and a spatula. Trust me, you don’t want to be fishing for your equipment in the middle of it all.
Safety Considerations: Remember, when you’re boiling those fruits, things can get a little hot under the collar. Watch out for splashes and always have a towel handy for quick cleanups.
Step-by-Step Process
-
Prepare the berries: start with 2 cups of berries of your choice—be it strawberries, blueberries, or raspberries. rinse, chop, and set them aside.
Fresh is great, but frozen works like a charm too !
-
Combine Ingredients: Toss your berries into a medium saucepan, along with 1/4 cup water, 2 tablespoons lemon juice, and your chosen sweetener, about 1/4 cup .
-
Cook the Mixture: Crank that heat up to medium and bring it to a boil. Stir occasionally, and crush those berries to release their juices.
-
Simmer: Reduce the heat and let it simmer for approximately 10 minutes . This is where the magic happens—watch for it to thicken up a tad.
-
Strain (Optional): If you prefer a smooth texture, strain it through a fine mesh strainer. No pressure, just personal preference here.
-
Thicken (If Needed): If you like a thicker jelly, dissolve 1 tablespoon of cornstarch in some cold water and whisk it in. Cook a little longer until it gets that desired consistency.
-
Add Gelatin: Remove from the heat and mix in 1 teaspoon of gelatin until it's fully dissolved.
-
Cool: Pour your jelly into clean jars and let it cool at room temperature before sticking it in the fridge to set. This will take a few hours, just practice patience!
Expert Techniques
Professional Methods: The key here is that patience is a virtue . Don’t rush the simmering stage. That’s where all the heavenly flavors meld together.
Quality Checkpoints: Always taste for sweetness before you finish up. Depending on your berries, you might want to adjust that sweetener.
Troubleshooting Tips: If your jelly doesn’t seem to thicken, don’t panic! Just add a bit more dissolved cornstarch and let it simmer longer.
Success Strategies
Common Mistakes to Avoid: Remember, overcooking can lead to a rubbery texture, especially with gelatin.
Quality Assurance Tips: For the best results, use ripe, in-season berries. They pack more flavor.
Perfect Results Guide: If you’re looking for something unique, why not infuse your jelly with mint or basil? Trust your palate; it can take you places .
Make-Ahead Options: You can definitely make this jelly in advance! It keeps well in the refrigerator for up to two weeks, ideal for those quick breakfast fixings like whole-grain toast .
So there you have it! You’re ready to impress friends and family with your homemade, sugar-free berry preserves . Just remember: this isn't just jelly; this is a guilt-free indulgence!
Looking for more ways to use your newfound jelly-making skills? Stay tuned for the next section: Additional Information .

Bring On the Flavor: All About Jelly Sugar-Free
Oh my gosh! everyone loves a good jelly , right? but, let’s talk a little about how we can whip up that delight but keep it guilt-free.
I’m talking about our star today: jelly sugar-free . imagine a bright, fruity spread that tastes just like summer—yeah, it’s totally possible! let’s dive into the nitty-gritty of making it, presenting it, and even storing it so you can enjoy every last drop.
Pro Tips & Secrets
You know what? i've learned a few secrets in my jelly-making journey. first up, always choose ripe berries. sweet, juicy berries are the real mvps in crafting a delightful sugar-free jam .
Also, don’t be shy about tweaking your sweetener. stevia and erythritol are awesome alternative sweeteners for jelly . just start with a little and add more if needed.
Trust your taste buds!
Quick tip : if you want a thicker consistency, mix a bit of cornstarch with cold water before adding it into your mixture.
No more soupy jelly! you want it spreadable , not drinkable—unless you’re into that, of course!
Perfect Presentation
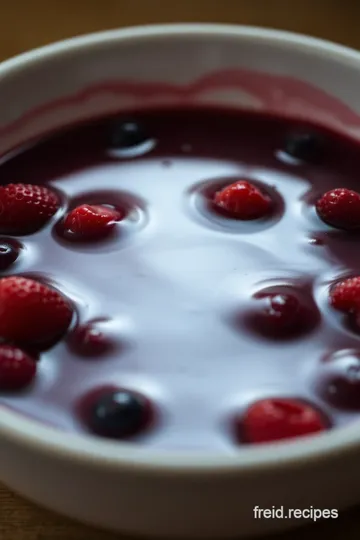
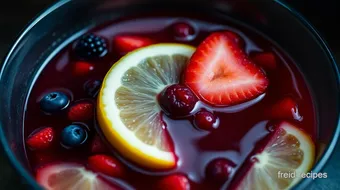
Now, let’s talk presentation . after all, we eat with our eyes first! when you’re ready to serve your no sugar jelly recipe , think about how to plate it.
A simple jar filled with that vibrant jelly looks fab by itself, but you can take it up a notch.
Consider garnishing with fresh mint leaves or a sprinkle of nuts for that extra pizzazz.
For color combinations, think about how beautiful layers look. A bright red strawberry jelly topped with a purple blueberry mix brings such a fun pop! Plus, color makes your homemade jelly feel even more special—perfect for gifting too!
Storage & Make-Ahead
Alright, so you’ve made that delicious jelly and now what? let’s make sure it stays fresh! store it in airtight jars in the fridge, and you’re good for about two weeks.
(but let’s be real—it probably won’t last that long in my house!)
I love making this ahead of time for brunch or when i’ve got friends coming over. just follow the reheating instructions : if it gets a little stiff in the fridge, you can warm it gently in the microwave or stove.
Trust me, your friends will think you’re a genius when they spread it on their toast!
Creative Variations
Why stop at just basic jelly? get creative! want to infuse some unique jelly flavors? pair your berries with a splash of lemon or a hint of lavender.
Or go seasonal—think pumpkin spice jelly for fall! you can even shake things up with a vegan jelly recipe if you swap gelatin for agar-agar.
And don’t forget about healthy berry preserves ; they’re not just for toast! use them as toppings on yogurt or mix into homemade ice cream.
Complete Nutrition Guide
Now, let’s chat about the health benefits. this jelly is a win-win—low-calorie and packed with vitamins! just 25 calories per serving and zero sugar? yes, please! it’s perfect if you’re scouting for sugar-free dessert recipes .
Remember to watch your portions! A little jelly goes a long way in brightening up your breakfast or snacks. And if you’re on the low-sugar train, this recipe fits right into your healthy snacks ideas !
Expert FAQ Solutions
Feeling a bit lost? don’t sweat it! common questions about jelly often arise. like, “what if it isn’t setting?” first, check your gelatin—did you use enough? or maybe your berries were too water-heavy.
A quick fix? just add more gelatin to your mix while cooking. trust me, i’ve been there!
Wrapping Things Up
So, there you have it! this jelly sugar-free recipe is not just an indulgence; it’s a celebration of flavors and a chance to enjoy something sweet without the guilt.
Whether you’re dolloping it on pancakes or using it in creative ways, rest assured, your homemade preserves will impress.
Get in the kitchen, have fun, and experiment! I’d love to hear how your jelly turns out and any tweaks you might come up with. Happy jelly-making, my friends!
Guilt-Free Berry Jelly: Your New Favorite Sugar Free Delight! Card
⚖️ Ingredients:
- 2 cups fresh or frozen mixed berries (strawberries, blueberries, raspberries)
- 1/4 cup water
- 2 tablespoons lemon juice (freshly squeezed)
- 1/4 cup granulated sugar substitute (e.g., erythritol or stevia, adjust to taste)
- 1 tablespoon cornstarch (optional, for thicker jelly)
- 1 teaspoon unsweetened gelatin (or vegan-friendly alternative)
🥄 Instructions:
- Step 1: Prepare the Berries: If using fresh berries, rinse and chop larger berries. If using frozen berries, allow them to thaw slightly.
- Step 2: Combine Ingredients: In a medium saucepan, combine berries, water, lemon juice, and sugar substitute.
- Step 3: Cook the Mixture: Heat over medium flame until boiling. Stir occasionally, breaking down the berries with a spoon.
- Step 4: Simmer: Reduce heat and let simmer for about 10 minutes or until the mixture thickens a bit.
- Step 5: Strain (optional): If desired, strain the mixture through a fine mesh strainer for a smoother jelly.
- Step 6: Thicken (if needed): Return to heat; if a thicker jelly is desired, dissolve cornstarch in a little cold water and add to the mixture. Cook until thickened.
- Step 7: Add Gelatin: Remove from heat and mix in gelatin until completely dissolved.
- Step 8: Cool: Pour the jelly into clean jars and allow to cool to room temperature before refrigerating, where it will set fully.
Previous Recipe: Ultimate Crispy Chickpea Bites: 5 Delicious Gluten Free and Dairy Free Appetizers!
Next Recipe: How to Make Delicious Coconut-Crumbed Fish with Sweet Chilli Slaw