Heavenly Gluten Free Slider Buns
Craving perfect gluten free slider buns? These soft, fluffy bites are my go-to for BBQs, and they'll charm any crowd. Let's dive into this irresistible recipe!

- Recipe Overview
- Key Benefits
- Transition to Ingredients Section
- Essential Ingredients Guide for Your Kitchen
- Mastering Professional Cooking: Your Guide to Perfect Gluten-Free Slider Buns
- Pro Tips & Secrets for Gluten-Free Slider Buns
- Perfect Presentation
- Storage & Make-Ahead
- Creative Variations
- Complete Nutrition Guide
- Expert FAQ Solutions
- Conclusion: Happy Baking!
- Recipe Card
Let me tell you a little story. a few summers ago, we were throwing a backyard barbecue bash. burgers, hot dogs, and all the sides were on our menu, and i was super excited.
But then it hit me – my friend sarah was coming over, and she couldn’t eat gluten. oh my gosh, i thought, i can't have her feeling left out while we're all digging into juicy sliders! that's when i decided to whip up some gluten-free slider buns .
Trust me, they were a total game changer. soft and fluffy, these little gems held everything together like they were born for it.
Fast forward to today, and i can honestly say these gluten-free buns are a hit at every gathering. friends, family, and even the gluten lovers in my life rave about them.
If you're searching for a way to keep everyone happy while respecting dietary needs at your next shindig, you've landed on the right recipe.
Recipe Overview
Let’s take a quick tour back in time. slider buns date back to the 1920s – created to hold those delightful little burgers that many of us crave.
Fast forward, and here we are in the age of gluten-free everything. these mini burger buns are taking the spotlight and are loved for good reason! they're not just for barbecue season either.
You can whip these up for a casual brunch or even a cozy family dinner.
Now, about the logistics, you’ll need around 20 minutes for active prep and about 30 minutes of rest time. at the end of your hour, you’ll have 12 buns ready to fill with all your favorite toppings.
Not too shabby, right? the cost? really affordable. you might have most of the ingredients at home already!
Key Benefits
So how about the perks? first off, these healthy slider buns pack a punch. they’re not just gluten-free; they're also loaded with nutritious options.
With almond flour in the mix, you get a bit of healthy fat and protein. perfect for those who want to enjoy tasty treats without guilt.
These buns are perfect for any occasion, whether it's a casual family bbq, a potluck, or even a game day gathering.
You'll impress everyone with your gluten-free party foods ! plus, they’re super versatile. you can dress them up with flavorful slider toppings or keep it simple with just some butter and salt.
Now, speaking of versatility, if you’re looking for something vegan or dairy-free, you can easily substitute with non-dairy milk and oils.
These are truly the most adaptable sliders you’ll find. and hey, they’re even low-carb slider buns if you’re watching your carbs!
Transition to Ingredients Section
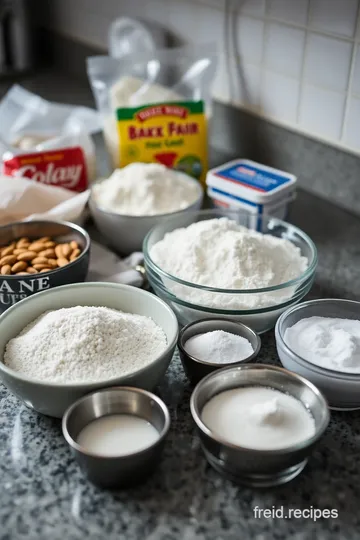
Alright, enough chit-chat. let’s get to the good stuff – the ingredients! you’re gonna need some gluten-free all-purpose flour, almond flour, and a few basics like sugar and baking powder.
I swear, once you dive into making your own homemade gluten-free bread , you’ll wonder why you ever settled for store-bought options.
Seriously, though, nothing beats that warm, soft, and fluffy feeling of a freshly baked bun. ready? let’s gather those ingredients and start baking!
Essential Ingredients Guide for Your Kitchen
Hey there, foodies! let’s dive into the world of must-have ingredients and how they can transform your cooking game. this isn't just another boring rundown of pantry staples.
Oh no! this is your all-access pass to a culinary adventure. you ready? buckle up!
Premium Core Components
Every great dish starts with quality ingredients. Let's break down what you need:
-
Measuring up: you wanna make sure you’ve got the right amounts. for example, if you're using 2 cups (240g) of gluten-free all-purpose flour, make sure to measure accurately.
Use a kitchen scale if you can; it’s a game changer!
-
Quality indicators: look for freshness. for flours, check the expiration date. the fresher, the better! a bag that’s been hanging around will throw off your bake, especially when making homemade gluten-free bread .
-
Storage Secrets: Keep your ingredients in airtight containers, especially those gluten-free goodies. And here’s a nifty tip: store your flour in the fridge to extend its shelf life!
-
Freshness Check: When picking herbs, sniff them! If they don’t smell fragrant, they’re probably past their prime. And for spices? A little taste test will do. They should have a kick!
Signature Seasoning Blend
Here’s where the magic happens! Your slider sandwich recipe is only as good as the flavors you infuse it with.
-
Spice It Up: Start with some classic combos. Think garlic powder, onion powder, and smoked paprika for that extra smokiness.
-
Herb Pairings: Fresh herbs are everything! Basil and parsley do wonders in summer dishes, while rosemary and thyme are perfect for cozy, winter meals.
-
Flavor Enhancers: Look out for aromatics ! Fresh garlic, shallots, and ginger can elevate your dish to gourmet status. Seriously, just a bit can change the whole vibe.
-
Regional Flavors: Want something zesty? Go for Tex-Mex seasonings for your next barbecue. Or, for Italian flair, grab some oregano and a sprinkle of Parmesan. The options are endless!
Smart Substitutions
In the world of cooking, sometimes you’re out of an ingredient, and that’s okay! Here’s how to pivot:
-
Common Alternatives: No olive oil? Use avocado oil instead! Low on flour? Try a mix of coconut or chickpea flour.
-
Dietary Modifications: Going vegan? Swap eggs with flaxseed meal or applesauce for binding.
-
Emergency Replacements: Ran out of sugar? Honey or maple syrup can work in a pinch, just adjust your liquid ingredients!
-
Seasonal Options: Make the most of what’s fresh. In summer, load up on fresh tomatoes and basil. Winter? Root veggies are your besties.
Kitchen Equipment Essentials
You don’t need a fancy kitchen, but having the right tools helps a ton! Here’s your checklist:
-
Must-Have Tools: A good whisk, mixing bowls, and a reliable baking sheet are starting points. And don’t skimp on measuring cups!
-
Alternative Equipment: If you don't have a stand mixer, no biggie! A good old hand mixer or even mixing by hand can do the trick!
-
Prep Tips: Chop veggies in advance for quick meal prep. Trust me, scenario: "Oh, snap! Guests in 30 minutes?" You’ll thank me later!
-
Smart Storage: Keep your kitchen organized and tidy. Designate a spice area and label everything. You’ll save time searching!
So, you've got your ingredients and tools ready. things are looking good! next up, let’s get into those delicious gluten-free slider buns .
These little beauties are perfect for mini burgers, veggie sandwiches, and a feast of flavorful toppings. just you wait, this heavenly recipe is about to make your gatherings unforgettable!
Mastering Professional Cooking: Your Guide to Perfect Gluten-Free Slider Buns
So, you want to dive into the world of professional cooking? oh my gosh, you’re in for a treat! one of the best things about whipping up something scrumptious is creating those delicious gluten-free slider buns that can elevate any gathering.
Whether you're hosting a summer barbecue or just craving a cozy night indoor with your favorite sliders , i've got you covered.
Let's jump into some essential preparation steps and the nitty-gritty of making those heavenly gluten-free buns !
Essential Preparation Steps
Mise en place is your best friend. this fancy term just means getting everything ready before you start cooking. trust me, having your ingredients prepped and measured out will help you flow through the process smoothly.
A chaotic kitchen can lead to missed ingredients or wrong measurements, and quite frankly, nobody wants that.
Next up— time management . cooking is like a dance. you gotta know your moves! start your prep by organizing your ingredients, and timing your actions.
For example, while your slider buns are resting, you can whip up some fun toppings or sides!
Organization strategies are crucial. Keep your workspace tidy. I can’t stress enough—clean as you go! No one likes fighting their way through a circled mess of flour and can't-kinda-remember-where-that-garlic-is moments.
And, of course, safety is key. make sure you’re using those kitchen tools smartly. when handling hot pans, remember to grab that pot holder.
Trust me, i have made mistakes on this front that i’d rather forget!
Step-by-Step Process
Let’s get down to business. Here’s how you can master your slider sandwich recipe in easy steps:
- Preheat your oven to 375° F ( 190° C) . Grab a baking sheet and line it with parchment paper.
- Mix the dry ingredients . In a large bowl, whisk together 2 cups of gluten-free all-purpose flour , ¼ cup almond flour , 1/4 cup sugar , 1 tablespoon baking powder , and 1 teaspoon salt . Getting that blend right is crucial —this is where the magic starts!
- In a separate bowl, whisk your wet ingredients : ½ cup warm water , ¼ cup milk , 1 large egg , and ¼ cup olive oil . Make it smooth, and you’re ready to combine!
- Gradually combine both mixtures until a soft dough forms. If you have a stand mixer, now's the time to take it for a spin. (And a bit of flour dust).
- Let that dough rest for 15- 30 minutes . Seriously, don’t rush this part! This hydration period can turn your buns from okay to wow .
- Shape your dough into 12 equal portions and place them nicely on that baking sheet. Don’t forget to give them some space; they need a lil room to puff up!
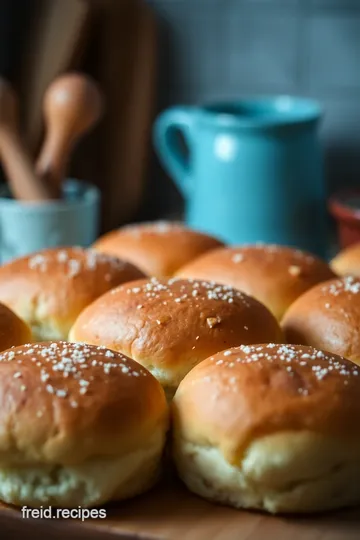
- If you wanna go all out, brush the tops with melted butter and sprinkle on some sesame seeds for that extra flair.
- Bake those beauties for 12- 15 minutes or until they are golden brown and a toothpick comes out clean— that’s your cue that they’re done .
- Finally, allow them to cool on a wire rack before diving in.
Expert Techniques
I’ve learned a ton over the years, and here are some expert tips to bump your gluten-free baking game to the next level:
- Flour blend matters! Make sure your gluten-free flour has xanthan gum, or toss in a bit yourself.
- If your dough feels a little too sticky, don't panic! Just sprinkle a touch more flour until it feels right.
- Always keep an eye on the temperature control while baking. Ovens can be tricky, and a few degrees too hot can change the outcome big time.
Now, common errors? Avoid skipping the resting time . That’s where the dough transforms!
Success Strategies
We all tend to make mistakes in the kitchen, so here’s a list of some of the most common missteps to dodge:
- Don’t be stingy with measuring. Accurate portions are your best buds in this game.
- Ensure similar sizes for your buns. Uniform buns = even baking.
- Wanna make your day easier? Make-ahead options are golden. These gluten-free rolls can be frozen before baking and reheated later!
These tips will have your gluten-free slider buns on the top of everyone’s favorite foods list! perfect for summer gatherings or cozy dinners with the family, these bites are bound to make you feel like a culinary rockstar.
Additional Information
As we wrap things up, remember that cooking is all about experimenting and having fun! success in the kitchen comes with practice, and there are endless opportunities to explore new flavors and textures.
Look for other gluten-free alternatives out there, and don’t hesitate to share your experiences. happy cooking!
Pro Tips & Secrets for Gluten-Free Slider Buns
Alright, friends, let’s get down to the nitty-gritty of making gluten-free slider buns that are soft, fluffy, and downright irresistible! Here are my tried-and-true tips to elevate your baking game.
Chef's personal insights: trust me, starting with a good gluten-free flour blend makes all the difference. i recommend a mix with xanthan gum for that chewy texture we all love.
If you skip this, your buns might turn out too crumbly.
Time-Saving Techniques: Got a busy schedule? Pre-measure your dry ingredients and store them in an airtight container. When the craving hits, you’ll just need to add your wet ingredients and bake!
Flavor enhancement tips: want to jazz up those buns? toss in some dried herbs or spices like garlic powder or onion powder.
It instantly adds a gourmet vibe. you can even sprinkle some sea salt on top before baking for that salty-sweet combo.
Presentation advice: it’s all about the look! brush your buns with a little melted butter (or coconut oil) straight out of the oven.
Not only does it taste delicious, but it also gives your mini burger buns a shiny finish that’s totally instagram-worthy.
Perfect Presentation
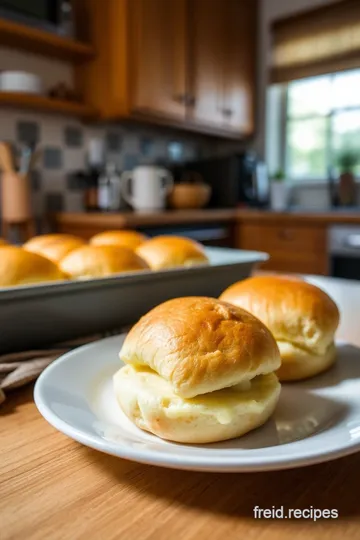
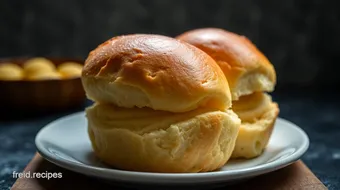
Now, let’s talk plating! Because no one wants their beautiful slider sandwich recipe to look like a hot mess when serving.
Plating Techniques: Stack those gluten-free slider buns on a wooden board surrounded by colorful toppings like lettuce, tomatoes, and pickles. Presentation matters, folks!
Garnish Ideas: Fresh herbs like cilantro or parsley can work wonders. Just a sprinkle on top elevates the whole dish.
Color Combinations: Think vibrant! Contrast the golden-brown buns with bright veggies. It’s all about making it pop on the plate.
Visual Appeal Tips: Pay attention to the height of your sliders. A tall, stacked slider always looks more appetizing. Layer a couple of patties with toppings.
Storage & Make-Ahead
You know what’s great about these buns? They’re super flexible with storage and prep.
Storage guidelines: after baking, let your buns cool on a wire rack. store them in an airtight container at room temp for a couple of days or in the fridge for about a week.
Preservation Methods: For long-term storage, pop those leftover buns in the freezer. Wrap each one tightly in plastic wrap and then aluminum foil for best results.
Reheating Instructions: When you’re ready to chow down, just pop them in the oven at 350° F ( 175° C) for about 5- 7 minutes. You’ll have warm, soft buns once again!
Freshness Duration: If you freeze them, they should last for about 3 months. Just remember to label and date!
Creative Variations
Get ready to unleash your creativity with these gluten-free alternatives.
Flavor Adaptations: Want a little something different? Add some cheese into the dough for a savory take. Or, switch things up by adding a dollop of pesto or BBQ sauce right into the mix!
Dietary Modifications: If you’re looking for dairy-free slider buns, just swap out the milk with almond or oat milk. Easy-peasy!
Seasonal Twists: How about a touch of pumpkin spice in the fall or a summery herb mix for outdoor grilling? Tailor your buns to the seasons!
Regional Variations: You could experiment with spices from different cuisines. Think taco seasoning for Mexican-inspired sliders!
Complete Nutrition Guide
Let’s break it down on the nutritional side, because we all want to know what’s in our favorite gluten-free party foods.
Detailed Breakdown: Each bun has roughly 120 calories, which is pretty decent for a slider! They pack a good amount of protein too with about 3g per bun.
Health Benefits: These buns are a healthier option if you're gluten-free. Plus, using almond flour adds extra protein and healthy fats. Win-win!
Dietary Considerations: If you’re keeping an eye on carbs, don’t fret! These are flexible, and already lower-carb than regular buns.
Portion Guidance: Stick to one bun for a snack or two for a meal. You know what they say, sharing is caring... unless it's the last one!
Expert FAQ Solutions
You might have a few burning questions, so let’s dive into some common ones I’ve encountered.
Common Questions: "Can I use a different flour?" Sure! Just make sure it's gluten-free and has a comparable texture.
Troubleshooting Guide: If your buns are crumbly, you may need more moisture. A splash of milk could do the trick.
Success Tips: Don’t rush the resting period! Those few minutes can help your buns rise and become fluffy.
Variations Explained: Want a more savory version? Add crumbled bacon bits into the dough, and thank me later!
Conclusion: Happy Baking!
So there you have it, a full-on guide to making the best gluten-free slider buns you've ever tasted! whether you're cooking for friends, family, or just yourself, these buns are bound to impress.
So roll up your sleeves and get baking! you’ll be the star of the next summer bbq or game day get-together with your fabulous food.
Remember, happy cooks make the best food! let’s get those mini burger buns baking!
Heavenly Gluten Free Slider Buns Card
⚖️ Ingredients:
- 2 cups (240g) gluten-free all-purpose flour (ensure a blend that contains xanthan gum)
- 1/4 cup (30g) almond flour
- 1/4 cup (50g) sugar
- 1 tablespoon (10g) baking powder
- 1 teaspoon (6g) salt
- 1/2 cup (120ml) warm water
- 1/4 cup (60ml) milk (dairy or non-dairy)
- 1 large egg
- 1/4 cup (60ml) olive oil or melted coconut oil
- 1 tablespoon (15ml) melted butter (or non-dairy alternative)
- Sesame seeds for garnish
🥄 Instructions:
- Step 1: Preheat oven to 375°F (190°C) and line a baking sheet with parchment paper.
- Step 2: In a large mixing bowl, whisk together gluten-free all-purpose flour, almond flour, sugar, baking powder, and salt until well combined.
- Step 3: In a separate bowl, whisk warm water, milk, egg, and olive oil until smooth.
- Step 4: Gradually add the wet ingredients to the dry mixture, mixing until a soft dough forms.
- Step 5: Allow the dough to rest for 15-30 minutes to hydrate the flours.
- Step 6: Divide the dough into 12 equal portions and shape each into a round bun.
- Step 7: Brush the tops with melted butter and sprinkle with sesame seeds for extra flavor.
- Step 8: Bake in the preheated oven for 12-15 minutes, or until golden brown.
- Step 9: Remove from the oven and allow to cool slightly on a wire rack before serving.
Previous Recipe: Ultimate Cheesy Gluten-Free Goldfish Crackers: A Homemade Delight!
Next Recipe: How to Make Gluten-Free Phyllo Dough: 5 Delicious Secrets Revealed