Joy the Baker Gluten-Free Fried Chicken
Discover how to make Joy the Baker gluten-free fried chicken with this easy recipe. Crispy, flavorful, and perfect for healthy dinners!

- Is the Perfect Fried Chicken Just a Myth?
- The Ultimate Guide to Mastering Joy the Baker's Gluten-Free Fried Chicken
- The Magic Behind This Recipe
- Health and Nutrition Highlights
- Recipe at a Glance
- Quality Ingredients Breakdown
- Kitchen Equipment Essentials
- Perfect Cooking Technique
- Expert Kitchen Wisdom
- Perfect Presentation
- Storage and Make-Ahead
- Creative Variations
- Seasonal twists are also fun! When fall rolls around, consider adding a hint of sage or even pumpkin spice to the breading. It sounds a bit wild, but give it a try, and you’ll understand!
- Complete Nutrition Guide
- Expert FAQ Solutions
- Recipe Card
Is the Perfect Fried Chicken Just a Myth?
Have you ever wondered if there’s a secret to achieving that golden, crispy fried chicken that makes your heart skip a beat? you know, the kind you find in those cozy southern diners where the sweet tea flows like a river and the plates are heaped high? well, let me tell you, it’s not a myth at all! in fact, it's not even that hard to master.
.. if you get a few things right. today, i'm excited to share with you my take on joy the baker’s gluten-free fried chicken .
It’s easy enough for a beginner, but it’s got that wow factor that will have your friends and family raving about it for days.
What sets this recipe apart? for starters, we're talking about juicy, flavorful chicken that’s perfectly marinated and coated in a crispy breading, all while being gluten-free.
The total preparation time is about 30 minutes, but trust me, you’ll want to marinate the chicken for a few hours (or overnight, if you can wait).
The skill level? i’d say it’s a solid medium, perfect for a home cook who’s ready to dive into some serious southern comfort food but isn't quite ready for a three-course dinner.
The Ultimate Guide to Mastering Joy the Baker's Gluten-Free Fried Chicken
Fried chicken has a rich culinary heritage, especially in the southern united states. it melds the traditions of various cultures, from the africans who brought us the basic techniques to the scottish who brought frying in fat to the american kitchen.
Every region has its own spin, whether it’s spicy cajun fried chicken or that classic buttermilk-battered goodness that warms your soul.
This recipe captures that essence with a gluten-free twist that keeps it accessible for everyone.
There’s something undeniably comforting about fried chicken, isn't there? it’s a dish that gathers people around, evokes joyful memories, and brings a part of southern culture right into your kitchen.
Even today, it’s wildly popular—especially among those looking for easy, quick dinner ideas. and let’s be frank: who doesn’t love to dive into a plate of crispy fried chicken after a long day?
The Magic Behind This Recipe
So, what’s the magic, you ask? it’s all in the flavor combos! the buttermilk marinade infuses the chicken with moisture and taste, while the gluten-free flour creates a crust that is crispy perfection.
Oh, and if you’re anything like me, you’ve probably faced the challenge of soggy crusts or overly greasy chicken. not anymore! this recipe includes foolproof techniques that ensure you’ll get that crunchy outside and juicy inside every time.
From double-dipping (seriously, try it! it works wonders) to mastering the right frying temperatures, i’ve tested and tweaked every aspect.
Not to mention, it’s totally manageable in one sitdown, which saves you from chaotic kitchen mayhem. and just before i forget—if you’re counting those precious minutes, i’ve got some time-saving tips for you too.
Health and Nutrition Highlights
Now, let’s chat about the health aspect. while fried chicken might not be the first thing that pops into your head when you think 'healthy,' this recipe has some nutritional benefits.
The chicken provides a great source of protein, and the inclusion of gluten-free flour makes it accessible for those with dietary considerations.
Plus, if you opt for a dairy-free buttermilk alternative, you’re keeping things light and inclusive.
Balanced nutrition doesn’t always mean compromising on taste. enjoying fried chicken in moderation, especially when made at home with good ingredients, can actually be part of a diverse and hearty diet.
Plus, with all the flavor packed in, you won't be left craving anything else.
Recipe at a Glance
- Total Preparation Time: 30 minutes (plus marinating time)
- Cooking Time: 30 minutes
- Serves: 4
- Difficulty Level: Medium
- Cost Efficiency: Reasonably priced for a satisfying meal
Ready to dive into the deliciousness? next up, we’ll discuss the actual ingredients you’ll need. from the buttermilk marinade to that all-important gluten-free flour, we’ll make sure you have everything on hand to create the best comfort food experience.
So, grab your apron and let’s get cooking!
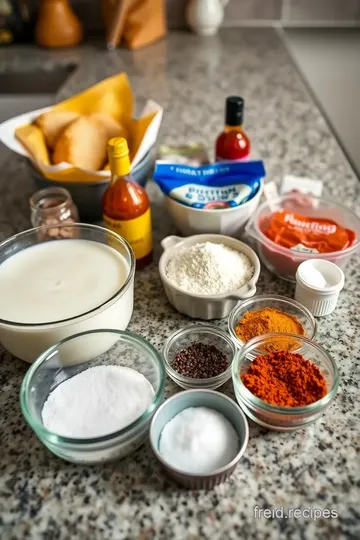
Quality Ingredients Breakdown
When it comes to cooking, quality ingredients make all the difference, especially for something as glorious as joy the baker's gluten-free fried chicken.
If you're gonna fry chicken, don't skimp on the good stuff! here's a detailed breakdown of premium ingredients to keep in mind.
Premium Core Ingredients
Chicken Marinade:
- Buttermilk: 4 cups. Look for the good stuff! Choose buttermilk that’s fresh and ideally from a local dairy if you can. It gives that tender, juicy goodness. If you're dairy-free, unsweetened coconut milk works just as well.
- Hot Sauce (Optional): 2 tablespoons. Which one? Go for your favorite—like Frank's RedHot for a classic kick. Remember to taste as you go. You want just enough heat to liven things up without overpowering.
- Spices: 2 teaspoons garlic powder, 1 teaspoon onion powder, 1 teaspoon paprika, ½ teaspoon black pepper, and ½ teaspoon salt. Opt for fresh spices where possible. They’re like the secret superheroes of flavor!
Breading:
- Gluten-Free All-Purpose Flour: 1 cup. Make sure it contains xanthan gum, which gives the breading nice elasticity. Brands like Bob's Red Mill have solid options. Store it in an airtight container to keep it fresh.
- Seasoning: Just like the marinade, I've got a blend here—1 teaspoon of paprika, garlic powder, onion powder, pepper, and salt with an added kick from ½ teaspoon cayenne pepper for spice lovers. Adjust the cayenne to your taste; a little can go a long way if you're feeling bold!
Chicken Parts:
- Chicken: The star of the show! I recommend going for bone-in, skin-on thighs or drumsticks. They stay juicier and can handle the frying heat better than boneless cuts. Quality-wise, look for organic or farm-raised if possible; you can really taste the difference.
For Frying:
- Vegetable Oil: Enough to submerge the chicken half-way for that deep frying magic. Canola or peanut oil is preferred here—feel free to stock up! Store it in a cool, dark place to keep it fresh for your next fry fest.
Signature Seasoning Blend
Now, this is where things get exciting! A pick-up of flavors that’ll make your taste buds do a happy dance.
-
Spice combinations: you can never go wrong with a little smoked paprika for that deep, warm flavor. i sometimes sneak in a pinch of cayenne for added heat.
Tossing in some black pepper or even an italian seasoning blend can elevate your crunch.
-
Herb Selections: If you have fresh thyme or parsley lying around, toss some into your marinade for a fresh twist. They add that lovely green aroma.
-
Flavor Enhancers: A drizzle of honey can add just a smidge of sweetness—great if you're balancing out the heat in the hot sauce. Just a thought!
-
Aromatic Additions: I always add a bay leaf or two into the marinade for a unique touch. It gives that southern vibe, taking it straight to Grandma’s kitchen.
Smart Substitutions
Life is unpredictable, and so are our ingredients sometimes. Here are some clever alternatives that save the day:
-
Alternative Options: If you don’t have buttermilk, mix regular milk with a splash of vinegar to mimic the tang. It'll work just fine.
-
Dietary Swaps: Going vegan? Substituting chicken with cauliflower or eggplant can still bring that “fry” element to your meal. Fun fact: you can even marinate cauliflower!
-
Emergency Replacements: Run out of gluten-free flour? Almond or coconut flour creates a lovely texture and flavor, though it might change the crispiness a bit.
-
Seasonal Variations: In the summer, toss in some fresh dill or parsley from your garden; it’ll make your dish sing with freshness.
Kitchen Equipment Essentials
Now, let’s chat about the tools you’ll need to make all this deliciousness happen!
-
Must-have tools: a large bowl for the marinade is essential. you'll want one big enough to dunk those chicken pieces! also, get a good pair of tongs—perfect for flipping and transferring food without making a mess.
-
Recommended appliances: a deep skillet or dutch oven is crucial for frying. for those who want to take it easy, an air fryer can yield crispy results with less oil.
I tried it once, and while it’s not the same, the results are pretty darn good!
-
Helpful gadgets: a thermometer is your best friend here—washed it out thoroughly to check both oil and chicken temperatures. also, a wire rack can help drain excess oil post-frying.
That crunch deserves to shine, not swim in grease!
-
Home Alternatives: Don’t have a wire rack? Use a simple plate lined with paper towels. Just be ready to change them out a couple of times; nobody likes soggy chicken!
Pro Ingredient Tips
Alright, here come my tried and true tips that’ll save you time, cash, and a few headaches in the kitchen:
-
Selection Secrets: Look for chicken that’s plump and fresh. If it’s got that eerie yellow tint, pass it by.
-
Quality Markers: Check for the “free-range” or “humanely raised” labels. Not just for ethics—these chickens often taste better!
-
Storage Solutions: Store your marinated chicken in glass containers. It’s not only stylish; it also helps you avoid any weird plastic chemicals mixing in with your food.
-
Money-saving tips: buy in bulk! if you spot a good sale on chicken, buy a few pounds and freeze what you don’t use.
It saves bucks and keeps those late-night fried chicken cravings at bay.
Now, with all this ingredient talk, you should be raring to dive into the actual cooking! That crisp crust, tender meat—get your apron on, because the instructions are coming up next!
Perfect Cooking Technique
Ah, fried chicken. it’s the dish that takes me back to family gatherings, where the smell of crispy, golden goodness fills the air.
Today, i’m thrilled to share my journey with you—let's get that kitchen rocking with joy the baker gluten-free fried chicken ! this recipe shines a spotlight on juicy, flavorful chicken that satisfies that comfort food craving, all while being gluten-free.
Essential Preparation Steps
Mise en Place:
This fancy french term just means “everything in its place”, and it’s the secret sauce to success in the kitchen.
Gather all your ingredients— buttermilk , spices , and the gluten-free flour —before diving in. trust me, doing this keeps things neat and your brain sane when things start sizzling.
Prep Techniques:
Start by making the chicken marinade . whisk together the buttermilk, hot sauce, and spices. this is a great moment to get creative; you can tweak the spices based on your mood.
Wanna make it spicy? toss in some extra cayenne pepper!
Time Management:
Plan some time for marination. seriously, the longer you marinate, the more tender and flavorful your chicken will be. two hours is good, but if you can spare the time, let it soak overnight.
While those chicken pieces are doing the tango in their buttermilk bath, you can prep the breading and set your station up for frying.
Organization Tips:
Keep your workspace tidy. have a plate for the dredged chicken, one for raw chicken, and another for the flour mixture.
This makes the process smoother and will help you avoid any cross-contamination mishaps. it’s just like setting up the way your grandmother would lay out her quilting fabrics—organized but with lots of love!
Professional Cooking Method
Step-by-Step Process:
Begin with marinating your chicken. remember my tip about covering it well? this is key, folks. then, move on to the breading station.
Grab a shallow dish and mix the gluten-free flour with lovely spices. dredge the chicken; don’t be shy, really press the flour onto the chicken.
It makes a massive difference in that crisp crust .
Temperature Control:
For frying, you want that oil to hang around 350°f (175°c). if you feel uncertain, just toss in a piece of bread—if it sizzles, you're good to go.
If it cooks too quickly, it means the oil is too hot. trust me, overcooked chicken is a heart-wrencher—we want it juicy inside, after all.
Timing Precision:
Fry your chicken for about 12-15 minutes until it’s golden brown. Flip halfway through for even cooking. Use a meat thermometer; it should read 165°F (75°C). That’s your golden indicator of doneness!
Success Indicators:
Golden-brown? Juicy interior? Your chicken should sing out with flavor and crunch! If it doesn’t feel like a festival in your mouth, it might be time to adjust those frying techniques.
Expert Techniques
Professional Methods:
Let’s chat double-dipping! i learned the hard way—coating the chicken twice gives it that extra crunch. dredge in flour, dip back into the buttermilk, then coat once more in flour.
It’s like giving your chicken a cozy winter coat, and who doesn’t love that?
Critical Steps:
Watch that oil temperature like a hawk! If it dips too low, you'll end up with greasy chicken instead of the crispy joy we’re after. Patience, my friend, means less oil absorption.
Precision Points:
Allow your chicken to drain on a wire rack. Seriously, let it perch there for a few minutes post-frying. It helps maintain that crispy texture we all adore.
Quality Checks:
Before you dive in, give it a real once-over: Are those crispy crusts glistening? Is the aroma making your heart race just a bit? If yes, you’re in for a treat!
Success Strategies
Troubleshooting Tips:
If you only have one fryer, fry in small batches. Overcrowding is a recipe for disaster—it’ll drop the oil temperature and ruin that crunch.
Quality Assurance:
Use fresh buttermilk and high-quality chicken. It’s amazing what a difference these little factors can make!
Perfect Results Guide:
For even more flavor, let those chicken pieces rest for a minute or two before serving. This helps redistribute the juices, keeping everything tender and tasty.
I hope this step-by-step chat helps you navigate the fried chicken path. Next, we’ll explore some gluten-free side dishes that’ll make your meal sing!

Expert Kitchen Wisdom
When it comes to perfecting your fried chicken, i can't stress enough the value of some expert kitchen wisdom. first off, marinating, my friends! using a buttermilk marinade isn't just a suggestion; it's the secret sauce (figuratively speaking) for juicy, tender chicken.
Even when i rushed it one time, thinking i could skip the marinating step, i immediately regretted it when biting into dry meat.
Patience is key! trust me —letting your chicken soak in that flavorful goodness for at least two hours will make a world of difference .
Another tip i picked up along the way is to play around with your frying techniques. the right temperature truly matters.
If the oil's too hot, you’ll end up with a burnt crust and raw chicken inside. if it’s not hot enough, you'll have greasy chicken that nobody wants to eat! aim for that sweet spot around 350°f.
It takes a little practice, but soon you’ll be frying like a pro.
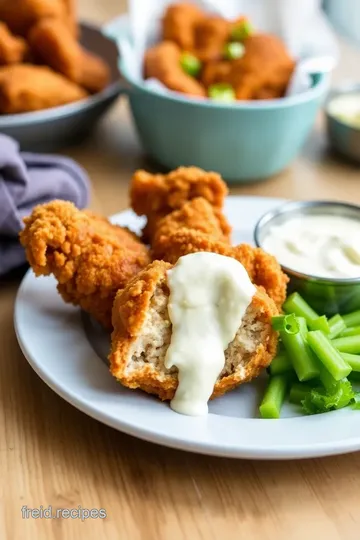
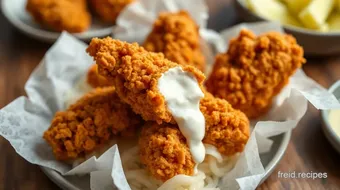
Perfect Presentation
Now, let's talk about making your meal look as good as it tastes; presentation can elevate your fried chicken game.
An easy and charming way to plate fried chicken is to arrange it on a wooden board or a large, rustic plate.
Toss in some crispy fried chicken right out of the pan and let the aroma work its magic.
Garnishing with fresh parsley or a sprinkle of smoked paprika adds color and flair. when i served a recent batch, i placed some lemon wedges on the side.
Not only did it brighten up the dish, but a squeeze of lemon really freshened every bite. and don’t forget, serving it alongside a vibrant slaw makes it a feast for the eyes!
Storage and Make-Ahead
Sometimes, life gets busy, and that’s a-okay. you can store any leftover chicken in a sealed container in the fridge for up to three days.
To keep it crispy, i recommend reheating it in the oven at 375°f instead of the microwave. it keeps that crunch we all love!
Thinking ahead? you can marinate the chicken the night before, which will not only save you time but help those flavors seep in for the ultimate comfort food experience.
Just don’t forget to remove it from the fridge about 20 minutes before frying to bring it to room temperature.
That little step does wonders!
Creative Variations
Oh, the delicious possibilities! if you're feeling adventurous, why not shake things up with some flavor adaptations? i’ve enjoyed taking this gluten-free fried chicken into southern territories with a cajun twist .
Just add cajun spices to your flour mix, and trust me, your taste buds will dance!
Got some dietary modifications to consider? No problem. If gluten isn’t your friend, using gluten-free flour is a no-brainer! Sometimes, I’ve even mixed in some cornstarch for a lighter touch.
Seasonal twists are also fun! When fall rolls around, consider adding a hint of sage or even pumpkin spice to the breading. It sounds a bit wild, but give it a try, and you’ll understand!
Complete Nutrition Guide
We can’t talk about comfort food without considering what’s in it, right? with my version of gluten-free fried chicken , each serving packs around 480 calories, with a decent 32 grams of protein.
If you're keeping an eye on portions, just carve it into good-sized pieces and pair it with a fresh side salad to boost those nutrients.
The health benefits of choosing chicken are numerous—it's rich in lean protein, which is essential for building and repairing muscles.
And when using a homemade chicken marinade , you control your ingredients, steering clear of the preservative-laden products often found in store-bought options.
Expert FAQ Solutions
Sometimes, even the best of us get tripped up in the kitchen. one of the most common concerns i hear is about oil splattering during frying.
If you’ve ever tried frying and ended up with burns and a mess, you’re not alone! a good tip is shaking off excess flour and lowering the chicken gently into the oil.
This minimizes the splatter and keeps your kitchen cleaner.
Oh! and don’t forget to keep an eye out for that perfect golden-brown color! i’ll admit, in my zealous frying days, i've gone a tad overboard and ended up with something resembling a darkened castle turret .
Not delicious at all.
There's something incredibly satisfying about whipping up a batch of joy the baker gluten-free fried chicken . not only does it tickle your taste buds, but it also feels like a warm hug from the inside out.
With some kitchen wisdom, stunning presentation, sensible storage tips, and a dash of creativity, you’ll navigate the frying world like a seasoned chef.
When it all comes together, i promise you’ll find this recipe not just delicious, but comforting in ways recipes often can’t define.
So, roll up your sleeves and dive into a wonderful chicken adventure!
Joy the Baker Gluten-Free Fried Chicken Card
⚖️ Ingredients:
- 4 cups buttermilk (or dairy-free alternative)
- 2 tablespoons hot sauce (optional)
- 2 teaspoons garlic powder
- 1 teaspoon onion powder
- 1 teaspoon paprika
- ½ teaspoon black pepper
- ½ teaspoon salt
- 1 cup gluten-free all-purpose flour (ensure it contains xanthan gum)
- 1 teaspoon paprika
- 1 teaspoon garlic powder
- 1 teaspoon onion powder
- 1 teaspoon pepper
- ½ teaspoon salt
- ½ teaspoon cayenne pepper (adjust for spice preference)
- 4 pieces of chicken (bone-in, skin-on thighs or drums preferred)
- Vegetable oil (such as canola or peanut oil) for frying
🥄 Instructions:
- Step 1: In a large bowl, whisk together the buttermilk, hot sauce, garlic powder, onion powder, paprika, black pepper, and salt. Add the chicken pieces to the marinade, ensuring they are fully submerged. Cover with plastic wrap and let it marinate in the refrigerator for at least 2 hours (ideally overnight for maximum tenderness).
- Step 2: In a shallow dish, combine the gluten-free flour, paprika, garlic powder, onion powder, pepper, salt, and cayenne pepper. Mix until well blended.
- Step 3: Remove the chicken from the marinade, allowing excess buttermilk to drip off. Dredge each piece in the gluten-free flour mixture, pressing it into the chicken to ensure a good coating. Shake off excess flour and place on a wire rack or a plate. Let the breaded chicken sit for about 15-20 minutes to help the coating adhere.
- Step 4: In a large
- Step 5: Carefully add the breaded chicken pieces to the hot oil, skin side down. Do not overcrowd the pan; fry in batches if necessary. Fry for about 12-15 minutes, flipping halfway, until the chicken is golden brown and an instant-read thermometer inserted into the thickest part reads 165°F (75°C).
- Step 6: Once cooked, remove the chicken from the oil using tongs and place on a wire rack set over a baking sheet to drain the excess oil. Allow the chicken to rest for a few minutes before serving.
Previous Recipe: Miso Brown Rice & Broccoli Salad with Fiery Prawns: 7 Best Tips for a Flavorful Meal
Next Recipe: Canyon Bakehouse Gluten-Free Bread: 7 Irresistible Recipes