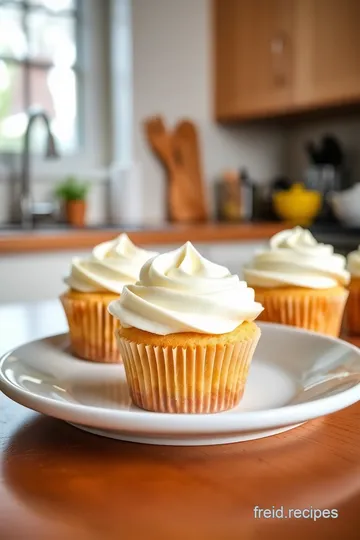
Light and Fluffy Dairy-Free Cupcakes
Craving something sweet? Discover my light and fluffy dairy-free cupcakes made with almond milk and coconut oil. Perfect for any celebration or snack time!

Indulging in Sweetness: Dairy-Free Cupcakes Made Easy
Oh my gosh, do i have a sweet story for you! a while back, i was at a birthday party, and one of the guests mentioned they had a dairy allergy.
I felt so bad thinking about them missing out on dessert. but then i thought, "why not whip up some dairy-free cupcakes that everyone can enjoy?" that's when i dove headfirst into the world of dairy-free baking , and let me tell you, it was a game-changer! now, i can blissfully bake cupcakes that are moist, fluffy, and simply delicious, without any dairy products.
Talk about a win-win!
Now, if you’re thinking about why these vegan cupcakes are so popular today, let me break it down. cupcakes have always been a classic american treat, but the push for allergies-friendly baking has taken the cupcake game to the next level.
We’re talking about diverse diets, allergies, and a quest for healthier options. it doesn’t matter if you're on a strict diet or just want to enjoy a sweet treat like everyone else—these cupcakes fit the bill!
Time and cost considerations
you’re looking at just 35 minutes of total prep and bake time, with a difficulty level that’s a solid easy .
If you're brand new to baking? no worries! this is a simple cupcake recipe that even kids can help with (trust me, i speak from experience here).
At about $10 to make a batch of 12 cupcakes, these beauties won’t break the bank either.
The Allure of Dairy-Free Cupcakes
These dairy-free cupcakes don’t just taste great—they pack a punch in the health department too! made with wholesome ingredients like almond milk and coconut oil , they’re a fantastic option for those looking to enjoy healthy dessert ideas without compromising on flavor.
Just think of all the glory of a lush cupcake without the tummy troubles.
Now picture this: you walk into a party with a platter of these delicious mini cakes, and suddenly you're the star of the show! they're perfect for birthday party cupcakes , snack time treats , or even a simple family gathering.
You just can’t go wrong! plus, they can easily be adapted. feeling adventurous? sprinkle in some cocoa powder for a chocolate twist or citrus zest for a refreshing zing.
Fluffy cupcake recipe advantages
what's even better? with the right dairy-free baking substitutes , you can play around with flavors and textures.
Maybe you want a low-fat cupcake option ? or perhaps you're looking for gluten-free dairy-free cupcakes ? this cupcake base allows for so much versatility.
You can dress these up with compelling cupcake decoration ideas or go for a more rustic look. either way, you'll win hearts and taste buds!
And let’s not forget the frosting! i haven’t even mentioned the non-dairy frosting options that will leave everyone begging for more.
Imagine a soft and creamy topping that complements the cupcake perfectly. don't worry if you're new to frosting—it's all about mixing together the best dairy-free ingredients you can find.
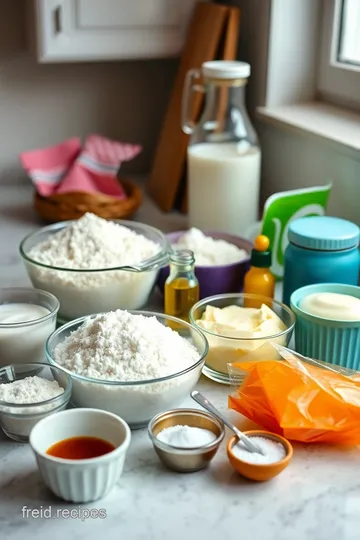
Ready to dive into the ingredient list? No need to stress! Here’s what you need to whip up these delightful dairy-free cupcakes :
-
For the Cupcakes:
- 1 ½ cups all-purpose flour
- 1 cup granulated sugar
- ½ cup unsweetened almond milk
- ½ cup melted coconut oil
- 1 tsp vanilla extract
- 1 tsp baking soda
- ½ tsp salt
- 1 tsp apple cider vinegar
-
For the Optional Dairy-Free Frosting:
- ½ cup dairy-free butter alternative
- 2 cups powdered sugar
- 2-3 tbsp almond milk
- 1 tsp vanilla extract
With all that said, there’s no better time than now to get baking! these moist cupcake recipes promise to be a crowd-pleaser for any occasion.
I cannot wait to share with you how to put this all together, trust me—you’re gonna want to stick around for the next steps!
Essential Ingredients Guide for Dairy-Free Cupcakes
Hey there, cupcake lovers! if you've ever tried to whip up a batch of dairy-free cupcakes and found yourself facepalming at the endless choices in the store, you're in the right place.
Let's dive into the world of essential ingredients, smart substitutions, and all the tasty tips you need for those dairy-free desserts .
Premium Core Components
First off, let’s talk about premium core components . knowing the right measurements is key. for your dairy-free cupcakes , you'll want 1 ½ cups (190g) of all-purpose flour and 1 cup (200g) of granulated sugar, among other ingredients.
It's super important—trust me; you don't want cupcakes that resemble bricks!
Now, how do you pick the best ingredients? quality indicators matter! look for flour that feels soft and has a fine texture.
Your sugar should be bright and not clumpy. and don’t get me started on almond milk—opt for unsweetened, like a good buddy who doesn’t overshadow your flavors.
When it comes to storage guidelines , keep your almond milk in the fridge—obviously—and use it within 7-10 days after opening.
Coconut oil, on the other hand, can chill in the pantry. just make sure to check for any funky smells, which signals it's time to toss it.
Freshness tips? Always check for expiration dates. Give ingredients a good sniff. If it smells stale, just say no.
Signature Seasoning Blend
Now let's spice things up! your signature seasoning blend creates the magic in your cupcakes. for that perfect sniff of flavor, toss in 1 tsp of vanilla extract and blend it in like you mean it.
It can transform your vanilla cupcake recipe into something heavenly!
And hey, don’t forget about herb selections ! you could consider basil or mint as fun twists if you're going experimental.
It may sound odd, but trust me; fresh herbs can make your treats stand out at those allergy-friendly parties!
Smart Substitutions
Okay, confession time. not all of us have every ingredient on hand when the sweet craving hits! smart substitutions are your best friends.
Don’t have almond milk? go with oat milk or soy milk; they work wonders too!
If someone’s sensitive to gluten (or you just forgot to buy the flour), try using coconut flour as a substitute in your moist cupcake recipe .
Just remember, you'll need to adjust your measurements.
And if you're on a strict diet, skip the sugar with some natural sweeteners like agave. ( Dairy-free baking substitutes are where creativity shines!)
Kitchen Equipment Essentials
Last but not least, let’s talk kitchen equipment essentials . you won’t need a fancy setup—just the basics! a mixing bowl, whisk (or mixer, no judgment!), cupcake tin, and liners are the bread and butter of your baking adventure.
Alternative equipment options? If you don't have a cupcake tin, a muffin tin works just fine. And remember to measure everything—precision pays off in the world of baking.
Storing your tools is key, too. After a baking sesh, make sure your mixing bowls are clean and stacked. You’ll thank yourself later when it's time to bake another batch of vegan cupcakes !
Wrapping Up
So there you have it, my friends! whether you’re whipping up some birthday party cupcakes or planning an indulgent vegan treat night, knowing your ingredients is crucial.
We’re all about making those sweet treats without dairy taste like pure goodness.
Are you ready? Let’s move on to those simple cupcake recipes that are about to rock your world. You’ve got the basics down, now it’s time to mix up some loveliness!
Mastering the Art of Professional Cooking
Cooking can feel a bit daunting, right? good news—turning out restaurant-quality meals at home doesn’t need to feel like rocket science.
Let’s dive into some simple yet professional methods that’ll have you feeling like a cooking star in no time!
Essential Preparation Steps
First things first, we’ve got to talk about mise en place . this fancy french term just means “everything in its place.
” before you even think about turning on the oven, gather your ingredients and equipment. it’s like laying out all the pieces of a puzzle before you start putting it together.
Take it from me; nothing's worse than mid-recipe panic when you can’t find that crucial ingredient!
Next up— time management . plan your cooking sessions. know how long each step takes. for example, if you’re baking dairy-free cupcakes , you’ll want to set aside roughly 15 minutes for prep and 20 minutes for baking at 350° f .
Simple, right?
Now, let’s talk organization . Keep your kitchen tidy. Use small bowls for your ingredients before mixing them together. Your future self will thank you when you only have one mixing bowl to wash!
And let’s not forget about safety considerations . always have a towel handy for hot pans and don’t forget your oven mitts! trust me, it’s a bummer to burn your hand just before serving your fabulous dairy-free desserts .
Step-by-Step Process
Alright, let’s break things down step-by-step so that you can really own your kitchen.
- Preheat your oven to 350° F ( 175° C).
- Line your cupcake tin with liners. Trust me, they’ll just pop right out when you’re done.
- In a large mixing bowl, whisk together the dry ingredients : 1 ½ cups flour, 1 cup sugar, 1 tsp baking soda, and ½ tsp salt.
- In another bowl, mix your wet ingredients : ½ cup unsweetened almond milk , ½ cup melted coconut oil , 1 tsp vanilla, and 1 tsp apple cider vinegar.
- Pour your wet mix into the dry mix, and gently combine. No need for a workout here—just mix until it’s combined!
- Fill those cupcake liners about 2/3 full .
- Bake for 20 minutes , or until your toothpick test comes out clean.
- Let them cool completely before you frost. Patience is a virtue!
For frosting, you can whip up a quick dairy-free buttercream . combine ½ cup dairy-free butter, 2 cups powdered sugar, and a splash of almond milk until creamy.
Garnish those little puffs of happiness as you please!
Expert Techniques
Want to level up? here’s the scoop. one critical step is to allow your cupcake batter to sit for about 5 minutes before placing it in the oven.
This lets the soda activate—more fluffiness !
Always keep quality checkpoints in mind. Is the batter lump-free? Does your frosting taste just right? Don’t be shy—taste along the way; it’s half the fun!
If things go sideways—like if your frosting is too runny—add a bit more powdered sugar until you reach the perfect consistency. Remember, cooking isn’t about perfection; it’s about making delicious food.
Success Strategies
Now, let’s talk about common pitfalls to avoid. Don’t pep up your batter too much; overmixing leads to sad, dense cupcakes. Also, keep an eye on the baking time—use that toothpick test!
A great tip is to make these cupcakes ahead of time. they can hang out in an airtight container for a couple of days.
You can even freeze them for up to three months. perfect for those snack time treats or sudden birthday party emergencies!
A Sweet Conclusion
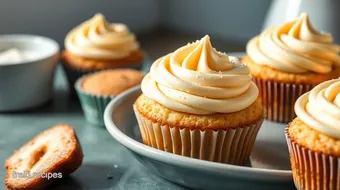
These dairy-free cupcakes aren’t just treats; they’re a simple way to impress at any gathering. Whether it's a birthday bash or just because it’s Tuesday, you’ll have moist, fluffy cupcakes everyone will adore—even those non-dairy fans will be coming back for seconds!
As we get ready to wind down, let’s transition to some additional information to help you further on your baking journey.
Stay tuned for more updates and delicious content, because let’s be real—once you dive into the world of allergy-friendly baking , you might not want to come back!
Additional Recipe Information: Light and Fluffy Dairy-Free Cupcakes
Alright, my friends, let’s dive into the details that’ll make your dairy-free cupcakes not just good, but, like, totally drool-worthy .
Whether you’re whipping these up for a special event or just need a sweet treat without the dairy, i got you covered.
Let's break it down!
Pro Tips & Secrets
Okay, tip number one: don’t skimp on the coconut oil . It’s not just a substitute; it adds that sneaky richness you’d expect from dairy. Trust me, you want that.
Need a time-saver? mix the dry ingredients first and add wet ones right before you pop ‘em in the oven.
This keeps your batter fresh and fluffy, which leads to that perfect, moist cupcake recipe we all dream of.
For flavor, consider adding a sprinkle of cinnamon or a splash of almond extract. this can elevate your taste profile to another level! and, oh, when you present those cupcakes, sprinkle a bit of sea salt on top of your frosting.
It’s like a sweet-and-salty after-party for your taste buds!
Perfect Presentation
We eat with our eyes first, right? so, let’s talk presentation. for plating, a simple white plate can make your vibrant cupcakes pop.
Think color combinations—use colorful cupcake liners and then add a bright non-dairy frosting on top.
Speaking of frosting, how about some fresh berries or a mint leaf for garnish? this not only makes your cupcake look super fancy but also adds a little fresh zing.
Honestly, it’s not just about taste; we want the visual appeal too!
Storage & Make-Ahead
If you find yourself with leftovers (which, let’s face it, is a rarity), store those cupcakes in an airtight container at room temp for about 2-3 days.
Want to keep them longer? try freezing them! just make sure to wrap them tightly, and they’ll stick around for up to three months.
When you’re ready to indulge, let them thaw at room temperature, and they’ll taste just as good .
Creative Variations
Feeling adventurous? let’s talk cupcake variations . you could throw in some cocoa powder or grab some fresh fruits like mashed bananas or pureed pumpkin for a seasonal twist.
Seriously, a banana-flavored cupcake on a hot summer day? gold star!
And don’t forget those dietary modifications . for gluten-free dairy-free cupcakes, just swap the all-purpose flour for a good gluten-free blend.
Allergy-friendly baking is all the rage, and you might just stumble upon a new fave flavor combo.
Complete Nutrition Guide
Looking for a balance? these cupcakes pack a pretty sweet punch. each one has about 180 calories , which is fantastic for a treat.
Plus, they’re filled with benefits—like healthy fats from the coconut oil and a bit of protein from the almond milk.
Not to mention, they’re perfect for healthier dessert ideas without sacrificing taste!
Expert FAQ Solutions
Now, let’s tackle some commonly asked questions. “what if my cupcakes don’t rise?” don’t fret, just check your baking soda freshness—sometimes, it loses its oomph! and if your cupcakes come out too dense? next time, try mixing the batter less.
We want it just combined.
Also, for quick dessert recipes , these cupcakes are ready in under an hour from start to finish, making them ideal for last-minute family-friendly dessert recipes or even those sudden cravings!
Conclusion
So there you have it! Your go-to guide on making the best dairy-free cupcakes that can impress anyone, from your picky kids to that culinary friend who knows everything about baking.
Don't be intimidated; just have fun with it! Everyone deserves a bite of these sweet treats without dairy. And who knows? You might just become the cupcake queen or king at your next birthday party! Let your baking journey begin, and may your ovens always be hot!

Light and Fluffy Dairy-Free Cupcakes Card
⚖️ Ingredients:
- 1 ½ cups (190g) all-purpose flour
- 1 cup (200g) granulated sugar
- ½ cup (120ml) unsweetened almond milk
- ½ cup (120ml) coconut oil, melted
- 1 tsp vanilla extract
- 1 tsp baking soda
- ½ tsp salt
- 1 tsp apple cider vinegar
- ½ cup (120ml) dairy-free butter alternative, softened
- 2 cups (240g) powdered sugar
- 2-3 tbsp almond milk
- 1 tsp vanilla extract
🥄 Instructions:
- Step 1: Preheat the oven to 350°F (175°C) and line a cupcake tin with liners.
- Step 2: In a large mixing bowl, combine the dry ingredients: flour, sugar, baking soda, and salt. Whisk together.
- Step 3: In another bowl, mix the wet ingredients: almond milk, melted coconut oil, vanilla extract, and apple cider vinegar.
- Step 4: Pour the wet ingredients into the dry ingredients and mix gently until just combined.
- Step 5: Fill each cupcake liner about 2/3 full with the batter.
- Step 6: Bake for 20 minutes, or until a toothpick inserted into the center comes out clean.
- Step 7: Allow the cupcakes to cool completely before frosting.
- Step 8: For the frosting, beat together dairy-free butter, powdered sugar, almond milk, and vanilla extract until creamy.
- Step 9: Frost the cooled cupcakes as desired.
Previous Recipe: Easy gluten free side dishes: 7 Savory Garlic Roasted Brussels Sprouts
Next Recipe: How to Make Decadent Gluten Free Chocolates: Easy Dark Truffles!